Warning, Advertencia – Crosman BP2220 User Manual
Page 4
• Put the air pistol “ON SAFE”.
• If the pressure in the gun cannot be relieved using the dry firing process it may indicate a valve lock
condition and require use of the degassing tool # PCPDT4 available at www.crosman.com , or contact
Crosman Customer Service at 1-800-724-7486.
4. Loading the Air pistol
WARNING:
Use .22 caliber pellets only in your Model BP2220. Never reuse ammuni-
tion. Use of any other ammunition can cause injury to you or damage to the air pistol.
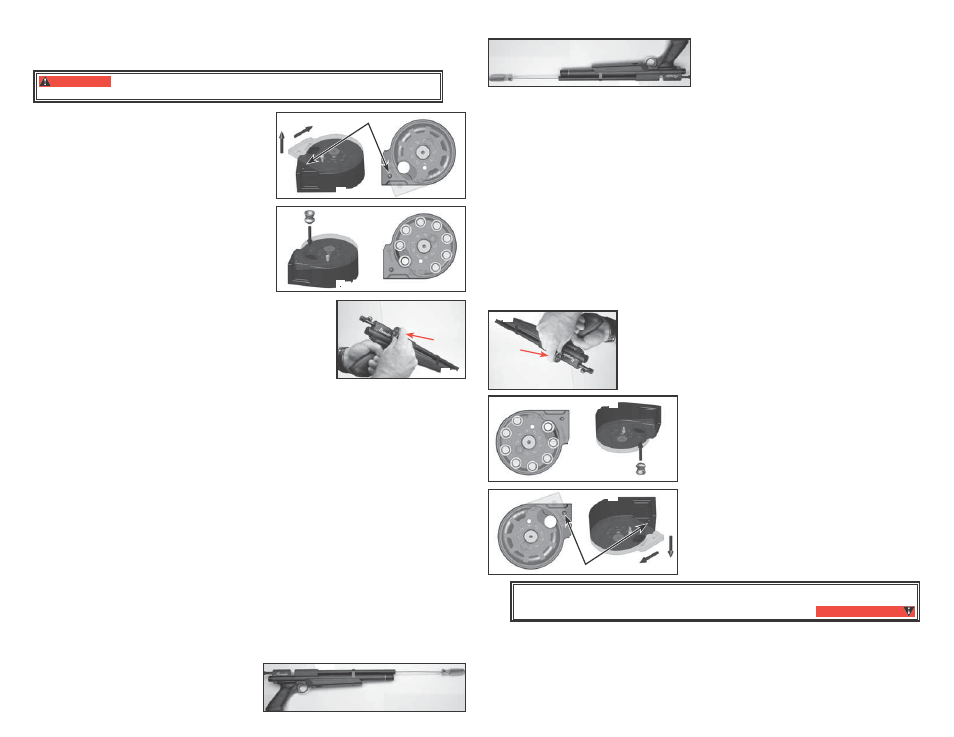
A. Loading the Clip
Lift the clear cover over the catch point and rotate in the
direction of the arrows (clockwise) per Figure 5A. Turn until the
cover appears as shown in Figure 5B.
• Place a finger under the clip covering the hole, place the
first pellet in the clip, nose first (Fig. 5C). Make certain
the pellet does not protrude out the back of the clip. In
the event the pellet does protrude simply push the pellet
inward.
• Rotate the cover counter clockwise and place the remain-
ing pellets into the clip. Upon completion of filling the
remaining positions rotate the cover until it comes to rest
at the catch point as shown in Figure 5D. The clip is now
ready for use.
B. Inserting the Clip
NOTE: Following these directions will result in your gun being
loaded and ready to fire.
• Put the air pistol “ON SAFE” (see section 2A) and point in
a SAFE DIRECTION.
• Pull the bolt back to the cocked position.
• With the cover of the clip facing the butt of the air pistol
insert the clip from the right side and push it inward until it snaps into
place. (Fig. 6)
• Push the bolt forward fully and latch to chamber a pellet.
• The air pistol is now ready to fire.
5. Un-Loading and Un-Cocking
A. Unloading- Removing the Clip
• Put the air pistol “ON SAFE” (see section 2A) and point in a SAFE
DIRECTION.
• Push the clip out of the receiver from the left side.
• Refill the clip and re-insert for continued shooting.
B. Un-Cocking
In the event you are finished shooting, remove the clip as instructed and un-cock the air pistol by the
following steps:
• Point the air pistol in a SAFE DIRECTION.
• Take the air pistol “OFF SAFE” (section 2B).
• Pull the bolt back to the rear position.
• While firmly holding the bolt in the rear position, pull the trigger.
• Continue to hold the trigger back while sliding the bolt forward to the latched position.
• Release the trigger.
• Put the air pistol on “ON SAFE” (see section 2A).
• The air pistol is now ready for storing.
6. Aiming and Firing Safely
• Always point your air pistol in a SAFE DIRECTION.
• Follow the instructions for filling the air gun (section 3) and loading pellets (section 4A).
• You and others with you should always wear shooting glasses to protect your eyes.
•
DO NOT shoot at hard surfaces or at the surface of water. The pellet may bounce off or ricochet and hit
someone or something you had not intended to hit.
• Always choose your target carefully. It is best to shoot at paper bull’s-eye targets attached to a safe
backstop. A heavy blanket should be hung behind the backstop to prevent ricochet should you miss the
backstop.
• Your air pistol is designed for target shooting and is suited for both indoor and outdoor use. Always
remember to place your target carefully. THINK about what you will hit if you miss the target.
• Before firing the air pistol make certain there is sufficient pressure for proper operation.
7. Removing a Jammed Pellet
A jammed pellet is usually the result of trying to fire the air
pistol when the pressure is too low. Before firing the air
pistol make certain there is sufficient pressure for proper
operation, by making sure the gauge needle is pointing to
the area between 1000 and 3000 psi.
Fig 5A
Fig 5B
catch point
Fig 5C
Fig 5D
Fig 6
Fig 7
4
D. Despresurización de la pistola de air
e comprimido
• Mantenga la pistola apuntando hacia una DIRECCIÓN SEGURA.
• Elimine todo el air
e de la pistola montando y disparando en seco continuamente la pistola al apuntar hacia una DIREC
-
CIÓN SEGURA hasta que el manómetro de pr
esión de la pistola de aire comprimido muestr
e que no hay más presión en el
manómetro y que no se escuche air
e cuando se dispara en seco la pistola.
• Active el segur
o de la pistola de aire comprimido (“ON SAFE”).
• Si no puede liberar la pr
esión de la pistola usando el proceso de dispar
o en seco, podría darse un caso de bloqueo de la
válvula. En esta situación se requier
e el uso de la herramienta de desgasificación #
PCPDT4 que se encuentra disponible
en www.cr
osman.com; o bien, puede contactar al Centro de Atención al Cliente de Cr
osman al 1-800-724-7486, 585-
657-6161.
4. Carga de la pistola de air
e comprimido
Use únicamente perdigones calibr
e .22 en el modelo BP2220. Nunca
reutilice una munición. El uso de una munición difer
ente podría causar lesiones personales o
hacer que la pistola de aire comprimido se dañe.
ADVERTENCIA:
A. Carga del tambor
• Levante la cubierta transpar
ente sobre el punto de agarr
e y rótela en
la dirección de las flechas (sentido horario), según la Figura 5A. Gir
e
hasta que la cubierta aparezca como lo muestra la Figura 5B.
• Coloque un dedo debajo del cargador que cubr
e el orificio, coloque
el primer perdigón en el cargador
, empezando por la nariz (Fig. 5C).
Asegúrese de que el per
digón no quede salido en la parte trasera
del cargador. En caso de que eso suceda, simplemente empuje el
perdigón hacia adentr
o.
• Rote la cubierta en sentido antihorario y coloque los per
digones
restantes en el cargador
. Al terminar de llenar las posiciones res
-
tantes, rote la cubierta hasta que se detenga en el punto de agarr
e,
tal como se muestra en la Figura 5D. El cargador está listo para
utilizarse.
B. Inserción del car
gador
NOTA:
Al seguir estas indicaciones, su pistola estará cargada y lista
para disparar.
• Active el segur
o de la pistola de aire comprimido (“ON SAFE”) (con
-
sulte la sección 2A) y apunte en una DIRECCIÓN SEGURA.
• T
ire del cerr
ojo hacia la posición de montada.
• Con la cubierta orientada hacia la culata de la pistola de air
e
comprimido, inserte el cargador desde la derecha y empújelo hacia
adentro hasta que quede encajado. (Fig. 6)
• Empuje
el cerr
ojo hacia
adelante completamente
y trabe
para recamarar
un per
digón.
• La pistola de air
e comprimido está lista para disparar.
5. Descarga y desmonte
A. Descarga: r
etiro del car
gador
• Active el segur
o de la pistola de aire comprimido (“ON SAFE”) (consulte la sección
2A) y apunte en una DIRECCIÓN SEGURA.
• Empuje el cargador hacia afuera de la corr
edera desde la izquierda.
• Rellene el cargador y r
einsértelo para seguir disparando.
B. Desmonte
Cuando haya terminado de disparar, r
etire el cargador según las instrucciones y desmonte la pistola de
aire comprimido
siguiendo los pasos a continuación:
• Apunte la pistola de air
e comprimido en una DIRECCIÓN SEGURA.
• Desactive el segur
o de la pistola de aire comprimido (“OFF SAFE”) (sección 2B).
• T
ire del cerr
ojo hacia atrás, a la posición trasera.
• Sosteniendo firmemente el cerr
ojo en la posición trasera, tire del gatillo.
• Sostenga el gatillo hacia atrás mientras desliza el cerr
ojo hacia adelante a la posición de traba.
• Suelte el gatillo.
• Active el segur
o de la pistola de aire comprimido (“ON SAFE”) (consultar la sección 2A).
• Y
a puede guardar la pistola de air
e comprimido.
6. Apuntar y disparar de forma segura
• Siempr
e apunte su pistola de aire comprimido en una DIRECCIÓN SEGURA.
• Siga las instrucciones para llenar la pistola de air
e (sección 3) y cargar los perdigones (sección 4A).
• Usted y quienes lo acompañen deberán usar siempr
e gafas de tiro para pr
otegerse los ojos.
• No dispar
e hacia superficies duras o hacia la superficie del agua. El perdigón puede r
ebotar e impactar en alguien o algo
que usted no tenía intención de impactar.
• Elija siempr
e su blanco con cuidado. Es recomendable disparar contra dianas de papel fijas en un r
espaldo seguro. Debe
colgarse una manta gruesa detrás del respaldo para evitar r
ebotes en caso de que no acierte al respaldo.
• Su pistola de air
e comprimido está diseñada para tiro al blanco y es apta para ser utilizada tanto en interior
es como al aire
libre. Recuer
de siempre colocar su blanco con cuidado. PIENSE en lo que podría impact
ar si no acierta al blanco.
• Antes de disparar la pistola de air
e comprimido, asegúrese de que hay pr
esión suficiente para llevar a cabo una operación
correcta.
7. Extracción de un perdigón atascado
Por lo general, un perdigón se atasca cuando se intenta disparar la
pistola de aire comprimido a una pr
esión muy baja. Antes de dis-
parar la pistola de aire comprimido, asegúr
ese de que haya presión
suficiente para una operación adecuada. Para ello, verifique que la
aguja del manómetro señale el ár
ea que se encuentra entre 1000 y
3000 psi.
Fig 5A
Fig 5B
Punto de enganche
Fig 5C
Fig 5D
Fig 6
Fig 7
4