Crosman CH2009 (2009) User Manual
Page 4
6
7
E N G L I S H
E N G L I S H
DO NOT ATTEMPT TO REPAIR THE AIRGUN OR TO DISASSEMBLE TO CORRECT AN OVER FILL OR VALVE LOCK. PARTS CAN
FLY FROM THE AIRGUN AT DANGEROUS SPEEDS WHEN IT IS DISASSEMBLED WHILE PRESSURIZED.
10. Advanced Tuning Techniques
A. Trigger Adjustment
The CH2009 trigger assembly can be adjusted and customized but unless you are experienced in making such adjustments,
Crosman recommends that these adjustments to factory settings be made only by a qualified gunsmith after reading all
instructions. Adjusting the trigger assembly can result in a light trigger pull, decreased sear engagement that could make
the gun more susceptible to discharge when dropped or jarred, or a non-functioning safety. Make only the adjustments
identified in this manual.
NOTE:
these adjustment features are for advanced shooters. Most shooters can use the settings provided during
manufacturing of the gun and should not need to make modifications.
•The match grade trigger on your pellet air rifle is a two stage, fully adjustable unit. It has been factory set to an
efficient setting that will suit most hunting and target uses. If you, as the owner, wish to alter the factory settings you
should do so only after reading the following instructions carefully.
•Put the air rifle “ON SAFE”, remove the clip and keep the airgun pointed in a SAFE DIRECTION.
•Depressurize the airgun (see section 4)
•Remove the stock screw, (fig 11). Using a
3/16
” Allen wrench, to separate the stock from the action. Do not remove the
trigger guard screws as the trigger guard should remain with the stock.
Do not
remove the trigger guard screws as the trigger guard should remain with the stock.
ADJUSTMENT OF TRIGGER SCREW (B) COULD INHIBIT PROPER FUNCTION OF THE SAFETY LEVER (F). THUS, ALWAYS
CHECK FOR FULL ENGAGEMENT AND SMOOTH FUNCTION OF THE SAFETY LEVER UPON COMPLETION OF ANY CHANGES TO THE TRIGGER SCREW.
IF YOU ARE NOT SURE IF THE SAFETY IS ENGAGING AND OPERATING PROPERLY, TAKE YOUR GUN TO AN EXPERIENCED GUNSMITH.
ADJUSTMENT TO THE TRIGGER ASSEMBLY COULD ALLOW THIS AIRGUN TO FIRE IF DROPPED OR JARRED, WITH OR
WITHOUT THE SAFETY ENGAGED.
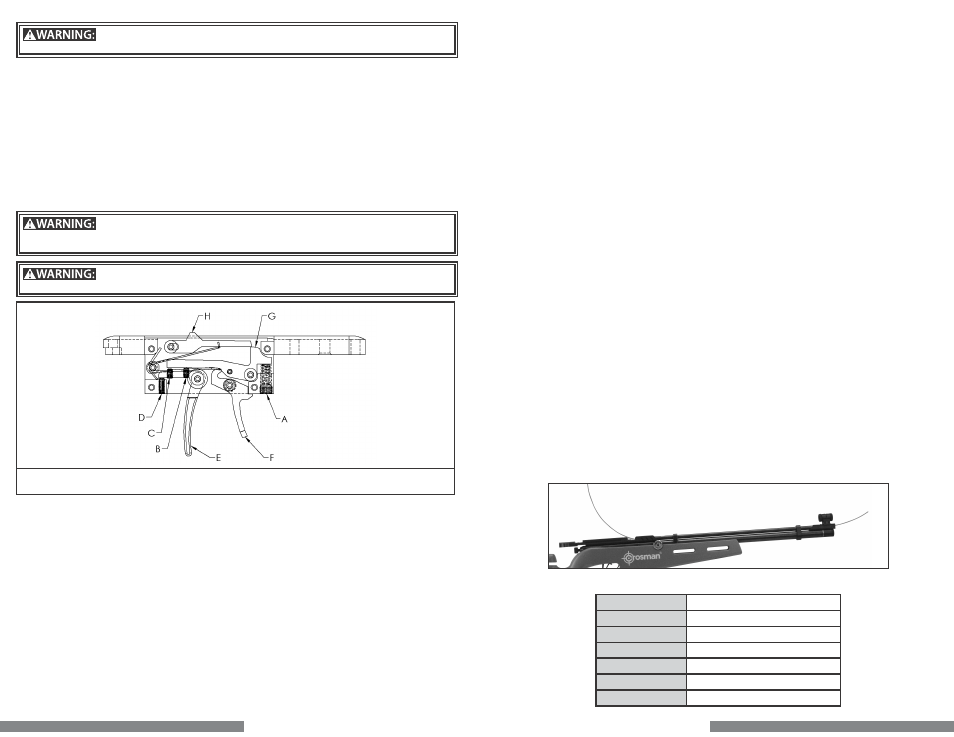
A.
TRIGGER WEIGHT ADJUSTER
B.
FIRST STAGE ADJUSTER
C.
SECOND STAGE ADJUSTER
D.
TRIGGER POSITION
E.
TRIGGER
F.
SAFETY LEVER
G.
LINK
H.
SEAR
•
Trigger Pull
Using a
1/8
” Allen wrench turn the adjuster screw (A) clockwise to increase trigger pull weight and coun-
terclockwise to decrease trigger pull weight. This adjustment will not affect sear engagement.
•
Trigger Position
Using a .050” Allen wrench the trigger position at rest can be adjusted. Turn screw (D) clockwise to
move the trigger back and counter clockwise to move the trigger forward. This adjustment could affect sear engage-
ment, and therefore could allow the gun to fire when dropped or jarred.
•
Trigger Stages
Using a .050” Allen wrench for adjustment of screws (B) and (C), changes can be made to the position
and length of first and second stages of the trigger motion. These adjustments could affect sear engagement, and
therefore could allow the gun to fire when dropped or jarred.
•
Screw (B)
changes the first stage. Turning screw (B) clockwise will increase the length of the first stage and
decrease the sear engagement. Turning counter clockwise will decrease the length of the first stage and increase
the sear engagement.
•
Screw (C)
changes the second stage. Turning screw (C) clockwise will cause the second stage to occur sooner
while turning counterclockwise will cause the second stage to occur later.
•
Adjustment of screws (B) and (C)
should be done in harmony with each other as they work together to create
the trigger’s profile. Start slowly to understand what each adjustment does and its relationship to the other.
•
Trigger Maintenance
The trigger is assembled with a moly graphite EP grease that should last for years. In the
event your trigger becomes contaminated with debris and is not functioning properly, contact a qualified gunsmith
to examine for repair or maintenance.
•After adjusting your trigger, always check that the trigger and safety are functioning properly. If you are not sure
if the trigger or safety is operating properly, take your gun to an experienced gunsmith.
•Re-insert the action into the stock, and replace and tighten the stock screw.
B.
Adjusting the Hammer Energy
The CH2009 is designed to be tuned to work at various fill pressures up to 2000 psi (138 bar) The gun is factory tuned to allow
minimum velocity deviation and maximum shot count. However, a shooter may decide to adjust the hammer energy to meet
his or her needs. This is done by adjustment of the hammer spring preload and hammer stroke length. In either case the
adjustment changes the amount of energy the hammer generates when striking the valve. It is advised to always record your
settings when tuning your rifle.
•The CH2009 has been factory set to suit most hunting and target uses. If you, as the owner, wish to alter the factory
settings you should do so only after reading the following instructions carefully
Generally, setting the knob at a position so there is a .25 inch view of threads visible between the hammer spring adjustment
knob and the receiver will achieve minimum velocity deviation and maximum shot output. (fig 12)
Hammer Spring Preload
To increase the energy, turn the hammer spring adjustment knob clockwise (fig 12), up to 6 revolutions.
NOTE:
More revolutions will simply cause the adjuster to spin but will not yield any higher force. Increasing the preload will
be required to facilitate use of higher fill pressures.
Hammer Stroke Length
The striker can be adjusted using a
1/8
” Allen wrench. Insert the wrench into the hole in the hammer spring adjustment
knob and push the wrench all the way in.. Turning the striker clockwise will shorten the hammer stroke and turning counter
clockwise will lengthen (fig 13) the stroke. A long stroke length will yield higher hammer energy while a short stroke length
will yield lower hammer energy. The striker can be adjusted inward by up to 12 revolutions.
If during tuning you are not sure which direction to move, or need to start over, turn the allen wrench counter-clockwise
until it reaches a hard stop. This will give you a point of reference to start over. Turning the wrench out clockwise from this
position about 4 ½ turns and then turning the knob to a .25 inch gap will bring the adjustments back to a point near the
factory preset.
TIP!
Too little hammer energy at high fill pressures may result in very low velocities which is the result of partial valve lock.
•Tuning the rifle to obtain various velocity profiles can be achieved through use of these adjustment points and should
be done in harmony with each other. Start slow to understand how each one affects the rifle’s performance. Experi-
ence and testing is the best way to understand these capabilities.
11. Reviewing Safety
•Never point the airgun at any person or at anything you do not intend to shoot.
•Always treat the airgun as though it is loaded and with the same respect you would a firearm.
•Always aim in a SAFE DIRECTION. Always keep the muzzle of the airgun pointed in a SAFE DIRECTION.
•Always keep the airgun on safe until you are ready to shoot.
•Always check to see if the airgun is “ON SAFE” (see section 2A) and unloaded when getting it from another person or
from storage.
•Always keep your finger off the trigger and out of the trigger guard until ready to shoot.
•You and others with you should always wear shooting glasses to protect your eyes.
•If your reading or prescription glasses are not safety glasses, make sure you wear shooting glasses over your regu-
lar glasses.
•Use .177 caliber (4.5mm) pellets only in your Model CH2009. NEVER reuse ammunition.
•Do not shoot at hard surfaces or at the surface of water. The pellet may bounce off or ricochet and hit someone or
something you had not intended to hit.
•Place the backstop in a location that will be safe should the backstop fail.
•Your backstop should be checked for wear before and after each use. All backstops are subject to wear and will even-
tually fail. Replace your backstop if the surface is worn or damaged or if a ricochet occurs.
•Do not attempt to disassemble or tamper with your airgun. Use an Authorized Service Station. Using unauthorized
repair centers or modifying the function of your airgun in any way may be unsafe and will void your warranty.
•Before you store your airgun make sure it is not loaded or cocked. Store this airgun charged with air or CO
2
to keep the
valves closed against dirt.
•Whenever you store the airgun, make sure it is “ON SAFE” (see section 2A.)
NOTE:
When using a CBI (CLEAR BARREL INDICATOR)
•Put the gun “ON SAFE” (sec 2A) and point in a SAFE DIRECTION.
•Pull the bolt back one click, then insert the device into the breech as shown.
NOTE:
you do not want to pull the bolt back all the way
•If you do pull the bolt all the way back, you will need to follow section 5B-on uncocking your air rifle.
14
SPECIFICATIONS
Mechanism
Bolt action single shot
Power Source
Compressed air or CO
2
(one or the other)
Caliber/Ammunition
.177 caliber lead pellet
Weight
7.1 lb
Length
38”- 41.5”
Barrel
Lothar Walther
Safety
Ambidextrous Lever