Crosman CH2009 (2009) User Manual
Page 2
2
3
E N G L I S H
E N G L I S H
NOT A TOY. THIS AIRGUN IS RECOMMENDED FOR ADULT USE ONLY. MISUSE OR CARELESS USE MAY CAUSE SERIOUS
INJURY OR DEATH. MAY BE DANGEROUS UP TO 600 YARDS (549 METERS).
DO NOT BRANDISH OR DISPLAY THIS AIRGUN IN PUBLIC—IT MAY CONFUSE PEOPLE AND MAY BE A CRIME. POLICE
AND OTHERS MAY THINK IT IS A FIREARM. DO NOT CHANGE THE COLORATION AND MARKINGS TO MAKE IT LOOK MORE LIKE A FIREARM. THAT
IS DANGEROUS AND MAY BE A CRIME.
YOU AND OTHERS WITH YOU SHOULD ALWAYS WEAR SHOOTING GLASSES TO PROTECT YOUR EYES.
READ ALL INSTRUCTIONS BEFORE USING.
BUYER AND USER HAVE THE DUTY TO OBEY ALL LAWS ABOUT THE USE AND OWNERSHIP OF THIS AIRGUN.
THIS AIRGUN IS INTENDED FOR USE BY ADULTS ONLY
LEAD PELLETS. DO NOT INHALE DUST OR PUT PELLETS IN MOUTH. WASH HANDS AFTER HANDLING. THIS PRODUCT
CONTAINS LEAD, A CHEMICAL KNOWN TO THE STATE OF CALIFORNIA TO CAUSE CANCER AND BIRTH DEFECTS (OR OTHER REPRODUC-
TIVE HARM.)
USE ONLY COMPRESSED AIR IN THIS AIRGUN. WHEN USING CROSMAN’S OPTIONAL CO
2
ADAPTER YOU MAY USE CO
2
.
USE NO OTHER GASSES—INCLUDING OXYGEN, WHICH CAN CAUSE A FIRE OR EXPLOSION THAT MAY RESULT IN SERIOUS INJURY OR DEATH.
Please read this owner’s manual completely. And remember that an airgun is not a toy. Always carefully follow the safety
instructions found in this owner’s manual and keep the manual in a safe place for future use. If you have any questions
regarding the operation of your new airgun, please contact
Crosman at 1-800-724-7486.
BECAUSE THIS AIRGUN HAS AN ADJUSTABLE MATCH GRADE TRIGGER, IT COULD FIRE WHEN DROPPED OR JARRED,
WITH OR WITHOUT THE SAFETY ENGAGED.
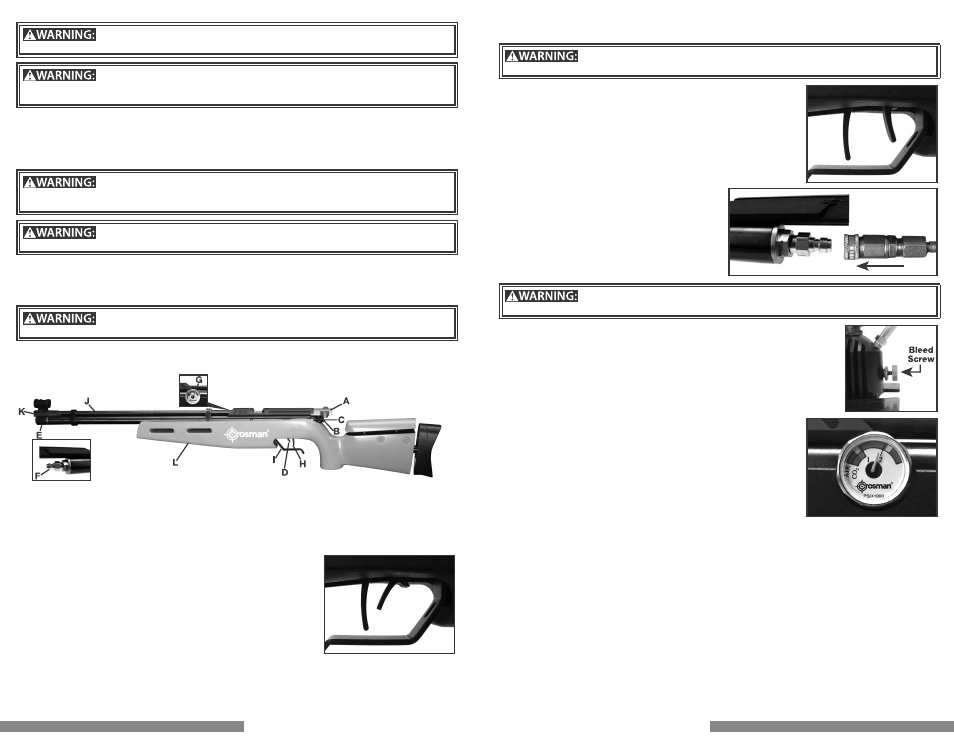
1. Learning the Parts of your New Airgun
Learning the names and parts of your new airgun will help you understand your owner’s manual.
A.
Bolt
B.
Hammer spring adjustment knob
C.
Hammer/ Striker travel adjustment (internal- accessed through Hammer
spring adjustment knob)
D.
Safety
E.
Protective cap for fill nipple
F.
Fill nipple
G.
Pressure gauge
H.
Trigger
I.
Trigger guard
J.
Barrel
K.
Muzzle
L.
Stock
Your new airgun is unique because it operates on either air or CO
2
. To fill and shoot with CO
2
, an optional CO
2
fill adapter must
be purchased. This owner’s manual describes operating the gun with air, only. The manual that comes with Crosman’s CO
2
adapter describes operation on CO
2
.
2. Operating the Safety
A. To Put the Airgun “ON SAFE:”
•Locate the safety in front of the trigger.
•The letters “F” (fire) and “S” (safe) on the bottom of the trigger guard also indi-
cate the appropriate position of the safety.
•Push the safety towards the trigger to put the safety on. The safety is on, and
the airgun is “ON SAFE” when the lever is in the rear position (near the trigger).
(Fig. 2A)
Even when the safety is on, you should continue to handle the airgun safely. Don’t
point the gun at anything you don’t intend to shoot.
Like all mechanical devices, an airgun safety can fail. Even when the safety is “ON
SAFE”, you should continue to handle the airgun safely. NEVER point the airgun at any
person. NEVER point the airgun at anything you do not intend to shoot
B.
To Take the Airgun “OFF SAFE”
Push the safety to the forward position (away from the trigger). When the airgun is “OFF SAFE” it is ready to be fired after
following the instructions in this manual on how to fill and load. (Fig. 2B)
2A
Safe On
3. Pressurizing the Airgun
NOTE:
Operation instructions for CO
2
operation are contained in the manual that comes with the CO
2
adapter.
USE ONLY COMPRESSED AIR IN THIS AIRGUN. WHEN USING CROSMAN’S OPTIONAL CO
2
ADAPTER YOU MAY USE CO
2
.
USE NO OTHER GASSES—INCLUDING OXYGEN, WHICH CAN CAUSE A FIRE OR EXPLOSION THAT MAY RESULT IN SERIOUS INJURY OR DEATH.
A. Pressurizing (Filling) the Airgun with a Hand Pump
•Be sure to wear eye protection
•Make sure the airgun is unloaded and not cocked. (See section 5 for instruc-
tions on unloading and un-cocking.)
•Read all instructions with your hand pump so you are familiar with its opera-
tion. Use only a pump designed for filling a pre-charged airgun and outfitted
with a Foster #12FS quick disconnect fitting. Do not use a standard air com-
pressor or bicycle pump.
•Put the airgun “ON SAFE” (see section 2A).
•Point the airgun in a SAFE DIRECTION.
•Pull off the protective cap that covers the fill nipple on the airgun.
•Connect the quick-disconnect fitting on the hand pump hose to the fill nipple
(fig. 3) by
o Pulling back and holding the knurled ring
o Connecting the fitting over the fill nipple.
o Releasing the knurled ring.
•Make certain the bleed valve on the hand pump is fully
closed (tighten in a clockwise direction) (fig.4).
•Start pumping and continue until the gauge needles on
your pump and on the airgun are between 1000 psi and
2000 psi depending on your desired tune.
DO NOT
fill the air gun to more than 2000 psi (138 bar). See
“Overfill” information (section 3C).
DISCONNECTING THE FILL HOSE FROM THE AIRGUN WITHOUT BLEEDING THE AIR FIRST MAY RESULT IN INJURY FROM
HOSE WHIP AS A RESULT OF PRESSURE IN THE FILL HOSE.
•Open the bleed screw on the pump base rapidly in a counter-clockwise direction to
COMPLETELY bleed the hose. You must bleed the fill hose COMPLETELY to avoid hose
whip from pressure in the fill hose.
•Disconnect the pump from the fill nipple on the gun
•Replace the cap over the fill nipple. Always keep the fill nipple capped to eliminate the
possibility of dirt entering the check valve.
B.
Pressurizing (Filling) the Airgun with a High Pressure Tank
The CH2009 may be filled from a high pressure tank (bottle). Scuba tanks and other high pressure
tanks can be outfitted for the task. Make certain that only clean, dry, compressed air is used in
your filling apparatus. A reputable dive shop or paintball shop is best suited to fill and service
tanks and bottles used for filling your PCP airgun.
•Be sure to wear eye protection
•Make sure the airgun is unloaded and not cocked. (See section 5 for instruc-
tions on unloading and un-cocking.)
•Read all instructions with your tank and hose adaptor so you are familiar with
its operation.
•Put the airgun “ON SAFE” (see section 2A).
•Point the airgun in a SAFE DIRECTION.
•Remove the protective cap that covers the fill nipple on the airgun.
•Connect the quick-disconnect fitting on the tank’s hose to the fill nipple (fig. 3).
NOTE:
the fitting must be a Foster #12FS quick disconnect fitting.
•Slowly open the valve on your tank and start filling the gun SLOWLY. Filling too
quickly will cause heat buildup that can affect accuracy of the fill pressure.
•Watch the gauges on the airgun and your tank (if equipped) until the desired
pressure is reached (1000-2000 psi)
DO NOT
fill the airgun to more than 2000 psi. See “Overfill” information in section 3C.
•Turn the valve on your tank off when the desired fill pressure is reached.
•Follow instructions with your tank and hose to BLEED the fill hose COMPLETELY to avoid hose whip from pressure in
the fill hose
•Disconnect the tank’s fill hose from the fill nipple on the airgun.
•Replace the cap over the fill nipple and tighten. Always keep the fill nipple capped to eliminate the possibility of dirt
entering the check valve.
TIP:
If your airgun is being filled from completely empty (zero pressure) the tension of the hammer pressing against the valve
may keep the valve open which will cause air to leak down the barrel. This is most likely to happen with a gun where the
hammer spring is adjusted to a high rate. In the event this occurs try cocking the bolt and leaving it in the rear (fully open)
position to eliminate the force on the valve allowing it to close. Always make certain the airgun is not loaded and there is not
a pellet in the chamber.
C.
Overfill:
•Over filling beyond the “as tuned” best fill pressure does not improve performance. It will actually lessen performance
and may cause the valve to lock. If you discover that the airgun has been over filled, try to dry fire the airgun (cock and
shoot with no pellet loaded) in a SAFE DIRECTION until pressure on your airgun drops to 2,000 psi or less depending
on where your gun’s tuned best fill pressure is.
•If the airgun will not discharge air with each shot, the valve may be completely pressure locked and will require use of
the degassing tool included with your airgun. Follow the instructions included with the degassing tool, or see section
4B on degassing tool method.
2B
Safe Off
3
4
5