Time and day setup, Mailbox programming, Announcement 1 – VTech 900I User Manual
Page 14: Announcement 2, Recording the announcement, Lringdevice(iffl))operanon
Attention! The text in this document has been recognized automatically. To view the original document, you can use the "Original mode".
lRINGDEVICE(Iffl))OPERAnON
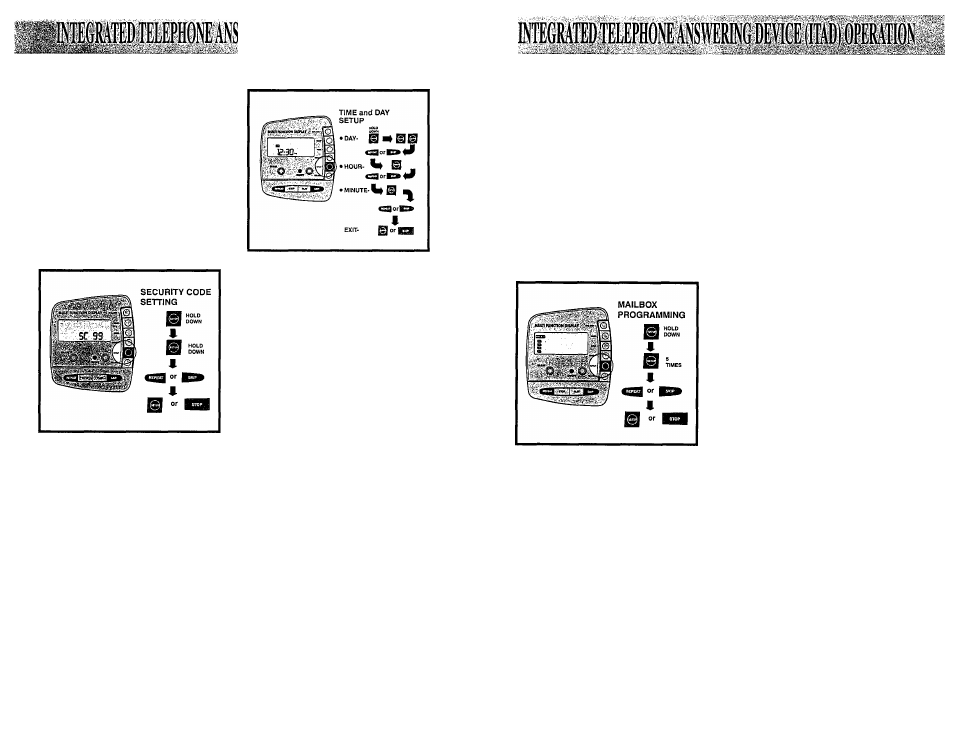
To change security code:
1. Press and hold SETUP until it
beeps.
2. Press SETUP briefly. The LCD will
display "SC" (Security Code) and
the current security code setting.
3. Use REPEAT and SKIP to scroll to
desired code, between 00 and 99.
4. Press SETUP to exit security code
programming mode, and advance
to time/day programming, or press
STOP to exit.
To change the time display on the LCD;
Note: When accessing the ITAD
remotely, the securi^ code is preceded
byThe:^:key.'V'""'
'
Time and Day Setup
The Time and Day default is set to SUN
12:00 pm. This will flash to indicate
clock has not been set.
1. Press and hold SETUP for 2
seconds or until it beeps.
2. Press SETUP 2 times until clock is
displayed and the DAY icon is
flashing.
3. Use REPEAT and SKIP keys to
select correct day.
4. Press SETUP to advance to hour
programming. Use REPEAT and
SKIP keys to select correct hour
and am/pm.
5. Press SETUP to advance to minute
programming. Use REPEAT and
SKIP keys again.
6. Press SETUP to exit time/day
programming mode, and advance
to mailbox programming, or press
STOP to exit.
Mailbox programming
The ITAD has the ability to be
programmed for up to 4 individual
mailboxes. In addition, there Is also a
Generic mailboxfor general messages
storage. On initial power-up, only the
Generic mailbox is enabled.
To change the number of mailboxes:
1. Press and hold SETUP for 2
seconds or until it beeps.
2.
Press SETUP 5 times until
MAiLBOX icon is illuminated.
3. Use REPEAT and SKIP keys to
scroll through selections (the
Maiibox Number icons indicate
which mailboxes are enabled).
4.
Press SETUP to exit mailbox
programming mode, and return to
ring type programming, or press
STOP to exit.
Selecting the Announcement
The ANNO key is used to select the
current outgoing announcement. There
are 3 choices of Announcements as
follows; 1,2&OGM.
Announcement 1
You can record your own personal
announcement and the caller is able to
leave a message.
If you do not record your own
announcement, the factory default
announcement:
Piease record message after the
tone.
will be used (see Recording the
Announcement).
Announcement 2
You can
record your own
announcement but the caller is not able
to leave a message.
If you do not record your own
announcement, the factory default
announcement:
No one can answer the phone at the
moment, piease caii again.
will be used (see Recording the
Announcement ).
After
you
record
your
own
announcement, you can return to
the default announcement by record
an OGM less than 1 second.
OGM (OutGoing Message)
You are not able to record an
announcement, it is programmed into
ITAD memory. The caller is not able to
leave a message.
Programmed OGM Announcement:
No one can answer the phone at the
moment, please call again.
Note:
The ITAD will default to
OGM Announcement if the current
selection is Announcement 1 and
the memory is full.
Recording the Announcement
1.
Press ANNO key until the
desired announcement icon is
displayed on the screen (1 or
2
) .
2. Press and hold ANNC key for 2
seconds until a beep is heard.
The clock will display 0:00 and
will start incrementing for the
length of the announcement.
24
25