Carl Goldberg GBGA1040 User Manual
Page 15
15
The Electra was designed for long, slow, relaxed flying -
not loops or similar aerobatic maneuvers. Save that kind
of lying for your next, higher performance sport plane.
Practicing precise control and glide planning on the
Electra is good preparation for the demands of advanced
aerobatic flying.
We recommend you use 3 channels, as this will allow
you to cut power whenever you wish to do so. On your
first few flights, after a couple of minutes, you may feel
you have "had enough" and want to land and relax. A 2-
channel system without motor control will not give you
this option; you will have to keep flying until the battery
power runs down.
You can expect a good solid 4 or 5 minutes of powered
flight with a properly charged battery. In this amount of
time, Electra will gain several hundred feet of altitude and
will allow you time to get oriented and familiar with the
control "feel." When the battery power begins to run out,
climb will slow down and the model will begin a slow
descent. You should continue flying your same flying
pattern as the model slowly glides.
For your initial landings, you should not be concerned
about trying to land at a specific spot. Your prime con-
cern should be a controlled landing, always into the wind,
with wing level. With practice, you will be able to plan
your approaches to land just about where you want.
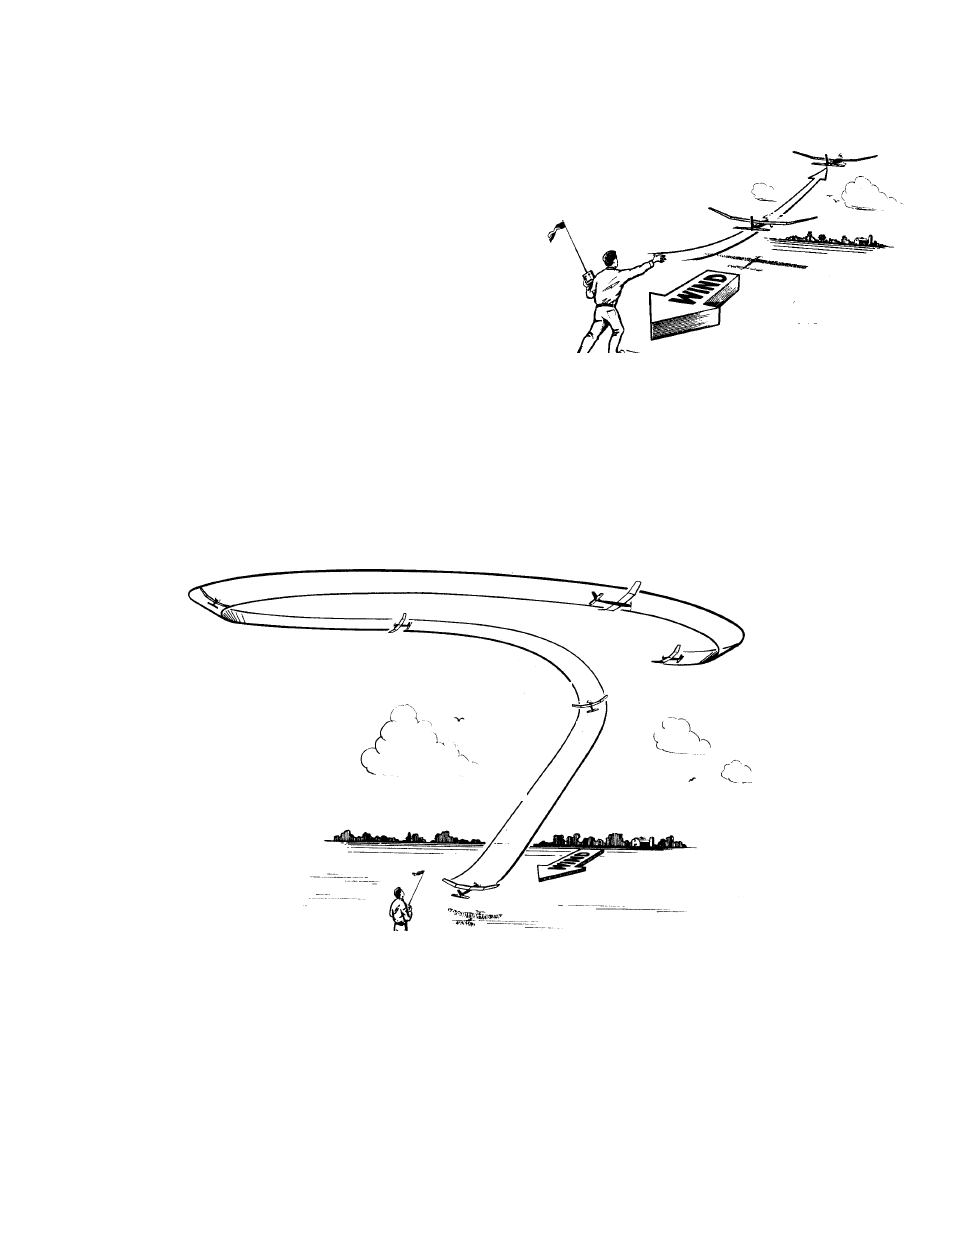
The Electra must be hand launched. This is easy to do,
but must be done carefully to avoid damaging the
model. It is best to launch over some tall grass. Facing
INTO the wind, hold the transmitter in one hand, the
model in the other and raise it above your head. The
wings should be level and the nose pointing straight
ahead-not slightly up. Imagine that you are gliding it
towards a spot about 50 feet ahead. DO NOT throw the
model UP. It's a natural tendency, but it will make the
model stall (fall) and dive to the ground.
After checking all controls, seeing that the Tx trim tabs
are centered, and making sure the Tx meter registers in
the safe zone, turn on the motor and hand launch the
model into the wind. Immediately take the Tx in both
hands and, remembering to operate the controls smooth-
ly, begin to direct the model in a gentle climb. Add slight
back stick pressure, if necessary, to keep the model from
descending. Soon, when it is about 100 feet away from
you, it will start to climb. Be patient; let it climb slowly. If
the climb is too steep, the model will stall and fall to the
ground. Avoid over-controlling.
CLIMB OUT. 1. During the climb out, just try to keep the
model flying into the wind with the wings level until you
reach an altitude of at least 150 feet.
STARTING THE PATTERN 2. At 150-200 feet of alti-
tude, add just a touch of left or right stick pressure until
the model begins a very shallow turn in the direction you
want to go. 3. Try to maintain this shallow turn. The
wind will tend to blow your plane and the pattern further
downwind. Try to keep it flying upwind at all times prior
to your landing approach. It is more difficult to fly a
model when it is downwind, and if a mistake is made, the
model will end up further downwind, making it more dif-
ficult to fly back to the field. To compensate for wind,
continue to make upwind turns shallow, but make the
downwind turns a little steeper.
1
1
CLIMB OUT SHOWN HERE IS
EXAGGERATED. ACTUAL CLIMB
OUT IS QUITE SHALLOW.
2
2
3
3
DOWNWIND TURNS A LITTLE STEEPER
UPWIND TURNS SHALLOW
HAND LAUNCHING