Akro-Mils 30936_ProCart User Manual
Page 4
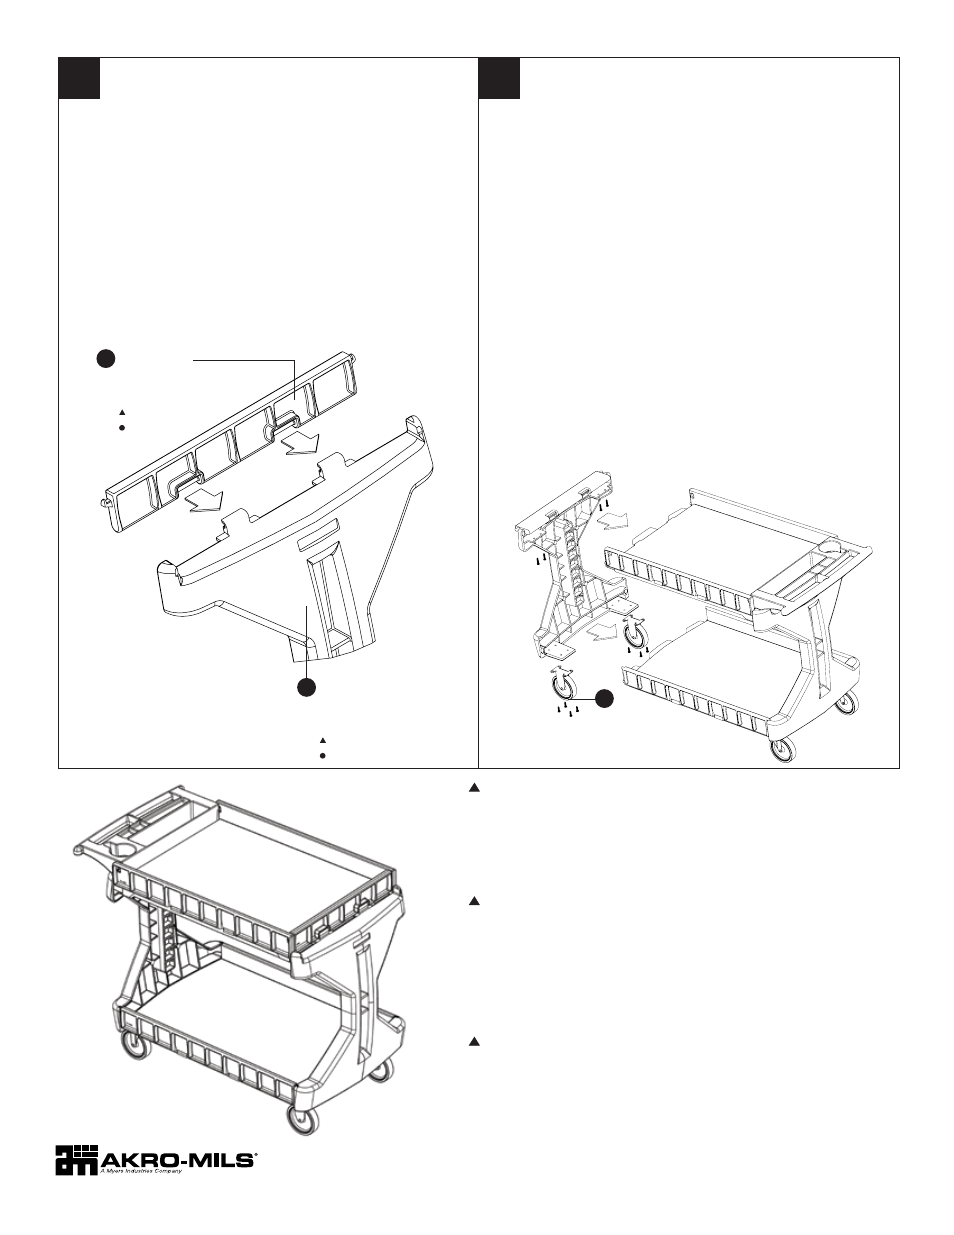
Attach front gate
(F) to front panel (J) by sliding 2 hinges
on front panel into front gate as shown. Leave front gate
in down position, with the smooth side up, and resting on
top of the front panel.
Fije la rejilla frontal
(F) al panel frontal (J) al deslizar las
dos bisagras del panel frontal en la rejilla frontal tal como
se muestra. Deje la rejilla frontal en posición hacia
abajo, descansando encima del panel frontal.
Fixer la grille avant
(F) au panneau avant (J) en glissant
les 2 charnières sur le panneau avant dans la grille avant,
tel qu’illustré. Laisser la grille avant en position abaissée,
reposant sur le panneau avant.
Attach front panel
(J) to top shelf (H) and bottom shelf (I)
simultaneously by sliding shelf tongues into slots on front
panel
(J). Be sure to place top and bottom gate tabs into
holes on front panel. Secure top shelf to front panel from
underneath with 4 screws. Attach fixed casters
(C) to bottom
tabs of front panel and up into bottom shelf
(I) as shown.
Your ProCart is fully assembled and ready to use.
Fije el panel frontal
(J) al entrepaño superior (H) y al entrepaño inferior
(I) simultáneamente al deslizar las lengüetas de los entrepaños en
las ranuras del panel frontal
(J) Asegúrese de colocar las lengüetas
de las rejillas superiores e inferiores en los orificios del panel frontal.
Asegure al entrepaño superior en el panel superior por debajo con 4
tornillos. Fije las ruedas fijas
(C) a las lengüetas del fondo del panel
frontal y hacia arriba del entrepaño inferior
(I) tal como se muestra.
Su ProCart está totalmente ensamblado y listo para su uso.
Fixer le panneau avant
(J) à la tablette supérieure (H) et à la tablette
inférieure
(I) simultanément en glissant les languettes des tablettes
dans les fentes sur le panneau avant
(J). Veiller à enfiler les onglets
de la grille inférieure et de la grille supérieure dans les trous sur le
panneau avant. Fixer la tablette supérieure au panneau avant depuis
dessous, à l’aide de 4 vis. Fixer les roulettes fixes
(C) aux onglets
inférieurs du panneau avant et dans la tablette inférieure
(I), tel
qu’illustré. Le chariot ProCart est prêt à être utilisé
6
7
F
Front Gate
Rejillas Frontales
Grilles avant
C
Fixed Casters
Ruedas Fijas
Roulettes fixes
74-963
74-940
J
Front Panel
Panel Frontal
Panneau avant
74-960
74-935
Form No. 06345 11/06
Akro-Mils P.O. Box 989, Akron, Ohio 44309 • 1-800-253-2467 • Fax: 330-761-6348 • www.akro-mils.com • e-mail: [email protected]
CAUTION:
• EXCEEDING RECOMMENDED WEIGHT LIMIT MAY RESULT IN INSTABILITY
CAUSING SERIOUS INJURY.
• MAXIMUM WEIGHT CAPACITY PER SHELF IS 200 lb. (90 kg).
• CAUTION WHEN MOVING CART ON INCLINE OR ROUGH SURFACE.
• CART CAN TIP OVER IF WEIGHT IS NOT EVENLY DISTRIBUTED.
• MAXIMUM PER CART LOAD IS 400 lb. (180 kg).
• US Patent Pending
PRECAUCION:
• EL EXCEDER EL LIMITE DE PESO RECOMENDADO PUEDE PROVOCAR
INESTABILIDAD Y CAUSAR LESIONES SERIAS.
• LA CAPACIDAD MáXIMA DE PESO DE CADA ENTREPAñO ES DE 200 lb. (90 kg).
• TENGA PRECAUCION CUANDO MUEVA EL CARRITO SOBRE
SUPERFICIES INCLINADAS O RUGOSAS.
• EL CARRITO PUEDE VOLCARSE SI EL PESO NO SE ENCUENTRA
DISTRIBUIDO DE MANERA UNIFORME.
• LA CARGA MáXIMA POR CARRITO ES DE 400 lb. (180 kg).
• Patente Pendiente en los EE.UU.
MISE EN GARDE:
• DÉPASSER LA LIMITE DE POIDS RECOMMANDÉE PEUT RENDRE
LE CHARIOT INSTABLE ET ENTRAÎNER UN RISQUE DE GRAVES BLESSURES.
• LA CAPACITÉ MAXIMALE DE LA PLATE-FORME EST DE 90 kg. (200 lb).
• USER DE PRUDENCE LORSQU’ON DÉPLACE LE CHARIOT SUR UNE
PENTE OU SUR UNE SURFACE INÉGALE.
• LE CHARIOT PEUT SE RENVERSER SI LE POIDS N’EST PAS RÉPARTI UNIFORMÉMENT.
• LE CHARGEMENT MAXIMAL PAR CHARIOT EST DE 180 kg. (400 lb).
• Brevet américain en instance
!
!
!