Cub Cadet C-155G User Manual
Page 21
CUTTING BLADES
WARNING: Be sure to shut the
engine off, remove ignition key,
disconnect the spark plug wire(s)
and ground against the engine to
prevent unintended starting before
removing the cutting blade(s) for
sharpening or replacement. Protect
your hands by using heavy gloves
or a rag to grasp the cutting blade.
WARNING: Periodically inspect the
blade adapter and/or spindle for
cracks or damage, especially if you
strike a foreign object. Replace
immediately if damaged.
The blades may be removed as follows.
•
Remove the deck from beneath the tractor,
(refer to Cutting Deck Removal) then
gently flip the deck over to expose its un-
derside.
•
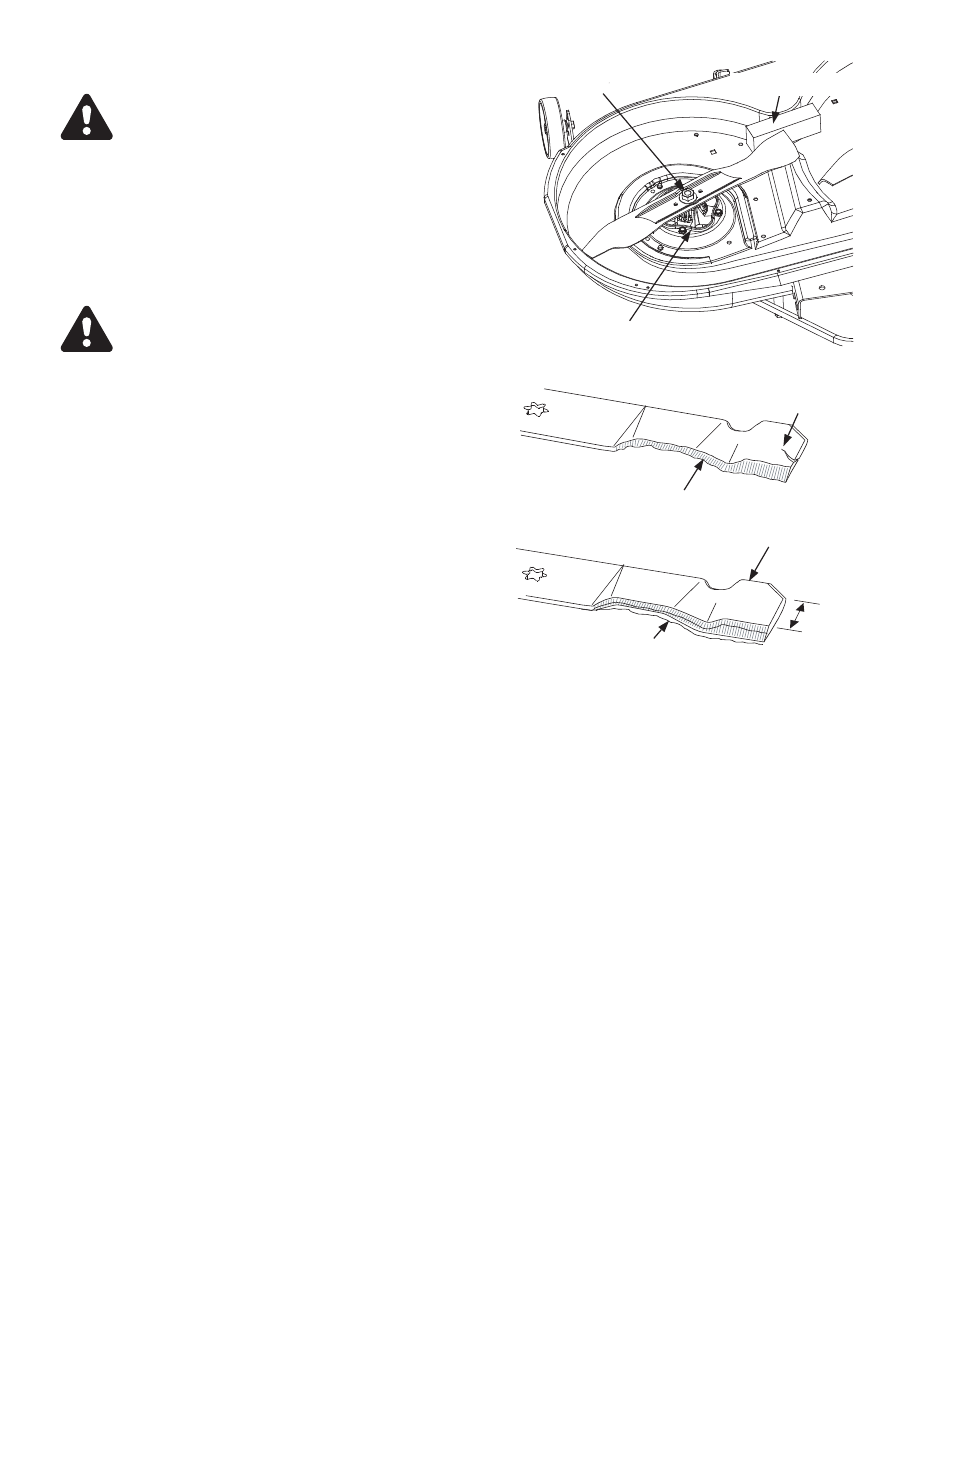
Place a block of wood between the center
deck housing baffle and the cutting blade
to act as a stabilizer. See Figure 22.
•
Use a 15/16" wrench to remove the hex
flange nut that secures the blade to the
spindle assembly. See Figure 22.
To properly sharpen the cutting blades, re-
move equal amounts of metal from both
ends of the blades along the cutting edges,
parallel to the trailing edge, at a 25° to 30°
angle. See Figure 23.
IMPORTANT: If the cutting edge of the
blade has already been sharpened to within
5/8" of the wind wing radius, or if any metal
separation is present, replace the blades
with new ones. See Figure 23.
It is important that each cutting blade edge
be ground equally to maintain proper blade
balance. A poorly balanced blade will cause
excessive vibration and may cause damage
to the tractor and result in personal injury.
The blade can be tested by balancing it on a
round shaft screwdriver. Grind metal from
the heavy side until it balances evenly.
When replacing the blade, be sure to install
the blade with the side of the blade marked
‘‘Bottom’’ (or with a part number stamped in
it) facing the ground when the mower is in
the operating position.
IMPORTANT: Use a torque wrench to
tighten the blade spindle hex flange nut to
between
70
foot-pounds
and
90
foot-pounds.
BATTERY
The battery is sealed and is mainte-
nance-free. Acid levels cannot be checked.
•
Always keep the battery cables and termi-
nals clean and free of corrosive build-up.
•
After cleaning the battery and terminals,
apply a light coat of petroleum jelly or
grease to both terminals
•
Always keep the rubber boot positioned
over the positive terminal to prevent short-
ing.
IMPORTANT: If removing the battery for any
reason, disconnect the NEGATIVE (Black)
wire from it’s terminal first, followed by the
POSITIVE (Red) wire. When re-installing the
battery, always connect the POSITIVE (Red)
wire its terminal first, followed by the NEGA-
TIVE (Black) wire. Be certain that the wires
are connected to the correct terminals; re-
versing them could change the polarity and
cause damage to your engine’s alternating
system.
Charging the battery:
If the tractor has not been put into use for an
extended period of time, charge the battery
with an automotive-type 12-volt charger for a
minimum of one hour at six amps.
21
FIGURE 22
Wood Block
Spindle Assembly
Hex Flange Nut
FIGURE 23
Wind Wing
Sharpen Edge Evenly
Blade Separation
Worn Blade Edge
5/8"
minimum