Operation, Preparation, Power-off programming – Checkline HTG2 User Manual
Page 4: Page 4 page 13
page 4
page 13
NG
OK
+N
G
OV
ER
LO
AD
ZER
O
F
NG
OK
+NG
AD
NG
OK
+NG
AD
OPERATION
Selecting Units
Press
to turn on the gauge. The LCD display briefly shows the
capacity of the gauge and then zero with a measuring unit (facto-
ry setup is lbf-in or ozf-in). If you want to change to other units:
1. Turn off the gauge.
2. Press
again while holding
to enter Power-Off program-
ming mode (CF9 flashes with solid nn0).
3. Press
to display U-03 with a unit, then press
or
to cycle desired units (ozf-in, lbf-in, kgf-cm and N-cm), and
press
to select (CF9 flashes with solid End).
4. Press
to exit 1st. programming mode.
Once units are selected, the gauge retains them as a default.
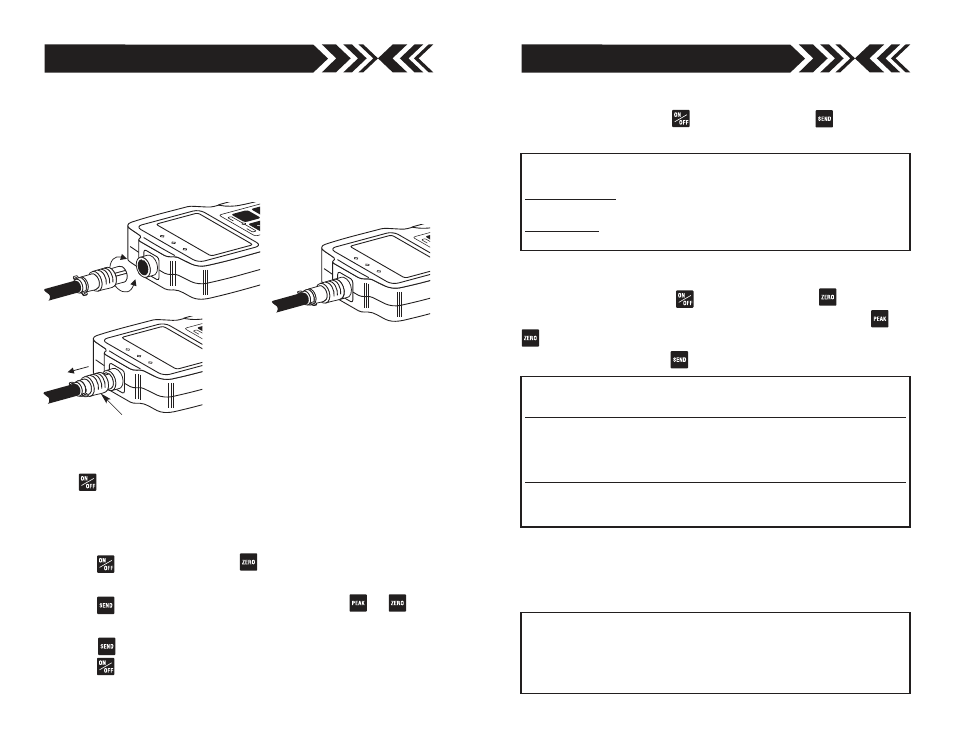
TURN CONNECTOR TO FIND
THE GROOVE
PUSH IN UNTIL IT MAKES A POSITIVE
CONNECTION
SLIDE THE RIBBED COVER OF THE
CONNECTOR BACK , THEN PULL
OUT THE CONNECTOR
RIBBED COVER
PREPARATION
Connect the coiled cable to both the measuring chuck and display
unit by rotating the round cable connector to find the matching
groove, then pushing in until positive connection is made.
To disconnect, first slide the ribbed cover of the connector back,
then pull out the connector (DO NOT ROTATE THE CONNECTOR).
Power-Off programming
Turn off the gauge. Press
again while holding
to enter
Power-Off programming (CF9 flashes with solid m0). Press
or
to cycle CF9m0, CF9m1, CF9m2, CF9m3(USB models
only) and CF9End. Press
to select a function.
Note: All power-on and power-off programming functions except for unit selection and
display orientation can be reset to factory defaults by the following procedure.
Turn on the gauge Press PEAK and ZERO for 3 seconds to display flashing CF9 with
solid F0. Press ZERO and PEAK for 5 seconds until flashing CF9 disappears and
becomes only solid F0. Then release both PEAK and ZERO. Gauge goes back to
measuring mode with factory default settings.
Memory clear
Memory location and value cycle. Press PEAK or ZERO to increase or decrease memo-
ry location (and corresponding value).
Single Memory Clear A memory location with a dot at both ends is the last stored data
and the only one that can be erased. Press SEND to erase, ErASEd is displayed. If you
attempt to erase other locations Error is displayed. Press ON/OFF to exit.
All Memory Clear While a memory value or location is displayed, press SEND for 3 sec-
onds, all data is erased and ErASEd is displayed, then – – – – –. Press ON/OFF to exit.
CF9 m0
Units selection
Press PEAK or ZERO to cycle; ‘U-01’: kgf-cm, ‘U-02’: N-cm, ‘U-03’: lbf-in or ozf-in
Press SEND to select, CF9End displays. Press SEND to exit.
CF9 m1
Torque dampening
Factory set=’Fd6’
Press PEAK or ZERO to cycle: ‘Fd0, Fd 1, Fd2, Fd3, Fd4, Fd5 or Fd6’. Torque dampen-
ing averages rapid torque changes over time. Larger numbers allow more dampening.
Press SEND to select, CF9End displays, press SEND to exit (Torque dampening rate
displays each time the gauge is turned on).
CF9 m2
+/– indicator
Default=’SC-OFF’
Press PEAK or ZERO to cycle. ‘SC-OFF’: CW (+) and CCW (–) or ‘SC-On’: CW (–) and
CCW (+). Press SEND to select, CF9End displays, press SEND to exit.
Power-Off programming
(clear data from memory)
Turn off the gauge. Press
again while holding
to enter
memory mode.