Number buttons, Nunb&t (»4, Continued on the next page – Panasonic PV-HS1000 User Manual
Page 19
Attention! The text in this document has been recognized automatically. To view the original document, you can use the "Original mode".
Press
Number buttons
to enter the dialing prefix,
then press PLAY to
move to the next screen.
• Press DISPLAY for *;
press ENTER for #; and
press PAUSE for
Dialing Prefix
сфвТ» fi
' V yovf Evctani nqunt filing
a
CpKill
nunb&t
(»4
to ftiiHi
Wsittno} bifon plKing
9
c«l|j
Pr*«s STOP bo tho lijiiog ргоГтх «к1 surt 0¥«r,
Pr«*f tho Kufnbor* «П four remoto control to ootot,
Prra D GPÍA V Гог о; EH'nER for «: PAUSE for
Dialing )4efiit [ ]
Pms REWto^iúedi to ZIP Cod«,
Prvis PLAV tvhaci «ro dan«.
• Some telephone systems must dial a special number prior to
placing a phone call, to disable call waiting for example. If your
phone system requires a special number, enter it on this screen.
K
f
TTie Hard Disk Recorder calls the ReplayTV Service
to retrieve local telephone numbers and TV channels.
• You are notified of the progress of the connection, and if any
errors occur during the connection.
• This connection to the ReplayTV Service lasts about 5 minutes.
• The internal Hard Disk Recorder clock and time zone are set
during this connection.
• This connection also provides the Hard Disk Recorder with TV
channel information for your local area.
Connect tetbtntpl^tV5«ryic* < ^ a t
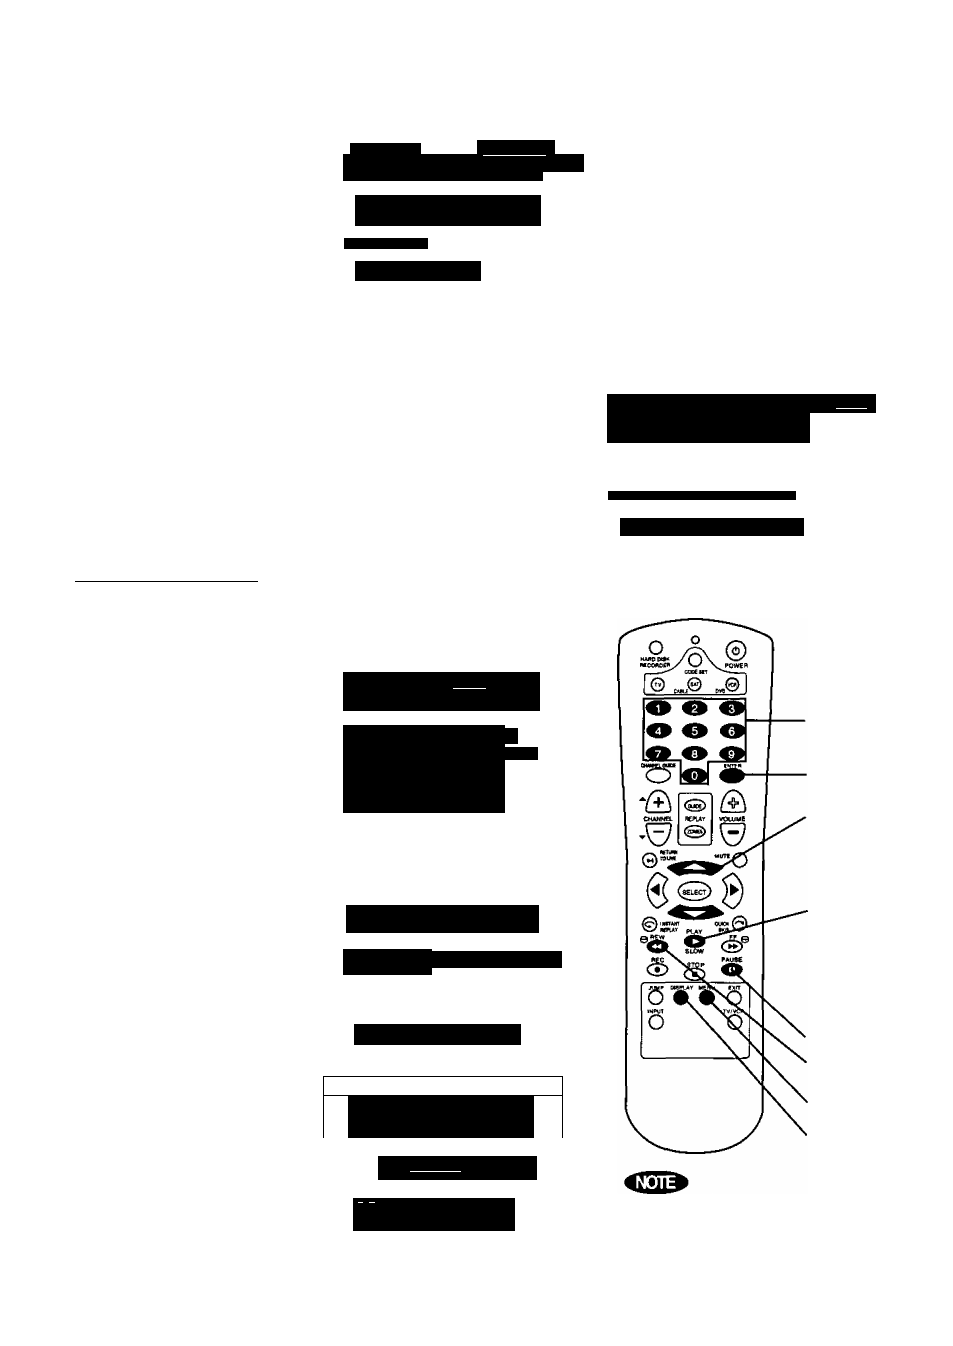
CAtting Local PNm« Numbm and TV ChanMlt.„ Thd №tn«d>Dn ftawW fast appnudmaMv ) rmnutm. STOP rf Rveordor a not conrwftart ba 4 ptiOd« tin*. If the connection failed. Press PLAY to try connecting again. Or, press REW repeatedly to return to the previous screen and confirm each setting item. Then, re-enter the correct information. ^Press A/T to select your local number, then •The ReplayTV Service finds local phone numbers based on the information Local Phone Numbers сфвТ á Choo» a toll-fr«» lecftl numbor by pmnrtg th* nutftLor 2 (6SÚ) 617-0610 [T«it4] Palo Atta, CA 3 {tíÚ}4ll41996 4 (650} 653-0610 [Ти14]5апИ4йва,СА 5 (650} 4S7-2900 Radwood Gty. CA 6 (6S0) 602-0130 [T*Ell]SanHatBü,CA Pr««s Ff f«r пн)г« phon* nuntb*f4. Pr«K REW to go back to Oialing PraFin, Pms PLAV wh*n you ar* doiw. 10 • You can change the number later by pressing MENU and selecting “Setup” and then "Change Dialing & Input Settings.” 11 Press A/T to select the dialing method, then press PLAY to move to • Choose the dialing method for your area. For example, Press A/T to select the device you have 1 input, then press PLAY to move to the • If nothing is connected to LINE 1, just press PLAY. Dialing Method <ф?ТТ^> Choo» th* diafing m*the>d that werks For your вг*а. 2 Oid 1-327-6823 3 014^650-327-6823 4 Oiai 1-650-327-6823 Pr*$s REW to go pack to I xk M Phont Numtiors. Pren PLAY wh*n you ar»dori*, 1 Configure Video Inputs ■A pi * p jn* 1 Cofiñguratíon i tir» t[ò-A-g}7l6^o-5 t I !*J- ó'-'b-ù [c- tt ■ u p I Piaai th* numüM м №■ r«mot« oontnil that Prass REW to go back to Dialing Mtihod. Prass PLAV wh*n you at * dan*. ____________________ If you select any components, the setup screen appears. Refer to “Completing the IR Blaster Setup” section on page 21. 7 Number buttons ENTER 9 A/T 20 buttons 11 7 PLAY « 9 10 11 PAUSE REW MENU DISPLAY • "Other” is reserved for future devices that may be connected to the Hard Disk Recorder. Continued on the next page. 19
Ploas« uvait whil« Uw Hard Drik PacsrdM' eennocb to th«
R«p
press PLAY to move to
the next screen.
you provided.
button that oorrvcpoTMk with th* Cboic« b«tow.
7 (650)551-950 L [TtttlJ 5^ MatM.CA
the next screen.
a direct call, or if you need
to dial a prefix and/or area
code.
connected to the LINE
next screen.
fVhat » oonnoctod to th* Una 1 input?
cef raspón* tu th* «onnoction abov*.