Remote control unit basics, Installation guide, Battery replacement – Panasonic CQ-DFX777EW User Manual
Page 6: Main controls, How to operate the controls
Attention! The text in this document has been recognized automatically. To view the original document, you can use the "Original mode".
CQ-[
Remote Control Unit Basics
Battery Replacement
1. Remove me battery holder.
Take hold of the holder al posrtion fl and puN fi
out to remove the batleiy by pushing posttlon A in
the diredioh shown oy the arrow.
2.
Replace the battery.
Set a new battery properly with its (■*■) side facing
up as shown in the figure.
3
. miert the battery holder.
Push the battery holder back into its original posi
tion.
Battery holder Position A
Battery Notes
Remove and dispose of an old battery imrr>edi
8
teiy.
Battery Information:
e Battery type: Panasonic lithium battery (CR2025)
e Elattery life:
6
months with normal use fat room temperature)
E>o not disassemble or short the battery. Do nor throw a battery into a lire.
Keep battehes out of the reach of children to avoid the risk of accidents
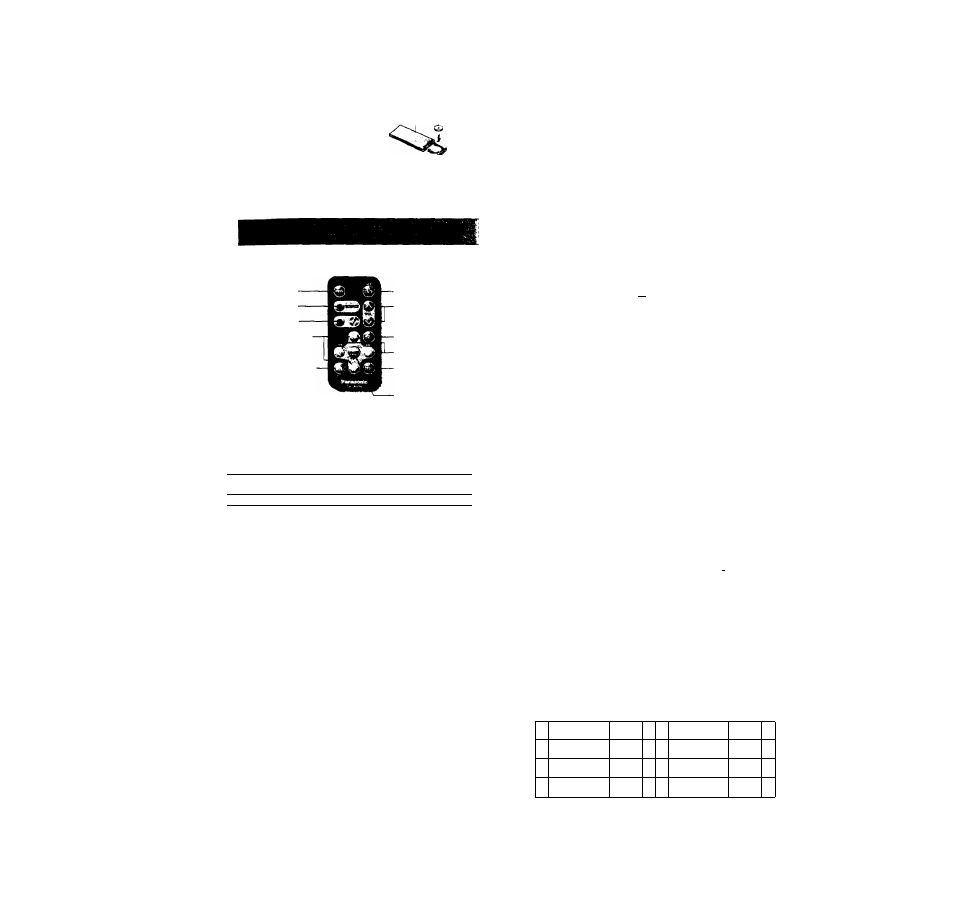
Main Controls
0 Power Button
0 SOURCE Button
О 3‘DSB Butteri —^
О D
isc
Up/Down Buttons
0 LEVEL/DIMMER Button
©MUTE Button
0
Voiurne Control Buttons
O SEL Button
0
Tune/Track Buttons
® DISP Button
©BAND Button
Remote Control Unit Basics
(continued)
ftMlIo
Ш
Selecting a Bend
9 BAND (Bind Select Button)
Press (BAND] to change the band set
ting as toHows
FMl-ePM2-*FM3-*AM
Manuel Tuning
0 < > (Mamial Tuning Buttorka)
Press t>l or t<] to tune in a higher or
lower frequency,
Saak Tuning
D < > (Saak Tuning Butlone)
Press and hold [>] or (<] for more ,
than 0.5 seconds, then release it.
{
Tuning will automatically stop when the
signals cf the next broadcast station
I
ana raceived.
|
“MONO/LOCAL
Selection'
and
"Auto
Station Preset" can be used by the re^
mote control unh. (• Page 12)
fWhen a disc is Insened, play starts.)
Starting CO Play
©SOURCE (Source Button)
•
Press [SOURCE] to change to ihe
CD play mode attar a disc has bean
inserted. Play will start automatical
ly-
♦ When the unit is connected with tt\e
CD Changer, press [SOURCE] re-
peaiedly to change the mode setting
as foliows.
Tkner-*-CDptayer«-(CD changer control)
"----------- MUX------------
Once a disc has been inserted. CD
piay will start automatically regardless
of the existing mode settirg.
Disc Selection
(Only for CD chenger control)
O (DlKUp/DovmButtons)
(When the CD changer is connected]
Press or [v] to change the discs
in ascending or descending order.
Track SaJectlon
Q ^
(Track Select Buttons)
•
Press [^^J to advance to the next
track
•
Press [■♦<] to play from the begin
ning of the track now playing
• Press
repeatedly to
skip me desired number of tracks.
Track Search
©
{Track Search Buttons)
•
Press
and
hold
[W
p
]
or
foi
more than
0.5
seconds lo advance
or reverse through a track
.
Remw
or
[■♦<]
to
stop
the
rapid advance or rapid reverse
“Oise Title Input' can be used by the re
mote control unit. (» Page 19*22)
How to Operate the Controls
Point til» r»mote contrat unit
»1
tiM main
unit'» »»n«or.
■ 1
Power
O PWR (Power Button)
Press [PWR] to switch on the power.
Press [PWR] again to switch off the
power.
Mode Selection
0 SOURCE (Source Button)
Press [SOURCE] to change the opera
tion rtKxle setting as follows,
Tur>er^CD pisyer (CD changer controi)
t------------ AUX----- ----- ^
Mute
©MUTE (Mute Button)
•
Press [MUTE] to mute the sound
compleiei-y
•
Press [MUTE] again to cancer
Volume
0
V VOL (Volume Control Buttone)
Press [A VOL} or [v VOL] lo in
crease or decrease the volume level
3*D5B
© 3-OSB Button
Press (CÍ1 to cnange the combinaron
of the 3*DSS and Loudness as loiJows.
Audio Mod«
O SEU (Select Button)
Press [BEL]
10
change the audio mode
setting as foilows
n*9ulBr Moor—^ VOLUME ^ SAS$ —* TnEfiLf
- РАоея -—- SAUNCf-
Dimmer
©Dimmer Button
Press and hold [DIMMER] for more
than
2
seconds to change the dimmer
level from one level to another through
the cyda of 3 levels as follows.
Dimmer
1
—► Dimmer 2 —► Dimmer 3
(Bnghi)
(Medium) (Dark)
t________________________ I
L«vet MatM- Display Switching
OUvM Button
(lAi) to change the Level meter
»»»00
trom one Level meter to anom
er thmuoti the c/cte ol
6
kinoi mode
Chsnging the Dispisy
©DISP Button
Press [DISP] to change the d^play
setting as loilows.
In Tunar Mod« Braedcia« ataiioni~—iC4CH;k
In CO Mocta (Dec NO OidCk -» Tni«
Track Nc .'
I
TradiHayTMTi«
C Wnw> a Ct> changar la oonnaefadj
in AUX Mads -ALTX I N ' » Clock
Refer to the operating instructions tor
the main unit tor more data>ls.
Installation Guide
Prepambon:
e Before installation check the radio operation with antanra and speakers
• Disconnect the cable from the negative ) batteiy tarminai ($ee caution below),
Cautiorr.
'
For installation to cars wtth trip or navigational computer, all electronic memory settings previousiy
registered in the computer will be lost when the batiety terminai is disconnected. For this type of car,
battery could not be disconnected. Therefore, extra care should be taken to prevent short circuitting
In daeh Inaullatiort
Instillation Opening
ln*dash installation can be done if the car’s dashboard
has an opening lor this unit as shown in the figure
|
|S
3
rwn
The car's dashboard should have a thickness of
r* - -isamm ~
4,5mrrt-Bmm in order to make the installation of the
unit
Inetailatiqn Preeautfona
This equipment. И poasible, should be installed by a professional installer.
In case o1 dIffrcuJty, please consult yotir nearest authonzed Panasonic Service Center
1
. This system is to be used onty m a 12-volt, DC battery system (car) with negative ground
2, Follow the eiectncal connection {~ page 32) carefully. Failure to do so may result in damage io
the umi.
3. Connect the power lead after other connections are made,
4, Be sure to connect the YELLOW lead to positive lerminai ('i^) of the battery io fuse block (BAT) ter
minal-
5 Insulate ail exposed wires to preveni short circuittmg
6
, Secure aN loose wires after installing the urnt.
7 Please caretuHy read the operating and instaliafion instructions ot the respective equipmeni betöre
connecting it to this unit
n Installation Hardware
i © 1
Ф
\
Mounting Collar
i—
1
® Power Connector
Hex. Nut (5 mm(>)
1
Removable face Plate
Case
1
Rear Support Strap
®
Remote Control Unit
1
Tapping Screw
(5 mm)
®
Lithium Battery
©
1
©
Mounting Bon (S mm Tnm Plate 1