Rane AC 22B (2003 version) User Manual
Page 14
Manual-
©Rane Corporation 00 th Ave. W., Mukilteo WA -0 USA TEL --000 FAX -- WEB www.rane.com
106180
Constant Directivity Horn
Equalization Modification
Constant Directivity (or CD) horns need additional equal-
ization to help cover the same area a long throw horn can cover.
Additional circuitry has been added to the AC 22B layout for the
additional equalization of the High Frequency outputs for CD
horns. This modification should only be attempted by an experi-
enced technician who is adept at soldering.
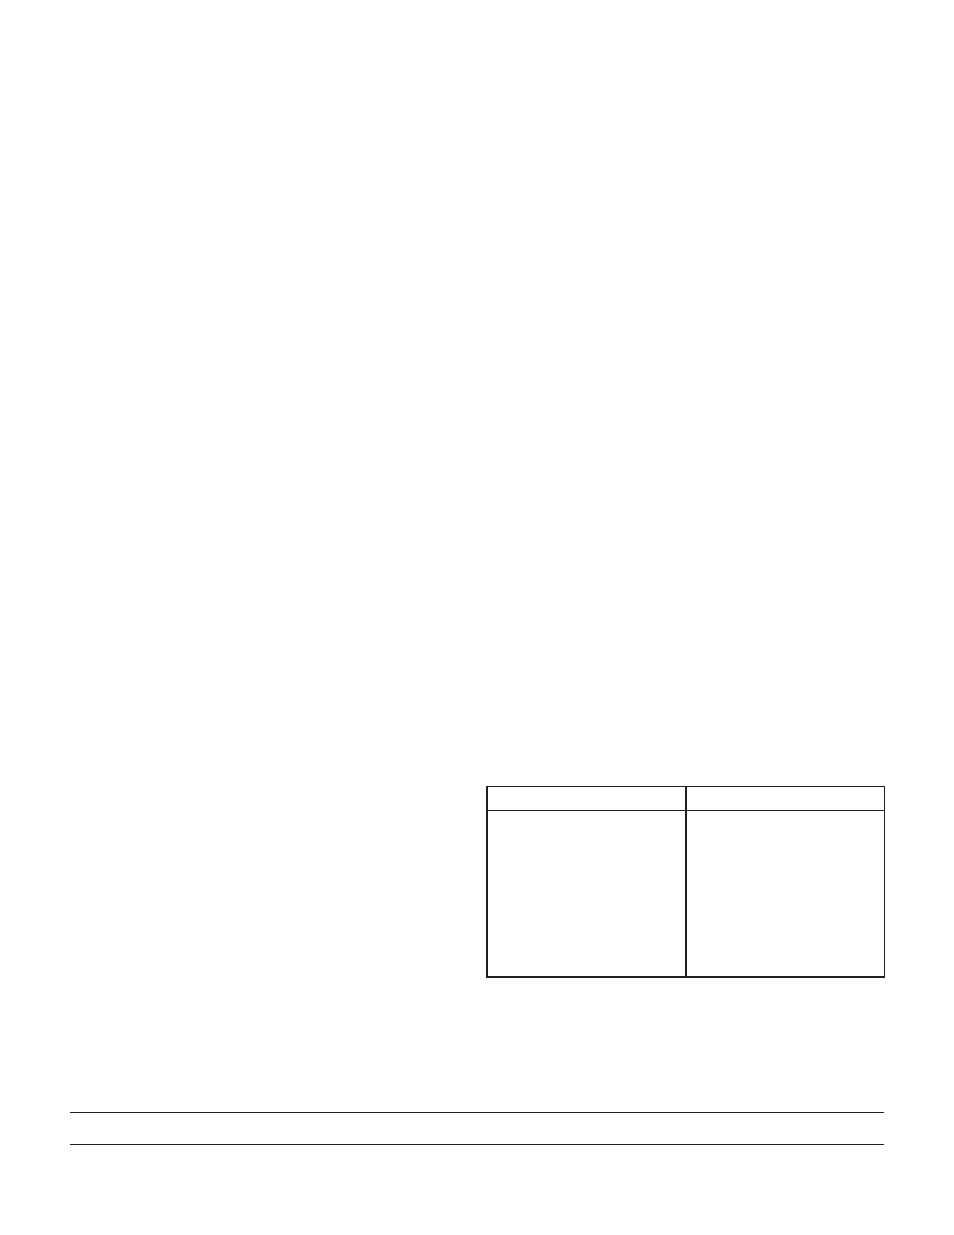
It is important to know the 3 dB down point of the CD
driver's frequency response. The manufacturer of your driver
should be able to supply you with a chart showing a frequency
response curve. Find the point where the high end starts to roll
off, and look for the point on the chart that is 3 dB down from
that point (toward the right, as the higher frequencies roll off).
Find the frequency at the bottom of the chart of this point — an
approximate is fine, you don't have to be exact. Find the closest
frequency in the table below to determine the correct value ca-
pacitor to install in the AC 22B to correct for this high frequency
roll off.
STEP BY STEP PROCEDURE
The following procedure is for Stereo 2-Way. For a Mono
3-Way system with a CD horn on the high output, only place
C212 in Channel 2.
1. Remove the top and bottom covers of the AC 22B.
2. Locate the positions for C112 and C212 on the board layout
page of the schematics and on the circuit board. C112 (for
Channel 1) is located near the middle of the board. C212 (for
Channel 2) is located near the middle and right edge of the
board.
3. Clean the solder pad on the underside of the board so that the
appropriate capacitor can be inserted. Install the capacitor,
and solder the leads from the underside using fresh solder.
Clip the excess leads.
Setting Levels Using an SPL
Meter and Pink Noise Generator
The MUTE switches on the AC 22B make using an SPL
meter an easy and relatively accurate means of tuning a system.
First, obtain a good SPL meter from a local electronics or hi-fi
store. Second, and perhaps a little trickier, get a hold of a pink
noise generator—again try electronics and hi-fi stores. You may
also use a sweep or tone generator in place of a pink noise source.
If so, be sure to look at several different tones within each cross-
over section to get a good average of driver response.
1. Run pink noise into the crossover Inputs (through the mixer
or directly, as is convenient).
2. To start, turn all crossover LEVEL(s) all the way down and all
amplifier level controls at least half way up.
3. Turn the crossover MASTER LEVEL(s) half way up. Place
the SPL meter at least 15 feet from the speaker stack and
about chest high. Once positioned, the SPL meter must
remain in the exact same location for the rest of the procedure.
Minimize all background noise (fans, air conditioners, traffic,
wild animals, etc.) to get accurate readings. Set the SPL meter
to “C-weighting”, “slow” if those switches are present.
4. Slowly turn the LOW LEVEL up until there is a healthy
rumble coming from the bass speakers (For this example
the 3-Way mode is used—the same procedure applies to all
configurations, starting with the lowest frequency and ending
with the highest). Adjust the SPL meter and/or LOW LEVEL
until you get a 0dB reading on the meter. After this point do
not change the controls on the SPL meter.
5. While leaving the LOW LEVEL control at the 0 dB adjust-
ment just obtained, press the LOW MUTE switch on the
crossover so the pink noise disappears from the bass speakers.
6. Now slowly turn up the MID LEVEL control so pink noise
is heard from the mid frequency speakers. Without chang-
ing any settings on the SPL meter, adjust the crossover MID
LEVEL control until you obtain a 0 dB reading on the SPL
meter. Now the low and mid speakers are set at the same level.
7. Now press the MID MUTE switch on the crossover so the
pink noise again disappears.
8. Repeat this process for each crossover frequency section, end-
ing with the highest frequency. NOTE: It is possible you may
turn one of the frequency section output LEVEL controls all the
way up and still not have enough volume for a 0 dB reading (as
determined by previous section levels). This is probably due to dif-
ferent sensitivities of amps, speakers and other level controls in the
system. When this happens, re-set the SPL meter so that it reads
0 dB on this frequency section (you may have to “down range”
the meter and re-adjust the crossover MASTER LEVEL control).
Now go back and re-adjust the previous crossover LEVEL con-
trols, turning these down to get a 0 dB reading on the meter.
9. Once the HIGH LEVEL control is set for 0 dB on the meter,
disengage all of the MUTE switches on the crossover, and
check that noise is emitting from all the speaker components.
The crossover should now be aligned. Make any overall level
adjustments with the MASTER LEVEL level controls and
leave the output LEVEL controls unchanged.
3 dB Down Frequency
Capacitor
2.0 kHz
.0068 µf
2.5 kHz
.0056 µf
3.0 kHz
.0047 µf
3.7 kHz
.0039 µf
4.0 kHz
.0036 µf
5.0 kHz
.0030 µf
6.0 kHz
.0024 µf