Install the boundary wire, Place the boundary flags, Fit the receiver collar – Petsafe YardMax™ Rechargeable In-Ground Fence™ User Manual
Page 20: Step
20
Customer Care Center 1-800-732-2677
Install the Boundary Wire
• Underground cables can carry high voltage. Have all underground cables marked before you dig to bury your
wire. In most areas, this is a free service. Avoid these cables when you dig.
• Before you begin installing the Boundary Wire, turn the Fence Transmitter OFF and unplug the adapter from
the Surge Protector.
To Bury the Boundary Wire
Burying the Boundary Wire is recommended to protect it and prevent disabling the system.
1. Cut a trench 1-3 inches deep along your planned boundary.
2. Place the Boundary Wire into the trench maintaining some slack to allow it to expand and contract with
temperature variations.
3. Use a blunt tool such as a wooden paint stick to push the Boundary Wire into the trench. Be careful not to
damage the Boundary Wire insulation.
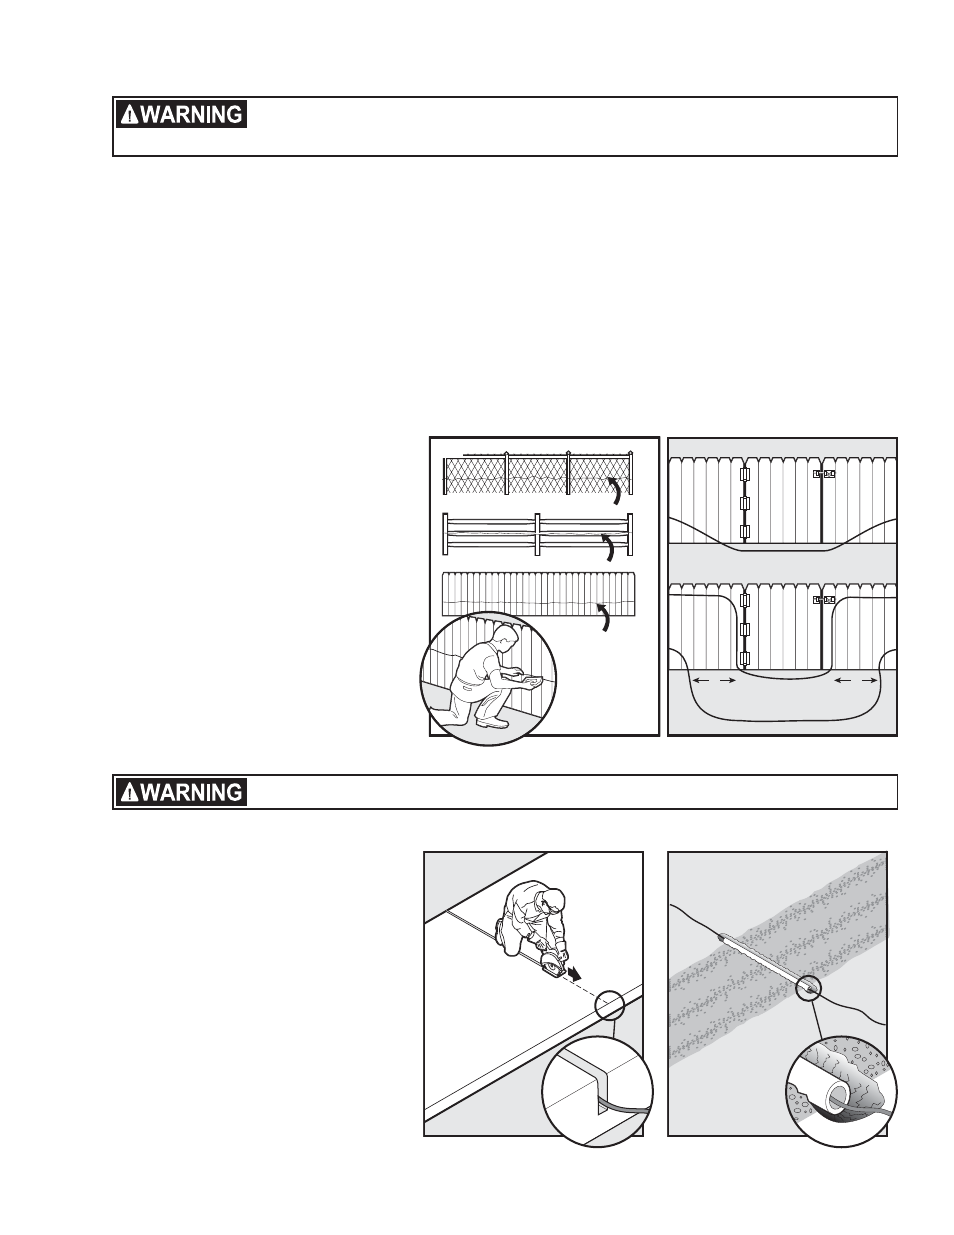
To Attach the Boundary Wire to an Existing Fence
The Boundary Wire can be attached to a chain link fence, split rail fence, or a wooden privacy fence. The Boundary
Wire can be attached as high as needed. However, make sure the Boundary Width is set at a high enough range
for the pet to receive the signal. If using a Double Loop (Traditional Mode only) with an existing fence at least five
feet tall, run the Boundary Wire on top of the fence and return it on the bottom of the fence to get the five foot
separation needed.
• Chain Link Fence (9A): Weave Boundary
Wire through the links or use plastic quick
ties.
• Wooden Split Rail or Privacy Fence
(9A): Use staples to attach Boundary Wire.
Avoid puncturing the insulation of the
Boundary Wire.
• Double Loop with an Existing Fence:
Run the Boundary Wire on top of the fence
and return it on the bottom of the fence to
get the five foot separation needed.
• Gate (Single Loop) (9B): Bury the
Boundary Wire in the ground across the
gate opening. Note: The signal is still
active across the gate. Your pet cannot
pass through an open gate.
• Gate (Double Loop) (9B): Bury both
Boundary Wires across the gate opening
while keeping them five feet apart.
STAPLE WIRE TO FENCE
WEAVE WIRE INTO FENCE
STAPLE WIRE
TO FENCE
9A
5'
5'
SINGLE LOOP
DOUBLE LOOP
9B
Follow all safety instructions for your power tools. Be sure to always wear your safety goggles.
To Cross Hard Surfaces (driveways, sidewalks, etc.)
• Concrete Driveway or Sidewalk (9C):
Place the Boundary Wire in a convenient
expansion joint or create a groove using a
circular saw and masonry blade. Place the
Boundary Wire in the groove and cover with
an appropriate waterproofing compound.
For best results, brush away dirt or other
debris before patching.
• Gravel or Dirt Driveway (9D): Place the
Boundary Wire in a PVC pipe or water
hose to protect the Boundary Wire before
burying.
9C
9D
Step
9
Place the Boundary Flags
The Boundary Flags are visual reminders for your pet of where the Warning Zone is located.
YardMax
™
mode:
1. Place the Boundary Flag along the Boundary Wire
approximately 6 inches inside the Pet Area (10A, 10B).
2. Place a Boundary Flag in the ground every 10 feet.
Traditional Mode:
1. Place the Test Light Contacts on the Contact Points.
Hold the Receiver Collar at your pet’s neck height.
2. For Traditional Mode, walk towards the Warning Zone
until the Receiver Collar beeps (10C).
3. Place a Boundary Flag in the ground (10D).
4. Walk back into the Pet Area until the beeping stops.
5. Repeat this process around the Warning Zone until it
is marked with Boundary Flags every 10 feet.
Boundary
Wire
10C
10D
Boundary
Wire
10A
Boundary
Wire
6”
10B
Fit the Receiver Collar
Important: The proper fit and placement of your Receiver Collar is important for effective training. The Contact Points
must have direct contact with your pet’s skin on the underside of his neck.
Please read and follow the instructions in this manual. Proper fit of the collar is important. A collar worn for too
long or made too tight on the pet’s neck may cause skin damage. Ranging from redness to pressure ulcers; this
condition is commonly known as bed sores.
• Avoid leaving the collar on the dog for more than 12 hours per day.
• When possible reposition the collar on the pet’s neck every 1 to 2 hours.
• Check the fit to prevent excessive pressure; follow the instructions in this manual.
• Never connect a lead to the electronic collar; it will cause excessive pressure on the contacts.
• When using a separate collar for a lead, don’t put pressure on the electronic collar.
• Wash the dog’s neck area and the contacts of the collar weekly with a damp cloth.
• Examine the contact area daily for signs of a rash or a sore.
• If a rash or sore is found, discontinue use of the collar until the skin has healed.
• If the condition persists beyond 48 hours, see your veterinarian.
• For additional information on bed sores and pressure necrosis, please visit our website.
These steps will help keep your pet safe and comfortable. Millions of pets are comfortable while they wear
stainless steel contacts. Some pets are sensitive to contact pressure. You may find after some time that your pet is
very tolerant of the collar. If so, you may relax some of these precautions. It is important to continue daily checks
of the contact area. If redness or sores are found, discontinue use until the skin has fully healed.
To assure a proper fit, please follow these steps:
1. Make sure the Receiver Collar is turned off.
2. Start with your dog standing comfortably (11A).
3. Place the Receiver Collar on your pet so that the “PetSafe
®
” logo is right side up and
the receiver is directly under your dog’s chin. Center the Contact Points underneath
your dog’s neck, touching the skin (11B).
You may need to trim the hair in the area of the Contact Points. Never shave the
dog’s neck; this may lead to a rash or infection.
11A
Step
10
Step
1 1