Prepare the receiver collar, Step, Receiver collar status indicators – Petsafe YardMax™ Rechargeable In-Ground Fence™ User Manual
Page 10: Receiver collar status indicator table, Readytest, Feature
10
Customer Care Center 1-800-732-2677
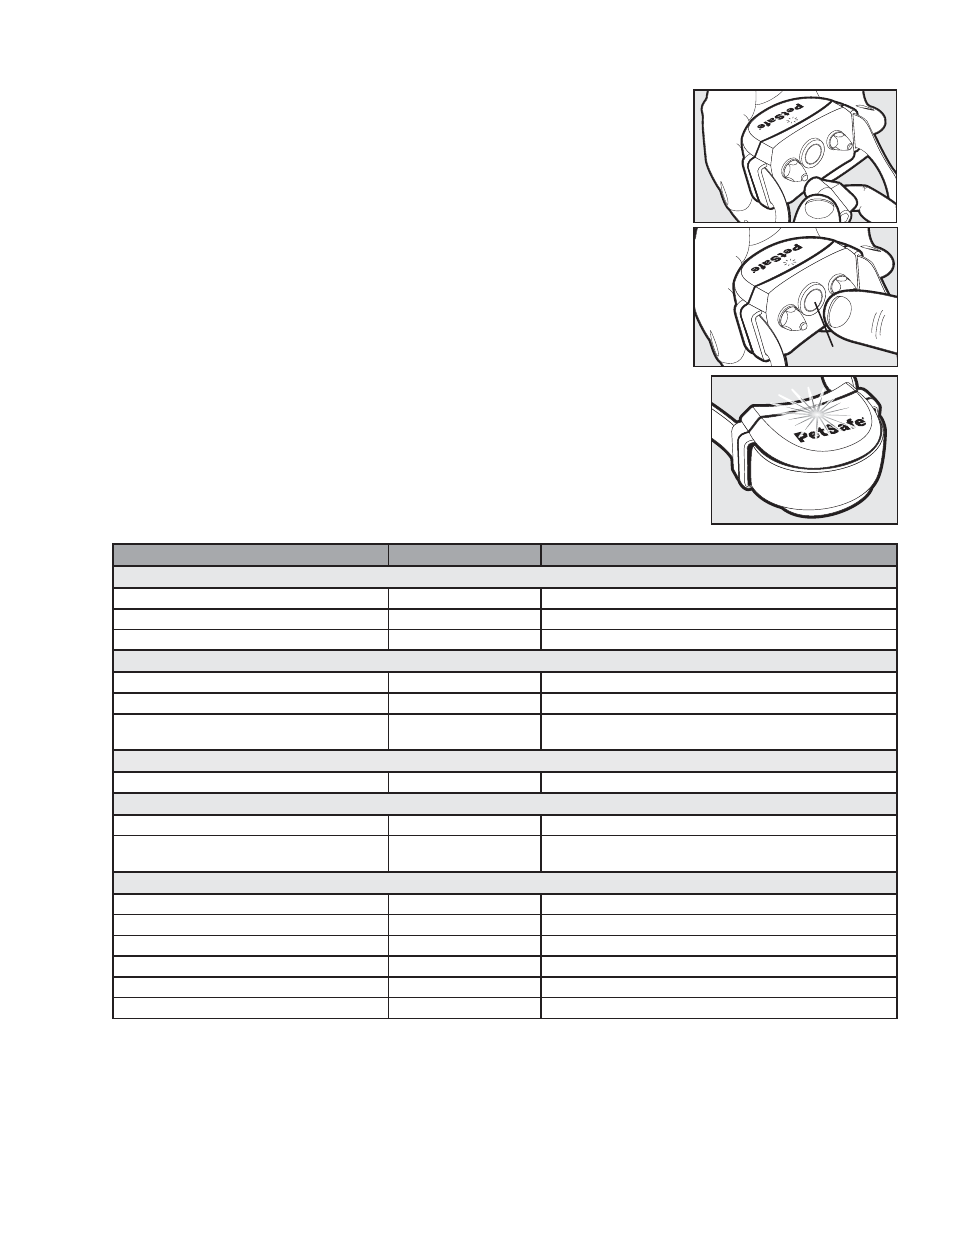
Prepare the Receiver Collar
Your Receiver Collar comes with short Contact Points installed. Use the long Contact
Points for dogs with long or thick hair. Tighten the Contact Points using the Contact
Point Wrench (3A). Check the tightness weekly. The Receiver Collar is waterproof.
To Turn On the Receiver Collar
Press and hold the Mode Button for 1 second (3B). The green or yellow or red
Receiver Indicator Light will turn ON for 5 seconds (3B) to indicate battery status,
followed by the red Receiver Indicator Light flashing the Static Correction Level.
To Turn off the Receiver Collar
Press and hold the Mode Button continuously for 5 seconds. The red Receiver
Indicator Light will be ON during this time. The red Receiver Indicator Light will
then turn OFF and all Receiver Indicator Lights will stay OFF indicating that the unit
is turned OFF. To extend the time between charging the Receiver Collar, consider
turning OFF the Receiver Collar when it is not in use.
Receiver Collar Status Indicators
3A
3B
Mode Button
The Receiver Collar Status Indicator Light along with the alarm tones are used to
determine the operational mode, the battery status, and the correction type. Refer to
the Receiver Collar Status Indicator Table below to understand the status lights and
tones for the Receiver Collar. During normal operation, the Receiver Collar Indicator
Light will flash every 4 seconds to indicate the battery status as shown in the table
below. If your Receiver Collar hasn’t been moved for at least 20 seconds, the battery
status light will function but the collar will enter sleep mode to conserve battery life. To
wake up the collar simply pick it up and flip it over or shake it.
Receiver Collar Status Indicator Table
3C
Status Light
Alarm Tone
Condition
While Plugged Into Receiver Charger
Solid Red
No Tone
Charge in progress
Solid Green
No Tone
Charge complete
No Light
No Tone
Charge failure, contact Customer Care Center
After Removing From Charger Or Turning On Performs ReadyTest
®
Off (1 second)
No Tone
Unit is performing ReadyTest
®
Continuous Green or Yellow or Red (5 seconds)
No Tone
Battery Charge Indicator
Continuous Red
20 sec.
ReadyTest
®
failure; unit is not operational, contact Customer
Care Center
Static Correction Report Level
Flashing Red from 1 to 6 times
No Tone
Receiver Collar is reporting Static Correction level from 1 to 6
PerfectFit
™
Test
Flashing Red & Green together (every 1 second) No Tone
Unit is in PerfectFit
™
mode for 90 sec. after turning on
Flashing Green (every 1 second)
Chime; 5 consecutive
chimes for confirmed fit
PerfectFit
™
mode indicates collar is making true contact with
dog's skin
Receiver Activation Status
Fast Pulsating Green
Warning Tone
Warning tone
Fast Pulsating Red
Duration of the Correction Static Correction being delivered (up to 10 sec.)
Continuous Green (10 seconds)
No Tone
Over Correction Protection; collar locked for 10 sec.
Slow Blinking Green (every 4 seconds)
No Tone
Collar battery charge 100% - 60%
Slow Blinking Yellow (every 4 seconds)
No Tone
Collar battery charge 60% - 20%
Slow Blinking Red (every 4 seconds)
No Tone
Collar battery charge 20% or less; charge immediately
ReadyTest
®
Feature
ReadyTest
®
gives you added confidence that the Receiver Collar is working and ready to use. When you remove the
Receiver Collar from the charger, or turn the Receiver Collar ON, the Receiver Collar will automatically go into self-
test mode for approximately 8 seconds. The receiver’s internal diagnostics will check that the battery charge is full
and that all circuits are working correctly.
Do not touch the Contact Points while the Receiver Collar is in test mode. This will cause the Receiver Collar to
fail the ReadyTest
®
. Do not turn the Receiver Collar ON while it is placed on your pet. This will cause the Receiver
Collar to fail the ReadyTest
®
.
Step
3