Welch Allyn 5091-45 Wall Sphyg Conversion Kit, Instructions - Installation Guide User Manual
Instructions
5091-45
Wall Sphyg Conversion Kit
Instructions
1.
Remove the gauge and bracket from the wall.
2.
Remove the bracket from the gauge by pressing the ears of the bracket
inward about 1/8” to disengage them from the pivot pins in the case.
Remove the pivot pins from the case and discard them.
3.
Drill out the 5/32” hole in the end of each ear of the bracket to 1/4” diam-
eter.
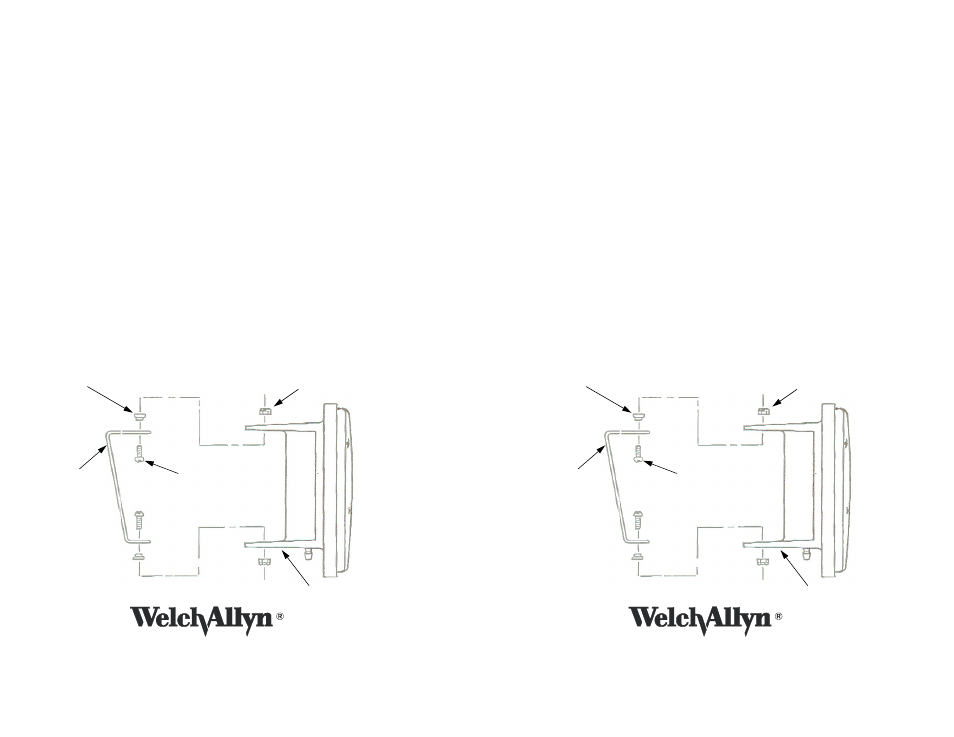
4.
To reattach the bracket to the case: place the bushings in the 1/4” diame-
ter holes drilled in the bracket as shown in the illustration. Place the
bracket and bushings between the ears of the case. Insert the case as
shown in the illustration. Tighten the lock nuts on the machine screws to
secure the assembly. Tighten the lock nuts enough to hold the plastic
bushings snugly against the case. The bushings are long enough to keep
the head of the machine screws from tightening against the bracket. This
allows the gauge to pivot freely about the plastic bushing.
5.
Reattach the gauge and bracket to the wall.
5091-45
Wall Sphyg Conversion Kit
Instructions
1.
Remove the gauge and bracket from the wall.
2.
Remove the bracket from the gauge by pressing the ears of the bracket
inward about 1/8” to disengage them from the pivot pins in the case.
Remove the pivot pins from the case and discard them.
3.
Drill out the 5/32” hole in the end of each ear of the bracket to 1/4” diam-
eter.
4.
To reattach the bracket to the case: place the bushings in the 1/4” diame-
ter holes drilled in the bracket as shown in the illustration. Place the
bracket and bushings between the ears of the case. Insert the case as
shown in the illustration. Tighten the lock nuts on the machine screws to
secure the assembly. Tighten the lock nuts enough to hold the plastic
bushings snugly against the case. The bushings are long enough to keep
the head of the machine screws from tightening against the bracket. This
allows the gauge to pivot freely about the plastic bushing.
5.
Reattach the gauge and bracket to the wall.
Plastic
Bushing
Bracket
Machine
Screw
Lock Nut
Case
4341 State Street Road
Skaneateles Falls, NY 13153 USA
Tel: 315-685-4560 or 800-535-6663
Fax: 315-685-3361
www.welchallyn.com
95P314 Rev B
Plastic
Bushing
Bracket
Machine
Screw
Lock Nut
Case
4341 State Street Road
Skaneateles Falls, NY 13153 USA
Tel: 315-685-4560 or 800-535-6663
Fax: 315-685-3361
www.welchallyn.com
95P314 Rev B
Document Outline
- 5091-45
- Wall Sphyg Conversion Kit
- Instructions
- 1. Remove the gauge and bracket from the wall.
- 2. Remove the bracket from the gauge by pressing the ears of the bracket inward about 1/8” to disengage them from the pivot pins in the case. Remove the pivot pins from the case and discard them.
- 3. Drill out the 5/32” hole in the end of each ear of the bracket to 1/4” diameter.
- 4. To reattach the bracket to the case: place the bushings in the 1/4” diameter holes drilled in the bracket as shown in the ill...
- 5. Reattach the gauge and bracket to the wall.
- Instructions