Rice Lake TicketPress - Operator Card User Manual
Ticketpress, Operator card, Printer operation
PN 129651
April 2012
Refer to Operator’s Manual (PN 128032) for detailed instructions
Manuals are available on our web site at
www.ricelake.com/manuals
US 800-472-6703 International 715-234-9171
TicketPress™
Ticket Printer
Operator Card
Note
Warning
Electric shock hazard.
Only qualified personnel should operate
the equipment.
Refer all repairs and modifications to
your distributor or service technician.
Failure to heed may result in serious
injury or death.
Control Panel Features
LCD Display and Status Indicators
LCD Display
Two line by sixteen-character display used to
convey current printer status information and
for printer configuration.
POWER
Indicator
Off – Printer is off.
On – Printer is on and ready to receive data.
Flashing:
Random pattern = Data being received from
host.
Steady pattern = Printer is in setup mode,
input data is ignored.
FAULT
Indicator
Off – The printer is operating normally.
On – The printer has detected a fault condition
that prevents printing. See Operator’s Manual.
Audible Alarm Sounds when a fault condition has occurred.
Front Panel Control Buttons
POWER
Press to turn the printer on.
Press and hold for approximately five seconds
to turn the printer off.
Increment
Enter
These buttons are only used to initiate a self
test or for printer configuration. See Operators
Manual
The Print button action is determined by the
current settings and whether a fault condition
currently exists. See Operators Manual.
Printer Operation
1. Press
POWER
to turn printer on.
2. Insert a ticket.
3. Send print from weight indicator.
If user activates print from TicketPress, cable
modification may be required. (See Operators
Manual PN 128032).
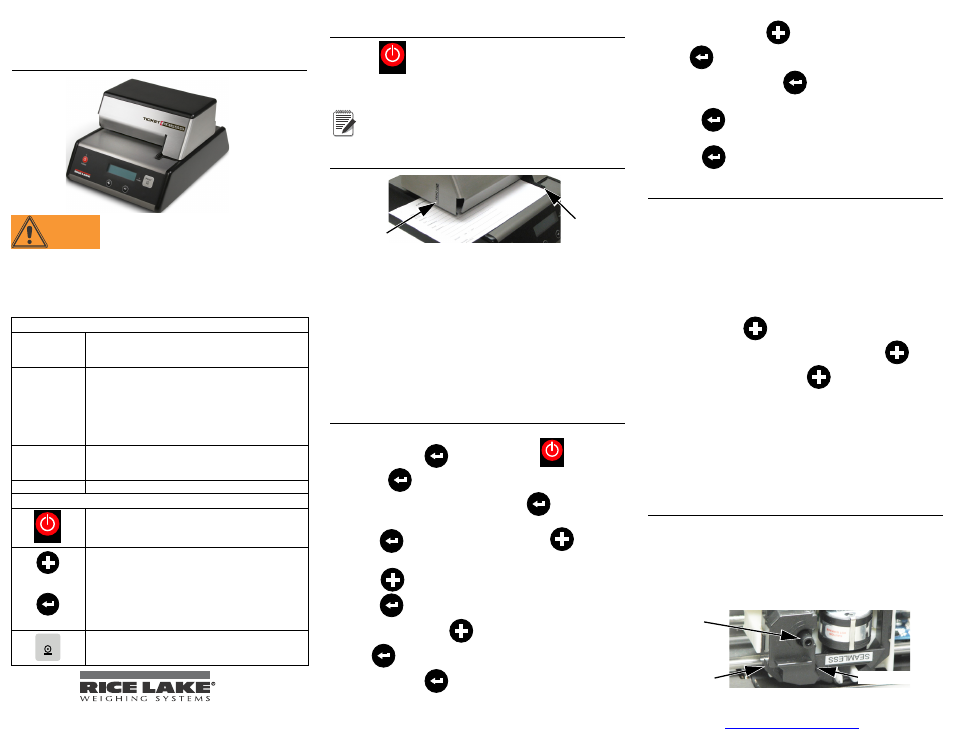
Insert ticket
Print Line
Indicator
Ticket Edge
Guide
1. Slide ticket into the printer as shown above.
2. Align right edge of ticket with the edge guide.
3. Slide ticket in far enough to align desired print position
with print line indicator.
If the TicketPress receives data to print and no ticket has been
inserted, the printer will sound a long beep and display
Ticket
Out
on the display. If this happens:
1. Make sure a ticket has been inserted, is aligned with the
ticket edge guide, and inserted far enough to be aligned
with the print line indicator.
2. When the ticket is inserted properly, the printer will
automatically continue printing.
Time and Date
1. Turn the printer off.
2. Press and hold
, press and release
POWER
, continuing
to hold
until
Entering Setup Menus
is displayed.
3. Options will display, press and hold
about 2
seconds to enter menu.
4. Press
to cycle through choices and
to select
Loc, Time, Date, ID.
5. Press
to select print position, if needed.
6. Press
until time is displayed.
7. To update
Time
use
to change highlighted portion
and
to move to next portion.
8. Press and hold
to advance.
9. To update
Date
use
to change highlighted portion
and
to move to next portion.
10.When complete, press
until
Option Menu
is
displayed. Screen will display time and date updated.
11.Press
until
Exit Setup Menus
,
Save Changes
is
displayed.
12.Press
again to exit menus and save changes.
Printer Self Test & Monitor Mode
The printer performs many self-diagnostics each time power
is applied. If you wish to perform an actual printing test
and/or use the Hex Dump mode to diagnose host data sent to
the printer, use the following steps.
1. Make sure the printer is powered off.
2. Make sure the printer has a ribbon installed and a blank
ticket loaded. This ticket must be at least 4” wide and 9”
long. You may also use a blank piece of copier/laser
paper.
3. Press and hold
4. Turn the printer on while continuing to hold
.
5. When printer beeps, release
. The printer will
automatically begin to print. Display screen shows
entering
Self Test Mode
.
6. After the self test has completed, the printer is left in
Monitor mode.
Insert a blank sheet to print subsequent
jobs in Hexadecimal representation for diagnostic
purposes.
7. To exit the Self Test & Monitor mode, turn the printer
off.
Replace Ribbon Cartridge
1. Open printer cover to expose the print head area.
2. Remove used ribbon by grasping side as indicated below.
3. Take new ribbon cartridge (PN 128031) from its
packaging and turn knob in the direction indicted until
fabric is taut.
4. Orient and press the ribbon onto the carriage as shown
below.
Knob
Grasp Here
Grasp Here