Losi LOSB0012LE User Manual User Manual
Page 5
Page 8
Page 9
Radio Operation
It is important that you familiarize yourself with the radio system, as this is your direct link to the model.
• Never run your model with low receiver or transmitter batteries.
• Never leave the power on or the batteries will not last long.
• Always turn the transmitter ON before turning the model ON.
• When finished running, always turn the model OFF before the transmitter.
• For best operation, it will be necessary to keep the “trims” adjusted for both the steering and throttle
as noted below.
Steering Trim: The model should go straight without turning the steering wheel. If not, turn the trim knob marked “ST.
TRIM” found to the upper right of the steering wheel in the direction needed to make it do so. If this is not enough, please
refer to “Synchronizing the Steering Servos” below and reset your trim.
Throttle Trim: The model should idle without the tires rotating when the trigger is at its neutral position. If not, turn the
trim knob marked “TH.TRIM” located to the lower right of the steering wheel counterclockwise to reposition the throttle
servo until it does. Note that additional braking force is applied when you push the trigger forward.
Synchronizing the Steering Servos: If you remove the steering servos or the servo savers you will probably have to
make some small adjustments to ensure they are working together at maximum capacity. With the servo savers removed
and the linkages attached:
• Turn on the radio and reset the steering trim knob so the raised dot is lined up
with the line extending from the words “ST. TRIM”.
• Loosen the setscrews securing the linkage slightly and mount the servo savers
so they are timed as closely as possible like that seen in the photo.
• Use the steering trim on the transmitter to fine-tune the timing of the
servo savers.
• Make sure the front tires are pointing forward and lock the steering linkage in
place by tightening the setscrews.
Maintenance
In addition to the service needs pointed out in this guide, you should try to maintain your new truck for proper
performance and to prevent wear. If dirt gets in the moving parts it can seriously hinder the performance of the model.
Use compressed air, a soft paintbrush, and/or toothbrush to remove dirt and dust. Avoid using solvents, if possible, as this
can actually wash the dirt into bearings and areas not accessible without disassembly causing additional wear. We suggest
you follow these basic guidelines. Remove as much freestanding dirt and dust as noted above. Never leave fuel in the tank
for more than a couple of hours. When done running for the day or longer, let the engine run out of fuel. Remove the air
cleaner and pour a little liquid or spray type penetrating oil, or quality after-run engine oil into the carburetor and spin
the engine over a few seconds. If needed, clean and re-oil the air cleaner before installing it back on the truck. Inspect the
truck for worn, broken, or binding parts and repair as necessary.
Adjusting the Slipper
The slipper is a key component of the drivetrain that is designed to help absorb sudden or
large impacts that would otherwise stress various drivetrain parts. You should never run
the Aftershock with the slipper locked (completely tight). The slipper can also be used as
a tuning aid for extremely slick conditions. To adjust the slipper start by turning the 1/4”
adjustment nut clockwise (tighten) until it gets tight and the spring is compressed. Do
not over-tighten as you will strip the nut. Now turn the adjustment nut counterclockwise
(loosen) one full turn. This should be a good overall setting.
Slipper–1 Turn Out
2-Speed Adjustment
When new and during engine break-in, the two speed will not shift. Only after the engine has been broken in and the
needle valve adjusted, if necessary, will it start shifting. You may need to adjust the shift point after a while as the shoes
wear in.
Although pre-adjusted at the factory, the two speed can be adjusted to shift at the point that suits you best. Under normal
circumstances, it should shift slightly before the engine reaches maximum power. The actual distance traveled will vary
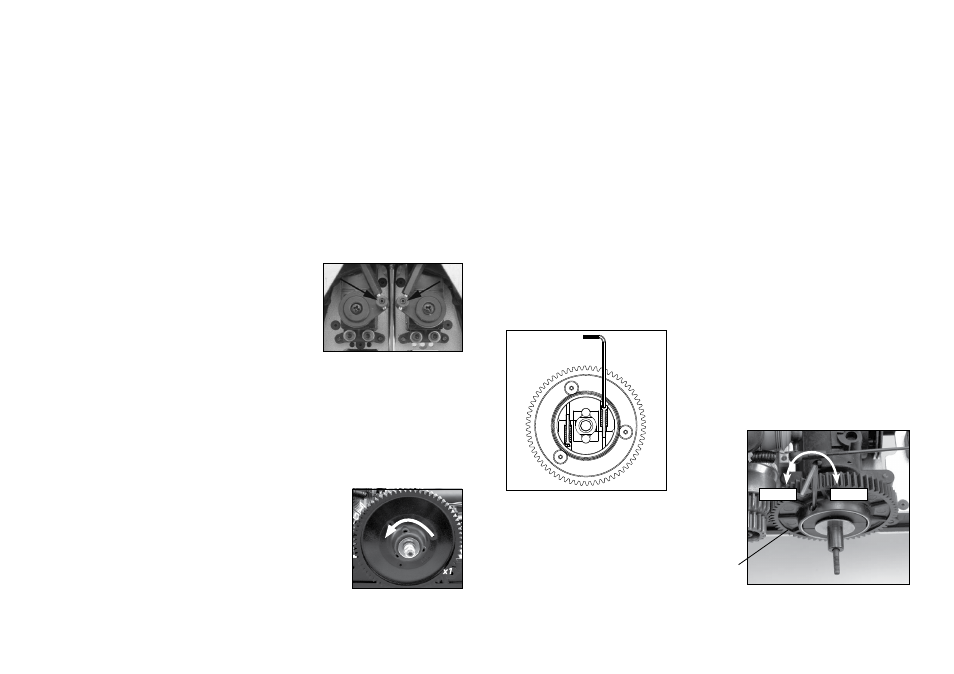
with the gear ratio and tune of the engine. There are two adjustment screws (see fig 1) that must be changed evenly for
the two speed to function correctly. Turning these clockwise will make it shift later and require the engine to rev higher.
Turning them counterclockwise will make it shift earlier and require less engine speed. If you should get lost adjusting the
two speed, start over at the factory setting by lightly bottoming out the adjustment screws and then backing them out five
full turns. The procedure for adjusting the two speed is as follows.
• Remove the gear cover.
• Turn the spur gears until the adjustment hole is visible in the bell housing between the large and small spur gears.
• Hold the small spur gear and, using your thumb, rotate the slipper forward until you can see the head of one of the
adjustment screws.
• Use a 5/64 Allen wrench to make your adjustment in 1/2-turn increments. Use the bent leg of the wrench
as your guide.
• Turn the slipper forward 1/2 rotation to adjust the other adjustment screw like the first.
(Remember to always adjust BOTH screws the same amount)
• Test drive the model to check the new shift point and replace the gear cover if satisfied.
• Never run your model without the gear cover, as it is dangerous and gear damage will occur!
Turning the adjustment screws counterclockwise
makes the 2-speed shift sooner; turning clockwise
will make it shift later.
Figure 1
Always adjust BOTH adjustment screws evenly.
Note: Outer (1st) spur
gear removed for
photo.
Later
Sooner