Warning, Luxur y-lift, Power recliner assembly instr uctions – La-Z-Boy Luxury-Lift Power Recliner User Manual
Page 5: Power recliner assembly details: f, 10 f, 12 f
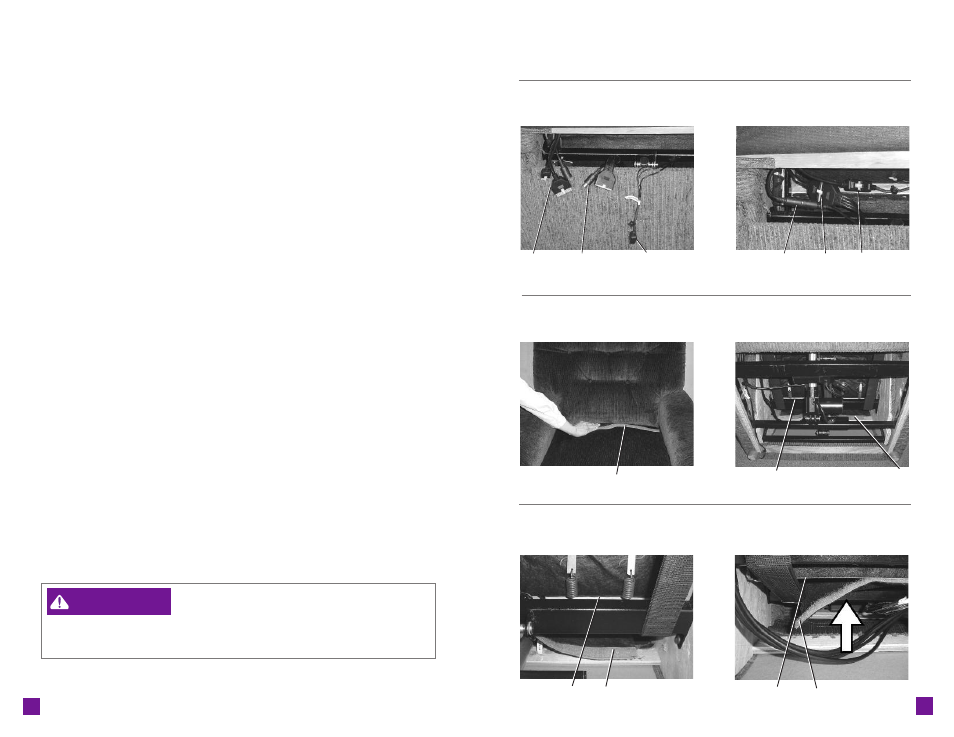
6. Lift the back upholster y cover to locate and identify the connector s . Do not
connect until instr ucted.
•
The two large, rectangular, 20-pin connector s are the Motor Power
connector s (F
I G U R E
7).
•
The two round connector s are the Hand Wand connector s (F
I G U R E
7).
•
The two small, rectangular connector s are either the heat or the heat
and massage connector s , depending on the style of your chair. The 1LL
lift chair s have heat in the back and seat, and the 1LM lift chair s have
heat and massage in the back and seat.
•
The 1LL lift chair s have two small, rectangular, 2-pin connector s
for the war ming pads (not shown).
•
The 1LM lift chair s have two small, rectangular, 8-pin connector s
for the war ming pads and massage motor s (F
I G U R E
7).
7. Connect the Motor Power connector s .
•
Align the clips on the connector s and push the connector s together
until they lock (F
I G U R E
8).
8. Connect the Hand Wand connector s .
•
Align the connector s and push the connector s tightly together (F
I G U R E
8).
9. Connect the heat or the heat and massage connector s .
•
Align the clips on the connector s and push the connector s together
until they lock (F
I G U R E
8).
•
Tuck all connections inside the back.
10. From the front of the chair, push the black nonwoven fla p with fastening
ta pe, between the seat and the back, toward the back of the chair
(F
I G U R E
9). Roll the chair onto its back.
11. Attach the black nonwoven fla p to the back seat spr ing rail, to for m a
pocket between the seat and the back that prevents objects from falling
into the mechanism.
•
Locate the fastening tape on the black nonwoven flap and the fastening
ta pe on the back seat spr ing rail (F
I G U R E
10). The fastening ta pe on the
back seat spr ing rail faces the back of the chair and is not easily visible.
•
You can locate the fastening ta pe on the back seat spr ing rail
by feeling under the rail (F
I G U R E
11), or by laying on the floor
and looking under the back seat spr ing rail (F
I G U R E
12).
•
Attach the black nonwoven fla p to the back seat spr ing rail by pressing
the fastening ta pe together, wor king from the center out (F
I G U R E
12).
•
Lift the elastic bands to connect the ends of the fastening ta pe.
•
Retur n the lift chair to the upr ight position.
–
To reduce the risk of serious injur y:
•
Provide a clear path for operation of the back and legrest. Place
ta bles and area r ugs at a distance to allow the legrest to fully extend
without r ubbing or interference.
12. Choose a location for the lift chair that is close to an electr ical outlet.
(Assembly Instructions Continued)
Luxur y-Lift
®
Power Recliner
Assembly Instr uctions:
9
8
Luxur y-Lift
®
Power Recliner
Assembly Details:
F
I G U R E
8
F
I G U R E
10
F
I G U R E
9
Motor
Power
Connector
Hand Wand
Connector
Heat and
Massage
Connector
F
I G U R E
7
Hand Wand
Connection
Motor
Power
Connection
Heat and
Massage
Connection
Black Nonwoven Flap
with Fastening Ta pe
Black Nonwoven Fla p
with Fastening Tape
Back Seat
Spring Rail
F
I G U R E
12
F
I G U R E
11
Back Seat
Spring Rail
Black Nonwoven Flap
with Fastening Tape
Back Seat
Spring Rail
Black Nonwoven Fla p
with Fastening Tape
Front
Back of Chair
WARNING