Notice, Warning, Luxur y-lift – La-Z-Boy Luxury-Lift Power Recliner User Manual
Page 4: Power recliner assembly details: f, 3luxur y-lift, Power recliner assembly instr uctions
Luxur y-Lift
®
Power Recliner
Assembly Details:
F
I G U R E
2
F
I G U R E
4
F
I G U R E
3
Luxur y-Lift
®
Power Recliner
Assembly Instr uctions:
Power
Transfor mer Box
Power Transfor mer
Connector
7
6
F
I G U R E
1
Cable Tie
Fastening Ta pe
Black Nonwoven Flap
F
I G U R E
6
F
I G U R E
5
Back and Body
Brackets Engaged
Locking Lever in Locked Position
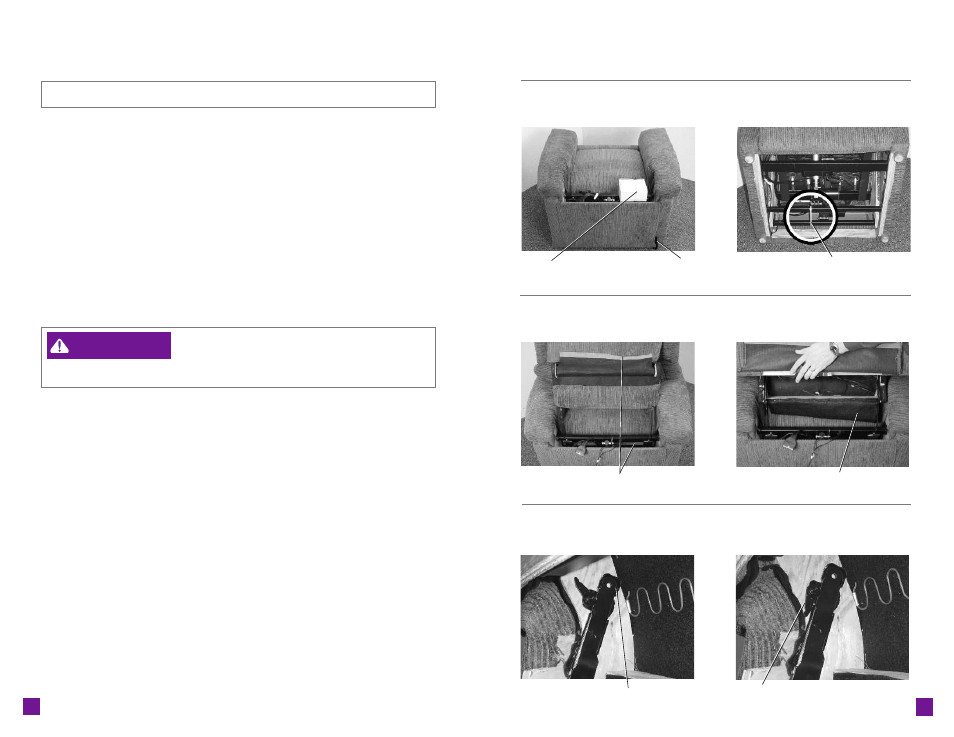
NOTICE:
Do not plug the transformer in until instructed.
1. Carefully cut the ca ble tie holding the Power Transfor mer box to the rear rail
(F
I G U R E
1). Set the box aside.
2. The Power Transfor mer connector is tucked into the rear upholstered panel,
toward the bottom of the chair (F
I G U R E
1). Remove the Power Transfor mer
connector from the upholstered panel.
3. Roll the lift chair onto its back side. Locate the cable tie on the rear base (F
IGURE
2).
•
Carefully cut the ca ble tie secur ing the lift base (F
I G U R E
2).
•
Retur n the lift chair to the upr ight position, being careful not to pinch the
Power Transfor mer connector or cord.
4. Lay the back across the chair ar ms with the front of the back facing the seat.
•
Note the location of the fastening ta pe on the black nonwoven fla p and
the fastening ta pe on the back seat spr ing rail (F
I G U R E
3). Do not attach
the fastening ta pe at this time.
•
Lay the black nonwoven fla p down toward the seat (F
I G U R E
4).
–
To reduce the risk of injur y:
•
Do not operate the unit until the back is installed and locked.
5. Install the back.
•
With the back across the chair ar ms , lift the back at a slight angle and
align the brackets on the back with the brackets on the body.
•
Lower the back onto the body, making sure the back and body brackets
are completely engaged (F
I G U R E
5).
•
Lift the back upholster y cover to visually confir m that both sets
of back and body brackets are engaged (F
I G U R E
5). If one or
both brackets are not engaged, remove the back and repeat
the steps a bove.
•
If you are una ble to install the back proper ly contact your
La-Z-Boy
®
dealer for assistance.
•
Lock the brackets by using a screwdr iver to push down the locking
lever s (F
I G U R E
6).
(Assembly Instructions Continued)
WARNING