Kidco G2301 User Manual
Page 9
U S E R G U I D E
9
16
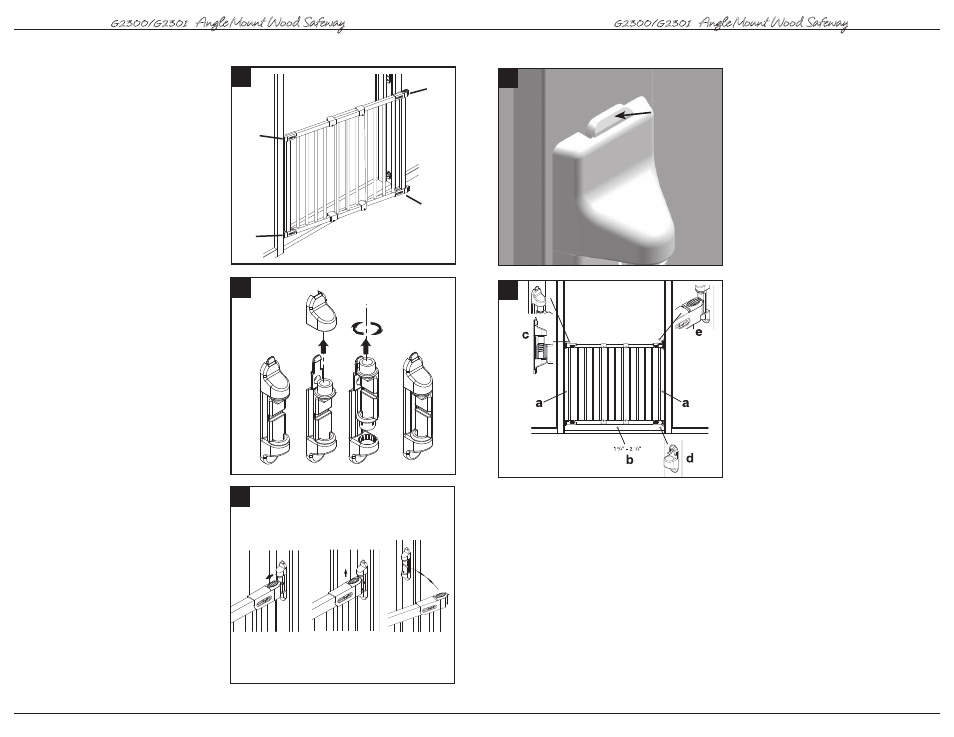
Temporary removal
The gate may be removed by pressing back
on the locking tab on top of upper hinge
while sliding the hinge cap up. Remove
spring and lift gate off top and bottom
hinges.
FOR SAFETY REASONS, RETURN
SPRING AND HINGE CAP ONTO HINGE
POST, MAKE SURE CAP IS LOCKED
IN PLACE.
17
If gate is outside mounted to a wall
(instead of doorframe) it is very important
that the wall hardware is flush with the edge.
When the gate is in place make sure that:
a) The distance between the wall/doorframe
and the 1st bar is less than 2 ¾” on
both sides.
b) The distance between the floor and the
lowest part of the gate frame is between
3
/
4
” - 2
1
/
2
”.
c) The spring is placed on top of the hinge
part on the gate. It must not be underneath.
d) The stop pin is placed so that the gate can
not open out over the stairs - if any.
e) The catch on the handle can move freely
(back and forth) and that it fits properly into
the slot on the upper locking bracket.
f) All screws are tightened.
NOTE: GATE SHOULD ALWAYS BE IN THE
LOCKED POSITION. IF GATE IS OPEN AND
EXCESSIVE PRESSURE IS APPLIED, (SUCH
AS STANDING OR SWINGING ON THE GATE)
STRUCTURAL DAMAGE MAY OCCUR.
16
Operación
U S E R G U I D E
24
13
Centre la reja en la abertura. Afloje los
tornillos de las piezas (H), (I), (J) y (K) y
ajústelos de manera que descansen
firmemente en la bisagra y en los soportes
del lado del mecanismo de cierre. La
distancia entre la reja y la pared o el
bastidor de la puerta debe ser
de 1” - 3”.
14
Si la reja se instala en ángulo,
necesitará girar la pieza (R) para que el asa
de la reja descanse de manera segura
dentro del soporte superior del mecanismo
de cierre. Una vez que el asa de la reja
descanse seguramente en el interior del
soporte del mecanismo de cierre, deslice la
tapa de cierre (Q) en el soporte superior del
mecanismo de cierre (W).
IMPORTANTE: ASEGÚRESE DE QUE
LA TAPA DE CIERRE NO SE PUEDA
EMPUJAR HACIA ARRIBA Y QUE
ESTÉ FIJA EN SU LUGAR.
Asegúrese de apretar todos los tornillos
de la reja.
15
Para abrir la reja, con su pulgar hale
hacia atrás el mecanismo de cierre y
levante la reja hacia arriba y hacia afuera
del soporte.
Al cerrar la reja, asegúrese de que tanto la
parte superior como la inferior del lado del
cierre estén descansando de manera
segura en los soportes, y que el cierre
superior esté cerrado.
15
17
G2300/G2301
Angle Mount Wood Safeway
®
G2300/G2301
Angle Mount Wood Safeway
®
14
Q
R
W
J
I
H
K
13