Go to the inlet supply water connection, Ews, inc. / environmental water systems 4.2-6 – Environmental Water Systems RU Series User Manual
Page 6
EWS, Inc. / Environmental Water Systems
4.2-6
www.EWSWATER.com office: 702-256-8182 (m-f; 8:30-4:30, pst) fax: 702-256-3744 [email protected]
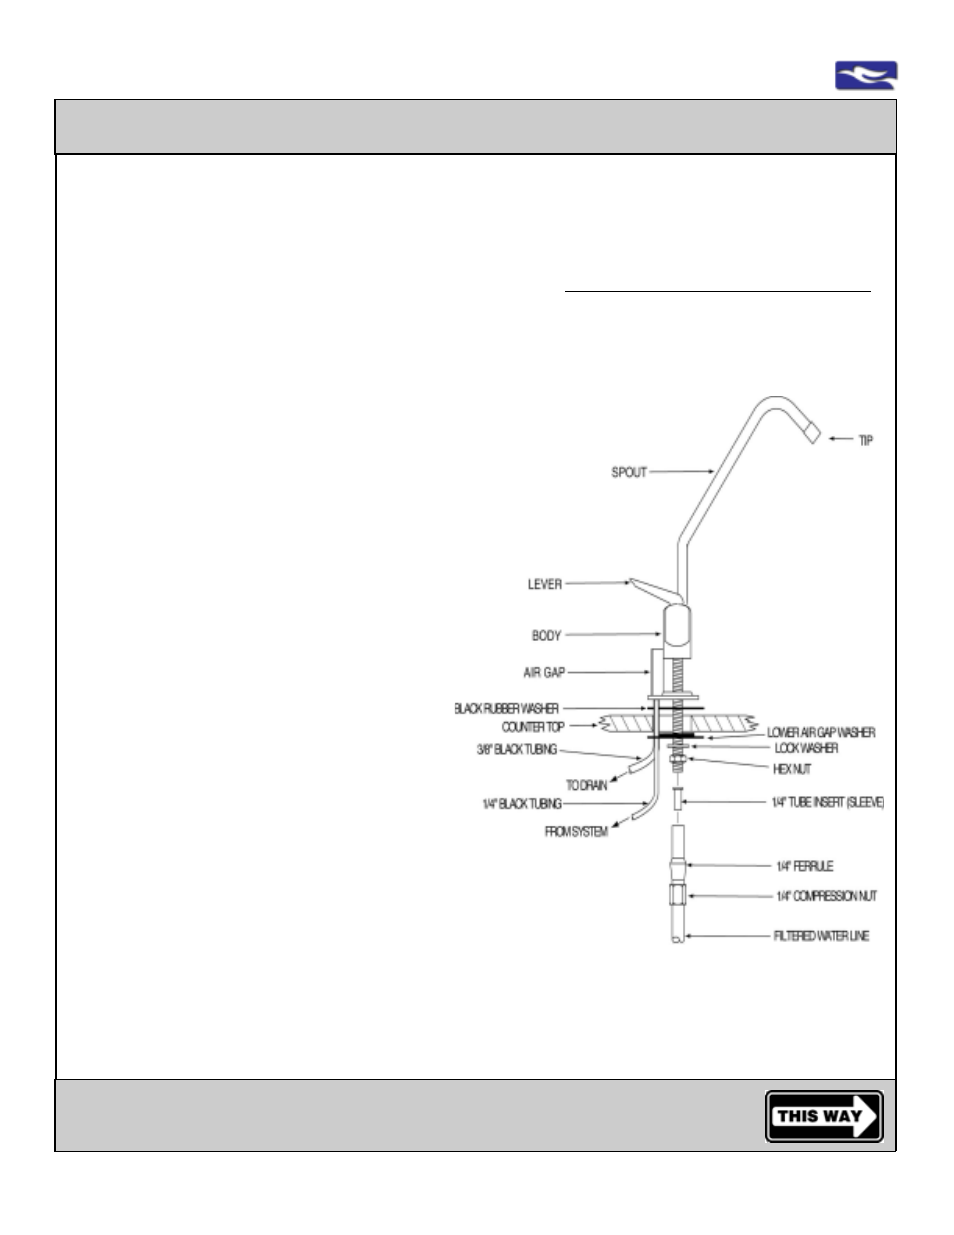
Installation of the Supplied Dispenser/Faucet with Air Gap
Step by step instructions to mount and secure the supplied dispenser/faucet
If using another faucet, please review the instructions included with that product**
Above the Surface
Step 2:
Place air gap to bottom of faucet body***
(optional: place flat white washer under decorative washer)
Step 3:
Place black rubber washer below air gap
(or below optional flat white washer)
Step 4:
Place faucet stem through hole and center
Below the Surface
Step 5:
Insert white beveled washer, bevel side up to
fit snugly into a (1 3/8”) pre-drilled hole or flat side
up depending on the application
Step 6:
Place lock washer on this white beveled washer
Step 7:
Spin hex nut onto faucet stem and
tighten hex nut and washers into place
***Other Air Gap connections can be found with
Drain Installation and Connection and System Interconnection instructions
Step 8:
Slide 1/4” compression nut (threads up)
onto 1/4” filtered line
Step 9:
Slide 1/4” plastic compression ferrule, long side
down onto filtered water tube. Ferrule will seat into
compression nut
Step 10:
Insert 1/4” tube insert sleeve into 1/4” filtered water line
Step 11:
Insert 1/4” blue (filtered water) tube into faucet stem. Leave
other end available for system interconnection
Step 12:
Thread 1/4” compression nut onto faucet stem and tighten
CAUTION: Do not overtigthen fittings
Enclosed Dispenser/Faucet Dimensions***
Height: from deck to top of dispenser 8”
from deck to tip of dispenser 6 1/4”
Reach: from center of dispenser to tip 6”
Hole:
minimum required with air gap 1 1/4”
maximum
1 3/8”
Note:
Spout pulls out from faucet body and has 2 o-rings at base. Insert completely into bottom of faucet body to prevent
leaking. Spount swivels to direct water. Handle and tip can be removed. Handle can be locked up in open position.
** Other faucets check with specifications.
***All dimensions are approximate.
Go to the Inlet Supply Water Connection