Drain installation and connection, Go to the connections of tubing, Ews, inc. / environmental water systems 4.2-12 – Environmental Water Systems RU Series User Manual
Page 12
EWS, Inc. / Environmental Water Systems
4.2-12
www.EWSWATER.com office: 702-256-8182 (m-f; 8:30-4:30, pst) fax: 702-256-3744 [email protected]
Step 1:
From the parts bag locate:
Drain saddle assembly and the 1/4” x quick connect fitting that is needed for the application
For use with a non-air gap installation: use (smaller) 1/4” quick connect fitting x 1/4” mpt
For use with an air gap installation:
use (larger) 3/8” quick connect fitting x 1/4” mpt
Step 2:
Place the drain saddle but do not tighten.
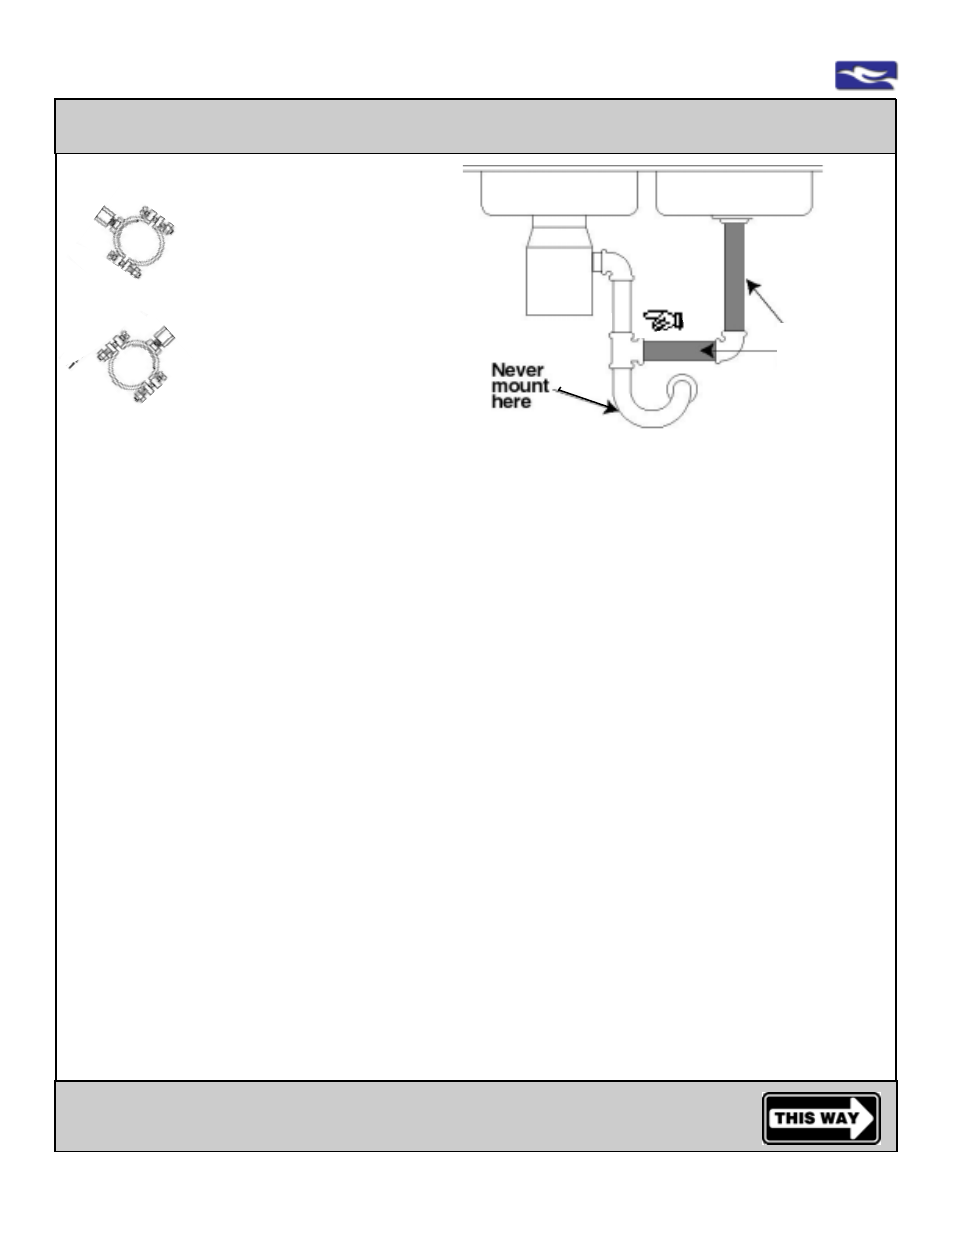
Placement of drain saddle should be located on the vertical tail piece of the plumbing system
at least 2” above the horizontal outlet or trap assembly.
NOTE:
On the vertical pipe: The higher the placement on this pipe, the greater the chance of
increased noise in your waste line. Drain connection should be pointing out or towards you
as you look into the cabinet.
On the horizontal pipe as an alternate location: See illustration A, the drain saddle should be
at a 10 o’clock or 2 o’clock position
Step 3:
Once the drain saddle is placed, use a 1/4” drill bit, and drill a hole slightly above the drain
saddle. Do not drill through the other side of the pipe.
Make sure the one hole is complete with clean edges and clear of debris.
WARNING:
IF DRILLING METAL PIPE, PROTECT YOURSELF FROM SERIOUS INJURY OR FATAL
SHOCK, USE A HAND DRILL OR A CORDLESS DRILL TO MAKE THE HOLE. IF YOU USE
AN ELECTRIC DRILL, OUTLET MUST BE GROUNDED. USE SAFETY GLASSES OR OTHER
EYE PROTECTION WHEN GRINDING TO PREVENT POSSIBLE EYE INJURY DUE TO FLY-
ING PARTICLES.
Step 4:
Loosen drain saddle and slide over the 1/4” hole. Make sure the hole in the drain pipe is
aligned with the hole in the drain saddle. Tighten drain saddle using a screwdriver, alternating
sides for even tightening.
Step 5:
Using Teflon tape (not included) wrap 1/4” male threads on 1/4” x quick connect fitting
(selected for air gap or non-air gap application) using clockwise motion for at least three
revolutions. Hand tighten fitting clockwise into drain saddle.There is no need to overtigthen.
WARNING:
Never mount off the garbage
disposal drain pipes.
When installing drain saddle on a
horizontal pipe - install connection
at the 10 o’clock or 2 o’clock
position (as illustrated to the left)
This allows for the proper flow of
RO rejection water and will help to
prevent any cross-contamination
Drain Installation and Connection
Go to the Connections of Tubing
Illustration
A
Mount
drain saddle
at either
location
(shown in dark)
when using
two (2) sinks
disposal
trap
sink #1
sink #2
strictly for illustration purposes only
Mount
drain saddle
here when
using only
one (1) sink