Jambs, Magnetic catch kit, Push / pull handle kit – Coral Industries Hyaline Swing Door/DPNL (1/4 Frameless) - 6T0 User Manual
Page 3
6T0 6/09
Position jamb (D) on sill with short legs against wall and
bottom of jamb inside sill. If necessary, file sharp edges on
bottom of jamb to fit rounded corners of your unit.
Align jamb vertically using a level. Drill mounting holes
through jamb into wall using 1/8" drill bit. Mounting holes are
normally located 3" from top and bottom of jamb and at center.
Secure jamb to wall using 8A x 1 1/4" pan head screws (L).
Repeat for opposite side.
Level
Sill
A
OUTSIDE OF
SHOWER
Drill 3" from top and bottom
of jamb, and at center.
Jamb
D
File sharp
edges to fit
rounded
corners of
your unit if
needed.
When anchors (N) are used holes should be drilled
using 3/16" drill bit.
8A x 1 1/4"
Pan Head Screw
L
3
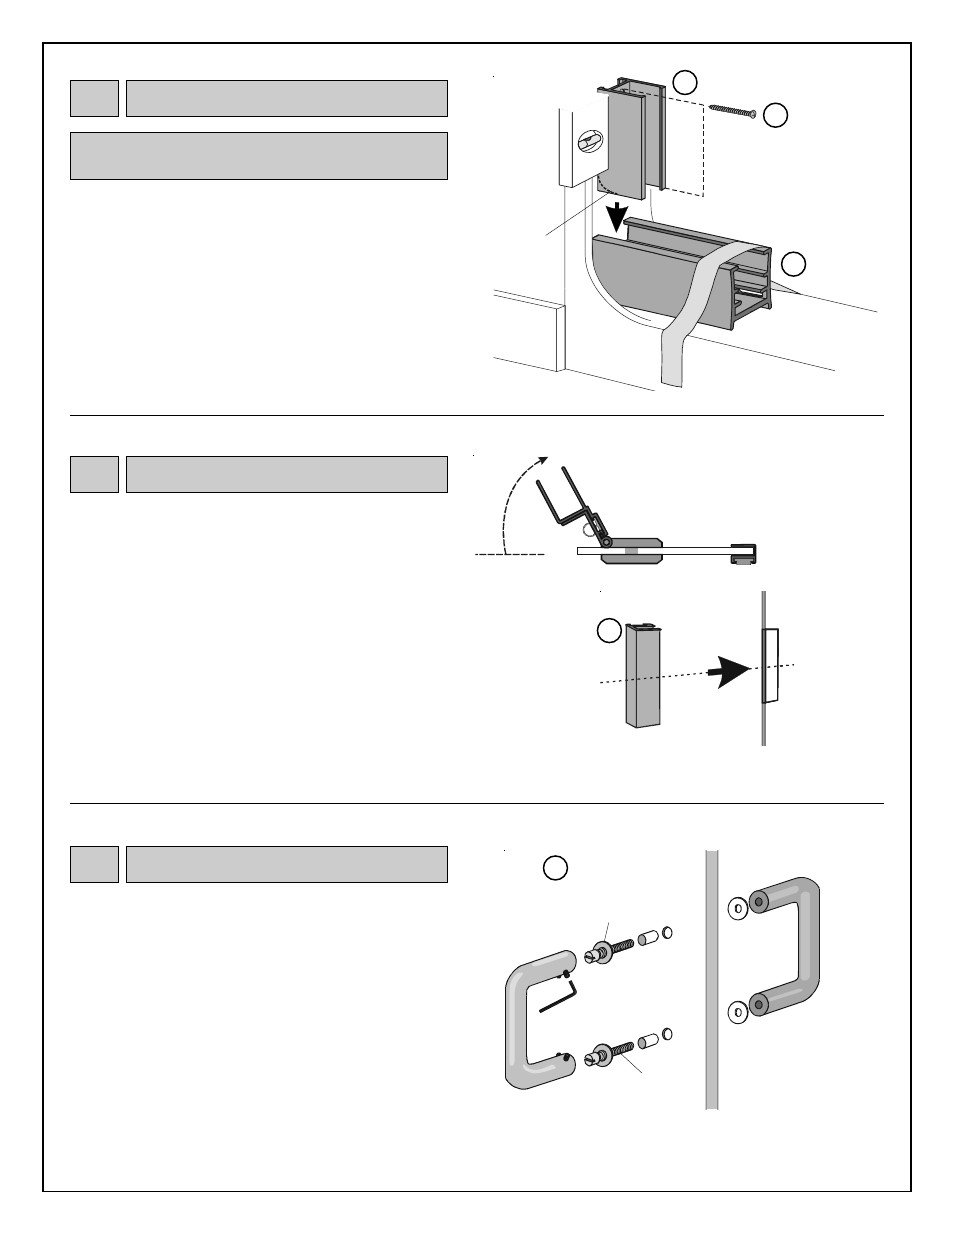
Jambs
(D)
Hinge Door Stop
(Swings toward outside
surface of glass)
Outside surface of panel
Magnet Holder
with Magnet
(Magnet faces
inside of shower)
R
Center
Handle
Vinyl
OUTSIDE
SURFACE OF
DOOR
4
Magnetic Catch Kit
(R)
Lay door panel, with hinge door stop attached, on a work table
covered with cardboard or carpet. Position so that hinge door
stop swings up as shown. This will be the outside surface of
your door panel (facing up). Adjust door on work table so that
opening edge and handle holes extend past table edge.
Mark center of glass on opening edge of door panel.
Wrap handle vinyl, from magnetic catch kit (R), over edge of
glass. Thinner glass may require the use of two pieces of vinyl
to insure a tight grip between handle and glass.
Hold metal slide for installation later. With a rubber mallet, tap
magnet holder, with magnet attached, onto glass. Magnet
should face inside surface of door panel.
5
Push / Pull Handle Kit
(K)
Push / Pull handle kit (K) comes with parts assembled in the
order they will be once installed on glass. Disassemble parts.
Place bushings in holes in glass. Trim as needed so that
bushings are flush with surface of glass. Place one plastic
washer on each connector screw and insert screws (from
inside surface of glass) through bushings in glass.
Place second plastic washer on exposed end of connector
screws on outside surface of glass. Holding exterior handle in
place on outside surface of glass, tighten connector screw to
secure handle.
On inside surface of glass, slip interior handle over connector
screws and tighten with 3/32" allen wrench provided.
Exterior
Handle
Plastic
Washer
Handle
Connector
Screw
Bushing
Plastic
Washer
INSIDE OF SHOWER
3/32 Allen
Wrench
Interior
Handle
Push/Pull Handle Kit
K