Code 3 Excalibur User Manual
Page 12
12
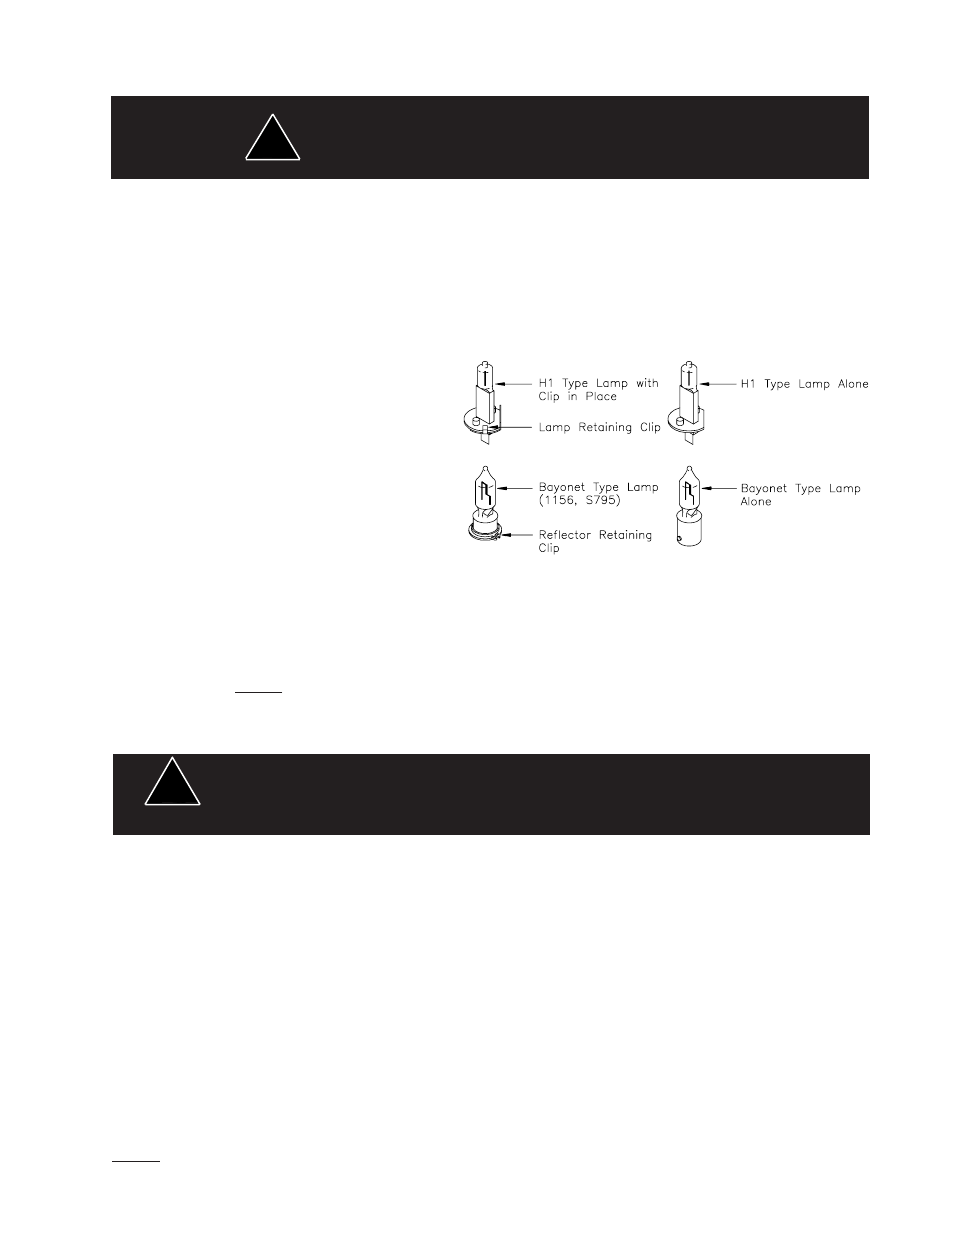
Figure 7
S-795 (Bayonet Style): Push down and turn to
remove lamp. Install a new lamp the same way.
Note: If attempting to clean the reflector, use only
a mild glass cleaner and a very soft cloth. Do not
attempt to use any wax type products as these will
burn onto the reflector.
Changing Lower Unit Lamp and/or Filter
Refer to Figure 10. Remove the reflector assembly
by removing the appropriate fasteners, then remove
the snap-on filter if necessary. In most cases, these
lamps will be a bayonet style, so simply push in and
turn counterclockwise to remove.
Replacement for Upper and Lower Level Components
See exploded view "Parts Section" for fastener removal, component location, and assembly
configuration. Caution, extreme care must be taken when installing components to prevent pinching wire connections
and to avoid interference with moving assemblies.
!
WARNING!
High voltages and/or temperatures are present inside the unit. Disconnect from power
and wait 10 minutes prior to servicing or troubleshooting. Use hand and eye protection
when changing halogen lamps or flashtubes.
Strobe Filter Replacement
Refer to figure 8. The filter can be removed by unsnapping it from the light head and by removing the mirror if present for clearance.
Prying the filter from the front may damage the glass strobe tube or reflector.
To replace the filter, reverse the above procedure. The filter should be fully engaged on the light head assembly. Care should be taken
to not damage the strobe tube or to scratch the reflective surface of the reflector when replacing the filter.
Strobe Light Head Replacement
Refer to figure 8. Disconnect the light head assembly from the strobe power supply and remove the filter if any. Unfasten the screws
attaching the light head mounting bracket to the light bar chassis and remove the light head from the light bar. On a bench or other
work suitable work surface unfasten the screws attaching the strobe light head assembly from the light head mounting bracket. Install
the new strobe light head assembly to the light head mounting bracket and reinstall the light head back onto the light bar chassis.
Reconnect the light head wiring to the strobe power supply and reattach the filter. It is important to reroute and secure the wiring as
close as possible to its original position.
Caution, verify that no wires are interfering with the operation of the fan located at the end of the power supply.
Changing Rotating Reflector Lamps
WARNING!
Lamps are extremely hot! Allow to cool completely before attempting to remove.
Gloves and eye protection should be worn when handling halogen lamps as they are
pressurized and accidental breakage can result in flying glass.
!
Remove the lens as outlined above. Next, inspect the lamp and compare to
Figure 7
to determine lamp type. It may be
necessary to remove any rotating or cylindrical filters to make access easier. Note: Make sure lamp is cool before attempting
to change it. Also, when installing a new lamp, be sure not to touch the glass with fingers. If contact is made, clean the glass
with a soft cloth after inspection.
H-1: First grasp lamp at base and turn until retaining clip tab is accessible. Using a blade screwdriver, remove retaining clip
and pull lamp straight up. Replace with new lamp. Insure that the power lead and retaining clip is fully seated.