Start recording, G-1), 1 hold the camcorder as in the figure – Sony CCD-F301 User Manual
Page 12: 5 slide standby up, 6 press start stop, To pause (to stop momentarily), To stop, For tow-positlon shooting (g-2), If the tape reaches near the end during recording, Notes on recording
Attention! The text in this document has been recognized automatically. To view the original document, you can use the "Original mode".
Recording a Picture Using
Automatic Adjustment
Make Sure liie preparations on page 11 are
complete belore recording
Start Recording
(G-1)
Before recording once-only ' events, we strongly
recomrrend making a trial recording and
checking that everything is working perfectly.
Make sure BEEP is set to ON. Beep will sound
when you start and slop recording.
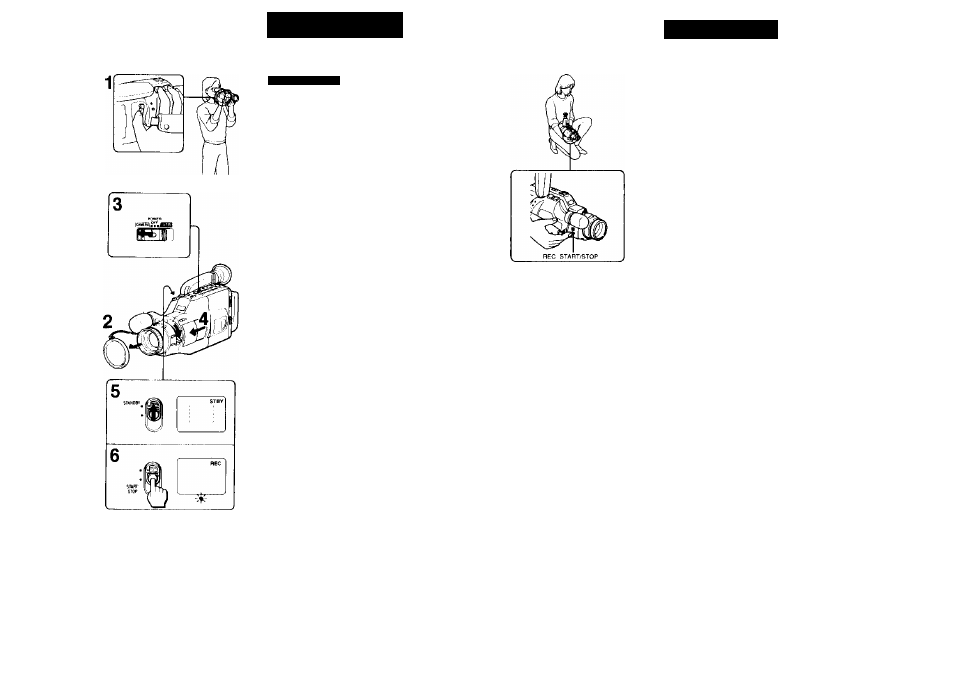
1
Hold the camcorder as in the figure.
Put your hand through the grip strap and
make sure that your thumb can easily touch
START.STOP.
2
Remove the lens cap and attach it to the
grip strap.
3
While pressing the green button, set
POWER to CAMERA.
4
Close the AUTO LOCK cover and turn the
zoom lever downwards.
5
Slide STANDBY up.
STBY appears in the viewfinder The
camcorder is now in the standby mode, and
focus IS adjusted automatically inside the
dotted frame m the illustration (auto-focus
adjusting range! Do not turn or stop the focus
ring forcibly
■ The dolled frame is not displayed in the
viewfinder.
6
Press START STOP.
A beep sounds. REC appears and the red
lamp lights up in the viewfinder and the
camera recording battery lamps light on the
camcorder The camcorder is now recording
To pause (to stop momentarily)
Press START STOP again.
Two beeps sound and STBY appears m the
viewfinder The camcorder is m standby mode
again
To stop
Slide STANDBY down and set POWER to OFF
?2
Recording a Picture Using
Automatic Adjustment
For tow-positlon shooting (G-2)
The viewfinder can be turned up 90 degrees.
Use the REC START STOP button on the front
right of the camcorder
1 Press REC START STOP to start recording.
2 Press It again to stop recording
If the tape reaches near the end during recording
Ttie E?t3 indication in the viewfinder and the camera
recording battery lamps on the camcorder blink slowly
When the tape reaches Us end blinking becomes rapid
and beeps sound lor about 5 seconds (it the BEEP
witch IS
loONi
Notes on recording
• To record from the beginning of the tape, run the lap
lor about 15 seconds before recording Tbis will avon
missing the starling poinl when the tape is played
• If POWER IS moved during recording, the tape will
• When moving from indoors to outdoors, or vice vers;
slide STANDBY up and point the camcorder at a
while object for about 15 seconds so lhal Ihe white
balance is properly adjusted
Note on standby mode
If you leave the camcorder m the standby mode tor 5
minutes or more, the camcorder will be automatically
luined off To resume the standby mode, slide
STANDBY down once and slide it up agam To start
recording, press START STOP directly.
Note on light sources
If you are shooting a subject under bright condiiions jus
alter shooting m a dark place, the picture may not
appear in the viewfinder In this case point the
camcorder to another direchon
This camcorder records in the SP (approilmaiely
1.43 cm/$ecoryd) and can play back in the SP mode
and the LP mode (apprexlmateiy 0.72 cm/second).
The quality of the playback picture In thé LP mode,
however, will not be as good as that In the SP mode.
PCM recording or playback is irei possible wfth this
camcorder.
The PDM sound recorded or after-recorded with
another video recorder cannot be played back with
this eamcoidèr
23