V.a.l.e, Gsx-r1000 – Two Brothers Racing Suzuki GSX-R1000 User Manual
Page 2
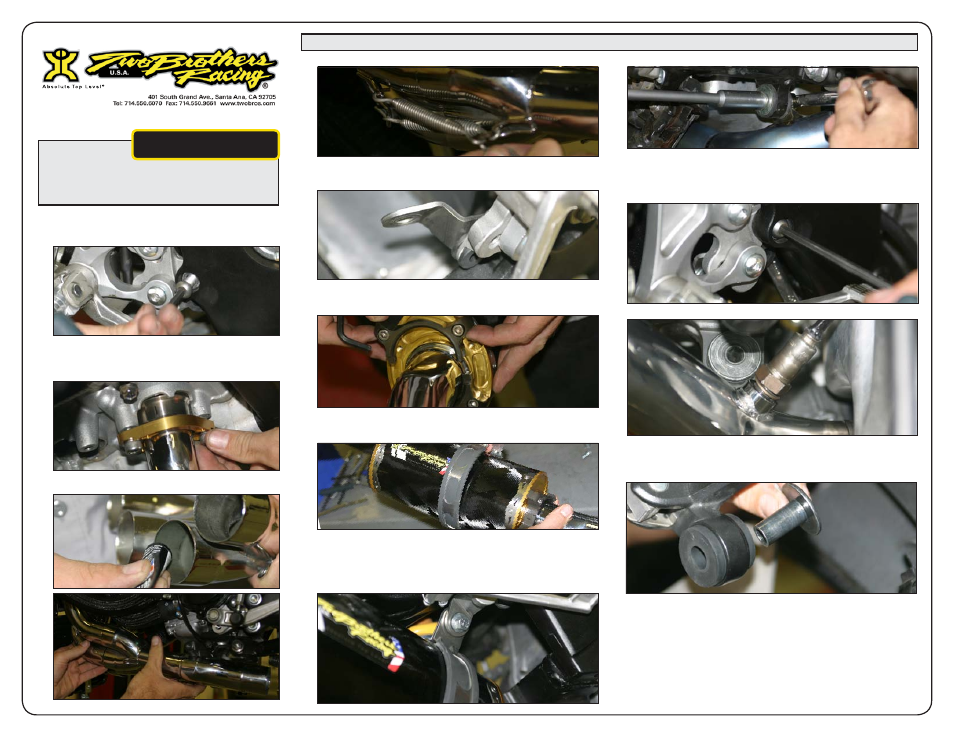
17. Attach slip-tube to OEM bracket using OEM bolt and supplied nut.
18. Tighten header flange bolts and re-install radiator bolts.
19. Tighten X-Ring bolts.
20. Tighten mounting bracket nut and bolt.
21. Install O2 sensor to slip-on tube.
22. Re-install fairings.
23. Remove all inner sleeves from OEM rubber grommets where OEM
mufflers and catalyst were mounted.
24. Check for clearance and adjust if needed.
25. Double check your work to ensure everything is tight and properly installed.
26. Before you run the bike, clean off all fingerprints and dirt, as any oily
residue will etch the metal and become somewhat permanent when
the system gets hot. Run the bike and enjoy. It is normal for some
white smoke to appear the first time you start the bike. This is packing/
manufacturing oil from inside the pipe burning off. Check for gaps or
leaks. If you find a leak, a little high temperature silicon sealant should
fix it. After 50 to 100 miles, recheck all fasteners for tightness.
V.A.L.E.
V a r i a b l e a x i s l o c k i n g e x h a u s t
TM
Instructions (continued)
2009-10 Suzuki
GSX-R1000
V.A.L.E.™ Full Titanium Exhaust System with M-2 Exhaust Canister
Part # 005-2420606V / 005-2420607V / 005-2420608V
9. Remove lower right side foot rest mounting bolt and
replace with the supplied 8x35mm bolt.
10. Install TBR header 1-4, 1 being the left and 4 being the
right if sitting on the bike. Keep loose for now (make
sure to use the OEM copper gasket between cylinder
head and exhaust header).
11. Install collector assembly. Use gasket maker on all slip-
fit joints.
12. Install springs.
13. Install supplied muffler mounting bracket to previously installed
longer bolt behind right side foot rest. The bracket goes on the inside
and is held in place with the supplied nut.
14. Attach TBR muffler to supplied slip-on tube using the 2 part X-ring
and 6x14mm socket head cap screws and lock washers provided,
leave loose for now.
15. Install rubber lined muffler clamp over TBR muffler and slide muffler
assembly over TBR header making sure the supplied barrel clamp is
on the slip-tube where the exhaust joint will be.
16. Locate the muffler mounting bracket previously installed and rotate
slip-tube and muffler to desired location, secure to muffler mounting
bracket (There is a lot of adjustment because the bracket / clamp /
muffler and slip-tube may all be moved individually so keep in mind
the muffler should be as close to the swingarm as possible without
touching leaving a minimum of 1/4” clearance).