Flush mounting the display – B&G Zeus2 Glass Helm ZM Display 19 User Manual
Page 6
4 |
Display installation |
ZM Series User Manual
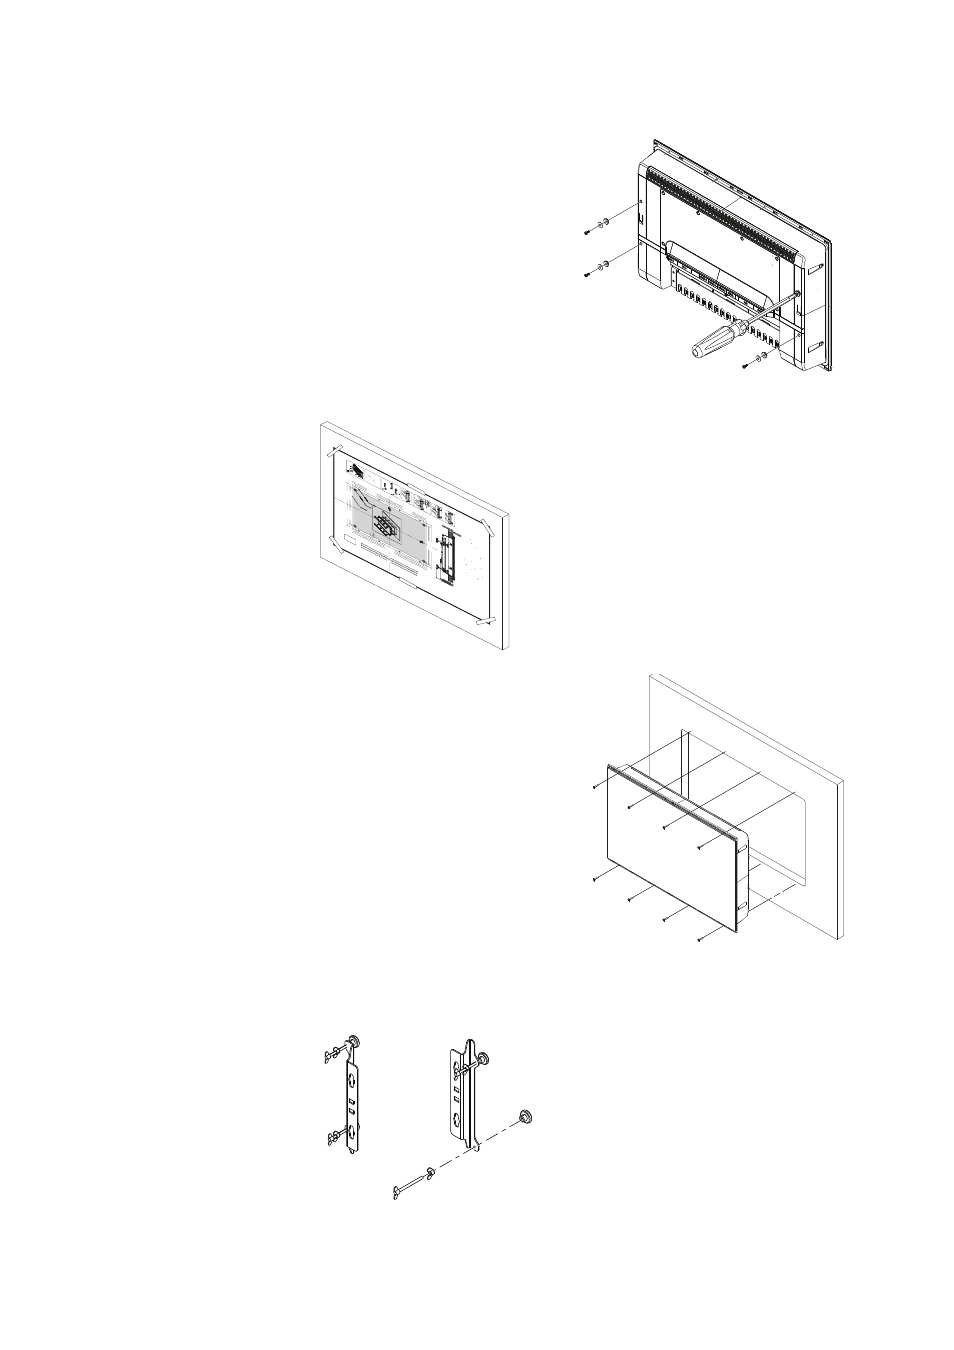
Flush mounting the display
Fit display in to dash cutout. Fit self tapping
screws and tighten them till gasket on back
of monitor just makes contact with the dash.
Tighten screws further, till bezel of monitor
is in full contact with dash surface on all four
sides. Do not machine tighten, firm hand
tightening is adequate.
Tape appropriate mounting template in place
on dash, and ensure cutout lines are level
relative to a reference point on dash. Drill top
and bottom mounting screw holes using
1.5mm drill bit.
Drill cutout corners with a small pilot drill bit
followed with 13mm drill bit. Complete cutout
with jigsaw or similar tool.
Fit the supplied M4 machine screws, washers,
and plastic spacers to each of the four
threaded fittings on the back case of screen.
Hand tighten only.
Wind wing nut on to wing screw, then wind
the wing screw assembly in to bracket till
approximately 5mm of threaded rod protrudes
through other side of bracket. Fit stopper foot
on to end of wing screw. Complete for both
threaded holes on each bracket.
REMOVE SHADED AREA
*988-10455-001*
NOTE:
DO N
OT SCALE
PRINT 1:1
IM
POR
TAN
T. Do not use this
temp
late if it has
been
res
caled
by copy
ing or
prin
ng.
If th
is is not the original,
or is a pri
nt
from a
le, please check
the dimension lines below a
re to
scale b
efore use.
IMPO
RTAN
T. Ne pas u
lise
r ce
gabarit s’il
a été pho
tocopié ou
imp
rimé en
form
at réduit
ou ag
randi.
Si ce
gabarit n
’est ni
un
original ni une
version impri
mée
d’un
chier P
DF, v
eui
llez
véri
er qu’il e
st à l
’échelle
avan
t de l
’u
lise
r.
IMPO
RTANT
E. no
usar
la plan
lla si
hay pe
ligro qu
e la es
cala
origi
nal e
xac
ta se ha al
terado por
copias
o p
rocesos de
imp
resión imp
recisos.
Si e
sto n
o es e
l original, o un P
DF, v
eri
car que l
as línea
s aba
jo e
stán
a la es
cala a
ntes de
usa
r.
WIC
HTIG.
Diesen
Vordruck
nich
t verw
enden,
wenn er du
rch
Kopie
ren
oder Druc
ken im
Maß
stab
verändert wu
rde.
Soll
te
es nic
ht das Origina
l oder ein PDF-Ausdruck
sein, müssen
unten
stehe
nde
Zeilen
vor e
rwendung
an den rich
gen
Maß
stab
an
gepa
sst w
erden.
BEL
ANGRIJK
. Gebruik
deze mal ni
et in
dien de sc
haa
l is
veran
-
derd doo
rdat h
et is
gecopiee
rd of
ged
ruk
t. Ind
ien d
eze mal
niet h
et origineel
of een pri
nt van P
DF is,
contr
oleer da
n o
f de
onde
rstaa
nde lij
nen de ju
iste
scha
al zij
n vo
orda
t u
ze gebrui-
kt.
IMPO
RTANTE.
Nã
o u
lize e
ste g
abari
to se
a es
cala do mesmo
ver s
ido al
terad
a po
r cópia ou im
pressã
o. Se nã
o for o
original o
u uma
cópia imp
ressa
de um
arqui
vo PD
F, ve
ri que
as linha
s ab
aixo, pa
ra acer
tar a es
cala a
ntes
da u
lização.
VIKTIG
T. A
nvän
d inte denna mall om den s
kalats om
genom
utsk
ri
eller
kopiering.
Om de
a inte
är original
et e
ller en
utskri
från en P
DF, k
ontro
llera a
linjerna nedan
stämmer
me
d s
kalan
innan
det a
nvän
ds.
IMPO
RTANTE.
Non u
lizzar
e que
sto modell
o se
è sta
to
ridimension
ato
cop
ian
dolo o
stampandolo
. Se que
sto non è
l’originale o la
stampa d
i un
le P
DF, v
eri
care
se le l
inee che
seguo
no de
vono
esse
re dimension
ate prima di esse
re u
lizza-
te.
TÄRK
EÄÄ
. Дl
д kдy
tд tд
tд ka
avio
ta, jo
s se
n m
i ak
aava o
n
muu
unut
kopi
o-idessa
tai tulo
staessa.
Jos
tдm
д ei ole al
ku-
peräinen
tai P
DF tu
loste
tark
ista
rajat mi
akaa
vasta
alla
enn
en kä
y öä.
注意:请尽量不要使用本安装挖孔尺寸模版图的复印件
。
如果使用复印
件
,则在使
用之前
请确认其比
例一定
要与原
件大
小必须一致。
중요: 복사나 출력으로
크
기가 조정 된 경우 이 템플릿
을
사용
하지 마십
시오. 원
본이 아
니
거나 인쇄물이면,
사용하기 전 아래 치수선
의 눈금을 확인 해 주십시오
.
注:このテンプレ
ー
トは
印刷や
コピ
ー
によ
って縮尺が
変
わ
っているこ
とが
あります
ので使用
しないで
下さ
い。
テ
ンプレ
ー
トがオリジナ
ル
のものでな
い場合には、
下の
寸
法線を使
っ
て
縮尺を確認してください。
ВНИМ
АНИЕ: Не используйт
е э
ту инс
трукци
ю
, ес
ли
он
а была изменена в ра
зм
ерах при
копиро
ва
нии и
ли
рас
печ
атке. Если вы используете не ор
игинал, а распеча
тку и
з ф
айл
а, убедитесь в соо
тветствии размеров лине
йки в
нижней час
ти и
нструкции с действительными разм
ерами.
Check dimensions before cutting
12"
300 mm
L C
L
C
192
.5
mm
(7
.58"
)
186.
0 m
m (7.
32"
)
19
2.5
mm
(7
.58")
18
6.0
mm
(7.
32
")
200
.0
mm
(7
.87"
)
117.5 mm (4.63")
111.0 mm (4.37")
130.0 mm (5.12")
130.0 mm (5.12")
117.5 mm (4.63")
111.0 mm (4.37")
200
.0
mm
(7.
87
")
385.
0 m
m (15.
16")
372.
0 m
m (14.
65")
400
.0
mm
(15
.75")
235.0 mm (9.25")
222.0 mm (8.74")
260.0 mm (10.24")
ZM-16
Marine Monitor
B&G
X4
1
3
x4
x2
4
CLIC
K
5
6
7
2