Danger, Warning, Prestart checklist – Great Plains SR5030 Operator Manual User Manual
Page 9: Hitching planters to tractor
7
Section 1 Preparation and Setup
4/12/05
SR5030 Split-Row Planter 401-140M-A
Great Plains Mfg., Inc.
Section 1
Preparation and Setup
This section will help you prepare your tractor and planter
for use. The planter must be hitched to a suitable tractor
and leveled before using it in the field.
Prestart Checklist
1.
Read and understand “Important Safety Informa-
tion” beginning on page 1.
2.
Check that all working parts are moving freely, bolts
are tight, and cotter pins are spread.
3.
Check that all grease fittings are in place and lubri-
cated. Refer to Lubrication, “Maintenance and Lubri-
cation,” page 24.
4.
Check that all safety decals and reflectors are legible.
Replace if damaged. Refer to Safety Decals, “Impor-
tant Safety Information,” page 4.
5.
Inflate tires and tighten bolts as recommended in the
“Appendix,” page 31.
Hitching Planters to Tractor
!
DANGER!
You may be severely injured or killed by being crushed between
the tractor and planter. Do not stand or place any part of your
body between planter and moving tractor. Stop tractor engine
and set park brake before installing hitch pins.
1.
To prevent soil compaction on rows, set tractor
wheels at 75 inches center to center. For hillsides and
steep slopes, set tractor wheels as wide as possible
for maximum stability.
2.
Adjust tractor lower links to maximize lifting height.
IMPORTANT: To keep the planter level make sure
the lower links are adjusted evenly.
Set tractor sway blocks to minimize side sway. Posi-
tion tractor lift control in float position.
3.
Back tractor up to planter. Align lower links with the
lower hitch holes on planter. Insert hitch pins and
spacers supplied with planter according to the catego-
ry of your tractor. Lock pins in place.
4.
Attach tractor top link in the lower hole for Category II
tractors. Attach tractor top link in the upper hole for
Category III tractors.
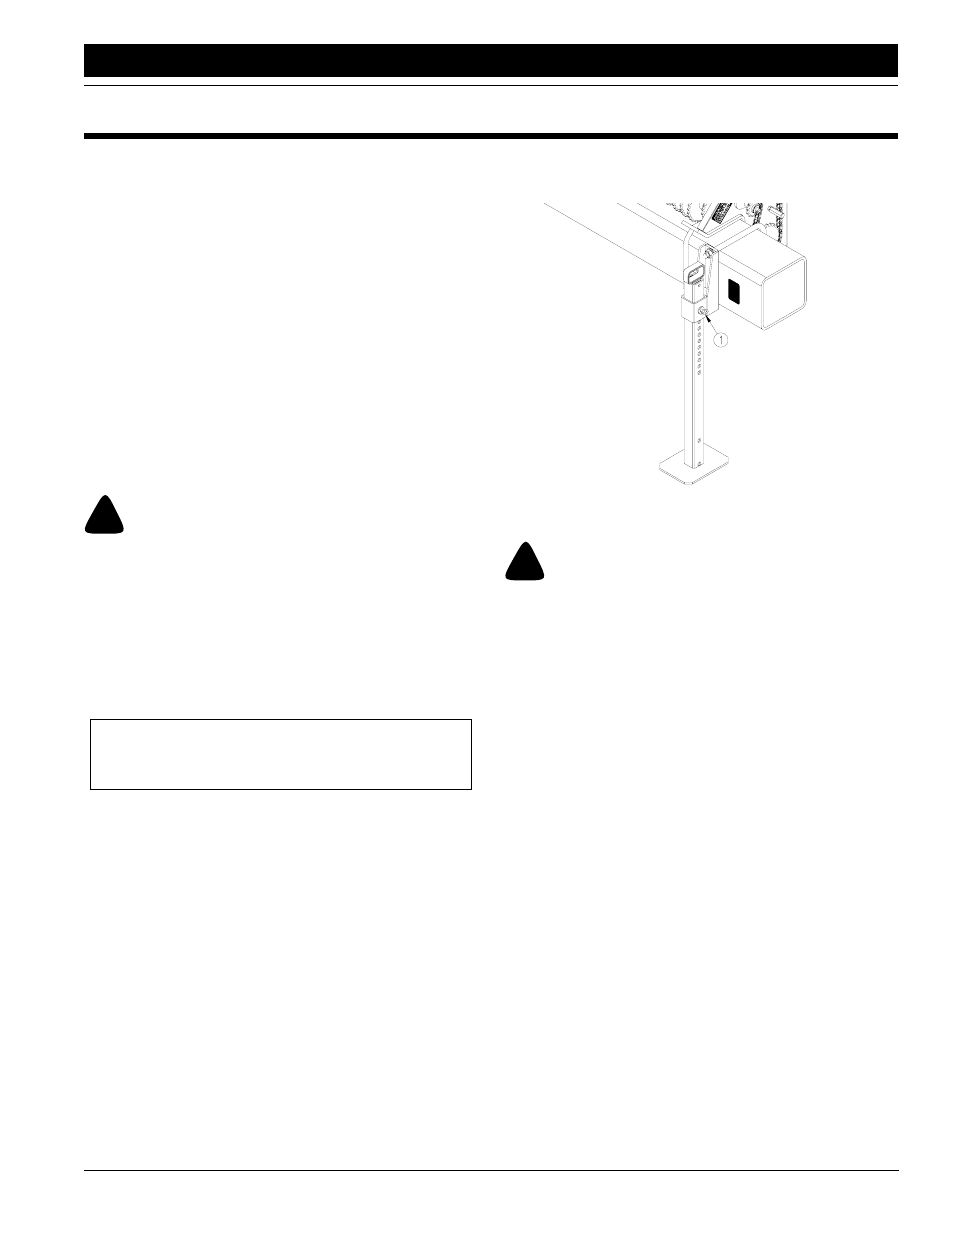
5.
Raise planter. Remove pins (1) holding parking
stands and raise stands. Replace pins in lowest hole
of each stand.
17723
Figure 1-1
Parking Stand
!
WARNING!
Escaping fluid under pressure can have sufficient pressure to
penetrate the skin. Check all hydraulic lines and fittings before
applying pressure. Fluid escaping from a very small hole can be
almost invisible. Use paper or cardboard, not body parts, and
wear heavy gloves to check for suspected leaks. If injured, seek
medical assistance from a doctor that is familiar with this type
of injury. Foreign fluids in the tissue must be surgically removed
within a few hours or gangrene will result.
6.
Hitch SR5030 to pull-type planter.
7.
Connect hydraulic hoses for pull-type planter to cou-
plers on rear of SR5030. Connect hydraulic hoses for
SR5030 to tractor outlets.
8.
Connect planter electrical harness to SR5030 har-
ness. Plug lead from SR5030 harness to the tractor
receptacle.