Great Plains PH-20 Operator Manual User Manual
Page 28
26
Section 3 Adjustments
PH-15, PH-20, PFH-15 and PFH-20 Precision Fertilizer Hitch 148-365M
12/29/2011
Great Plains Mfg., Inc.
Side to Side Adjustment Fertilizer Tine
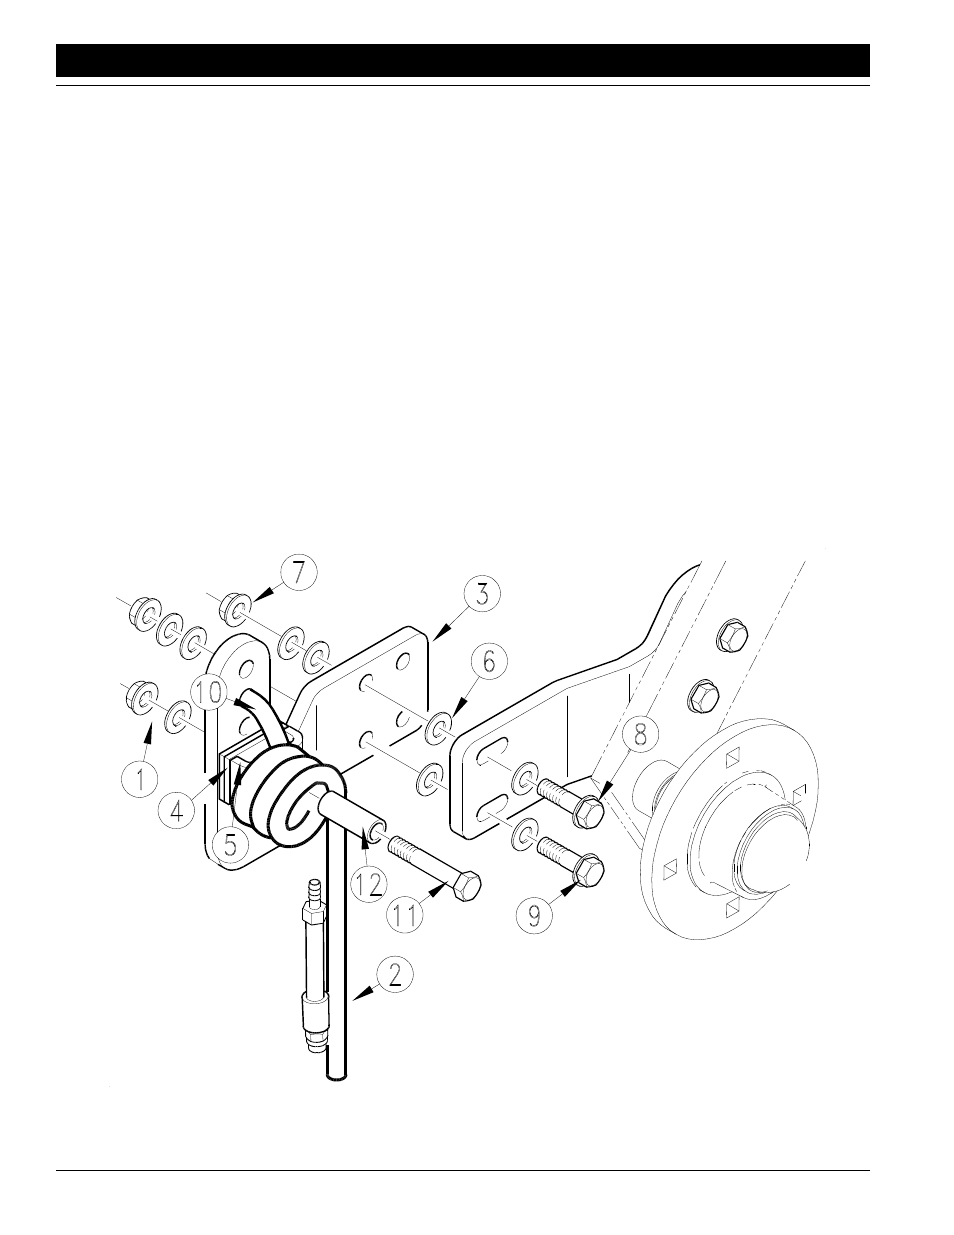
The fertilizer tine must be straight with the coulter blade
and centered behind the coulter blade. To alter the side to
side rotation of the tine:
1.
Remove 1/2-inch, hex-flange nut and flat washer (1)
holding tine (2) on back arm (3).
1.
Center tine behind coulter blade by adding or remov-
ing rectangular spacer washers (4) that fit between
back arm and fertilizer-tine clip (5). Store unused
spacer washers on opposite side of back arm.
2.
If a finer adjustment is needed to center tine behind
coulter blade, place a 1/2-inch flat washer (6) between
front arm and back arm to shim them apart. Store un-
used washers on outside of back arm under 1/2-inch
flange nuts (7).
3.
When tine is centered behind coulter blade, adjust tine
so it is aligned vertically with the coulter blade. If nec-
essary, remove hex-flange nuts (7) holding back arm
to front arm. To rotate bottom of tine counterclockwise,
place one 1/2-inch flat washer between front arm and
back arm on upper hex-flange bolt (8). To rotate bot-
tom of tine clockwise, place one 1/2-inch flat washer
between front arm and back arm on lower hex flange
bolt (9). Retighten hex flange nuts and store extra
washers behind hex-flange nuts.
Front to Back Adjustment
1.
Loosen hex flange nuts (7) holding back arm to front
arm.
2.
Rotate back arm assembly until tine is in a vertical or
slightly swept back position and between 1 to 1 1/2
inch behind coulter.
3.
Retighten hex flange nuts.
Up and Down Adjustment
1.
To adjust tine depth, remove 1/2-inch hex flange nut
and flat washer (1) holding coil tine (2) to back arm (3).
2.
Position tine to desired height by placing hooked end
of the coil tine (10) in one of the five holes in back
plate.
3.
Secure tine to back arm by reassembling 1/2-by-4 1/2-
inch bolt (11) through round spacer tube (12), clip,
rectangular spacers and back arm. Secure with a flat
washer and hex flange nut.
Figure 3-14
Tine Adjustment
18025