Volume control – ClearOne AP IR Remote User Manual
Page 6
Programmable Functions
Technical Services Group ~ 1-800-283-5936 (USA) ~ 1-801-974-3760
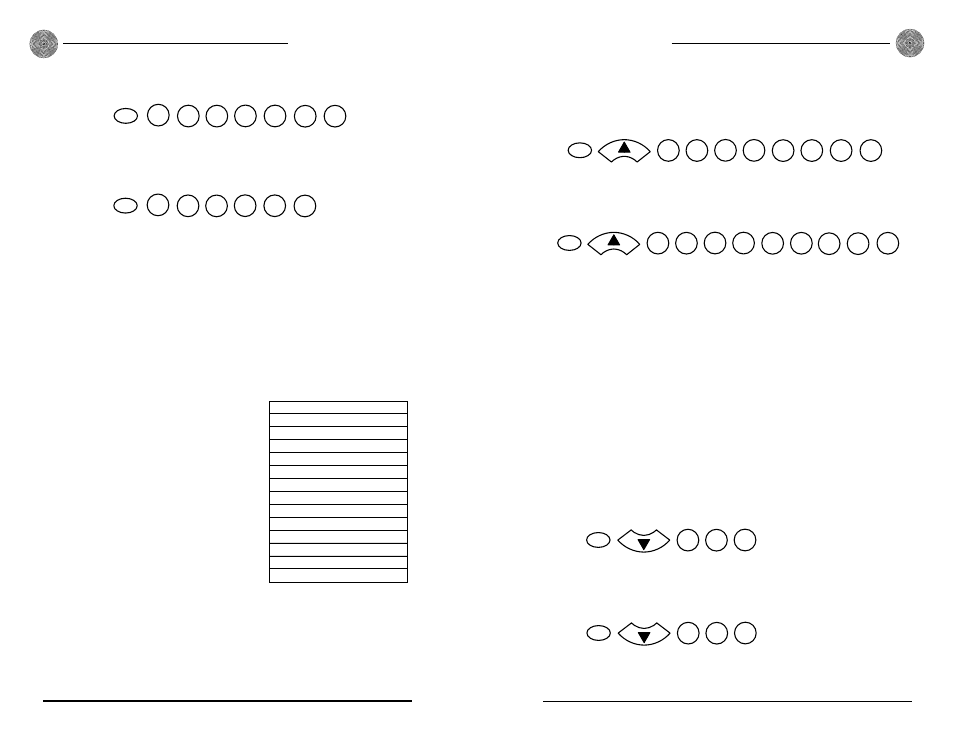
Volume control examples
To adjust volume of Output D on all units with a nominal level of 0 and store it in
location 0 (default), enter:
To adjust volume of Mic 1 on AP400 unit 1 with nominal level of -12 and store it in
location 2, enter:
To program volume range/step size
This is a global volume setting so all volume adjustments will have the same range
and step increment.
1. Press and hold the Program button until the LEDs in the receiver flash.
2. Press the Volume Down button.
3. Enter the 2 digit range of the volume (00–20).
A range of 00 disables the adjustment of the volume from the remote control
buttons.
4. Enter the step size—the number of decibels the volume will increase or
decrease each time you press a volume button—by selecting 0–9.
Volume range/step size examples
To change the volume range to ±6dB with 1dB step increments (default), enter:
To change the volume range to ±10dB with 2dB step increments, enter:
9
Programmable Functions
8
Technical Services Group ~ 1-800-283-5936 (USA) ~ 1-801-974-3760
To store a command to mute Output D on AP400 unit 0 in location 3, enter:
To store a command to mute all mics on AP400 unit 1 in location 2, enter:
Volume Control
If you are using a GT1524, you do not need to program this function.
There are ten locations for storing volume control commands. All volume control
commands are performed when the Volume Up or Volume Down button is pressed.
To change the nominal level to negative, enter an asterisk before the value (e.g. *10
= -10 and 10 = +10).
To program volume control
1. Press and hold the Program button until
the LEDs in the receiver flash.
2. Press the Volume Up button.
3. Select a location for volume control (0-9).
4. Select the device type (0=device connected
to, 1=AP800, 2=AP10, 3=AP400, *=all
devices).
5. Select the device ID (0–7, *=all units).
6. Select channel for volume control (*,
01–08, 11–15) See table to the left.
7. Select 4 for input or 6 for output.
8. Select nominal level (*=negative nominal
level, 00–20).
To erase a preprogrammed location
• Press Program, Volume Up, location (0–9), then Volume Down.
PROGRAM
3
3
MUTE ON
0
1
4
Location
Device Type Device ID
Channel
Input/Output
6
PROGRAM
2
3
MUTE ON
1
*
4
Location
Device Type Device ID
Channel
Input/Output
✍
*
All Mics
01
Channel 1
02
Channel 2
03
Channel 3
04
Channel 4
05
Channel 5
06
Channel 6
07
Channel 7
08
Channel 8
11
Channel A
12
Channel B
13
Channel C
14
Channel D
15
Channel T
Figure 6. Volume control
channel codes
PROGRAM
0
*
*
1
4
Location
Device Type Device ID
Channel
Input/Output
6
0
Nominal Level
0
PROGRAM
2
3
1
0
1
Location
Device Type Device ID
Channel
Input/Output
4
1
Nominal Level
2
*
PROGRAM
0
6
1
Range
Range
Step
PROGRAM
1
0
2
Range
Range
Step