Watts PWSTA 90-120K User Manual
Page 6
6
Model 9000/9100/9500
7
16. Cycle timer into backwash position. Turn manual knob so that the micro switch rides on the first set of pins.
— In this position the tanks switch (lower piston) and the control valve moves to the backwash position (upper
piston).
— Wait until the positioning of upper and lower pistons stops before advancing the timer further.
If advanced
too fast the control will not home into the In Service position (it will not advance to any other position). To
correct this, rotate the manual knob back to
In Service and start again into backwash.
NOTE: Once valve positions itself into the backwash cycle, the homing circuit locks in.
17. With all the air backwashed, slowly cycle the timer to the brine position; rapid rinse; and brine tank refill. Wait
for the control drive motor to position itself in each cycle and stop, before advancing on to the next position.
18. Once back in the
In Service position, cycle the control valve again into the backwash position. The tanks
switch again, and air head backwashes out of the other tank. Cycle the control back to the
In Service position.
Leave the timer in the open position. DO NOT insert meter cable yet.
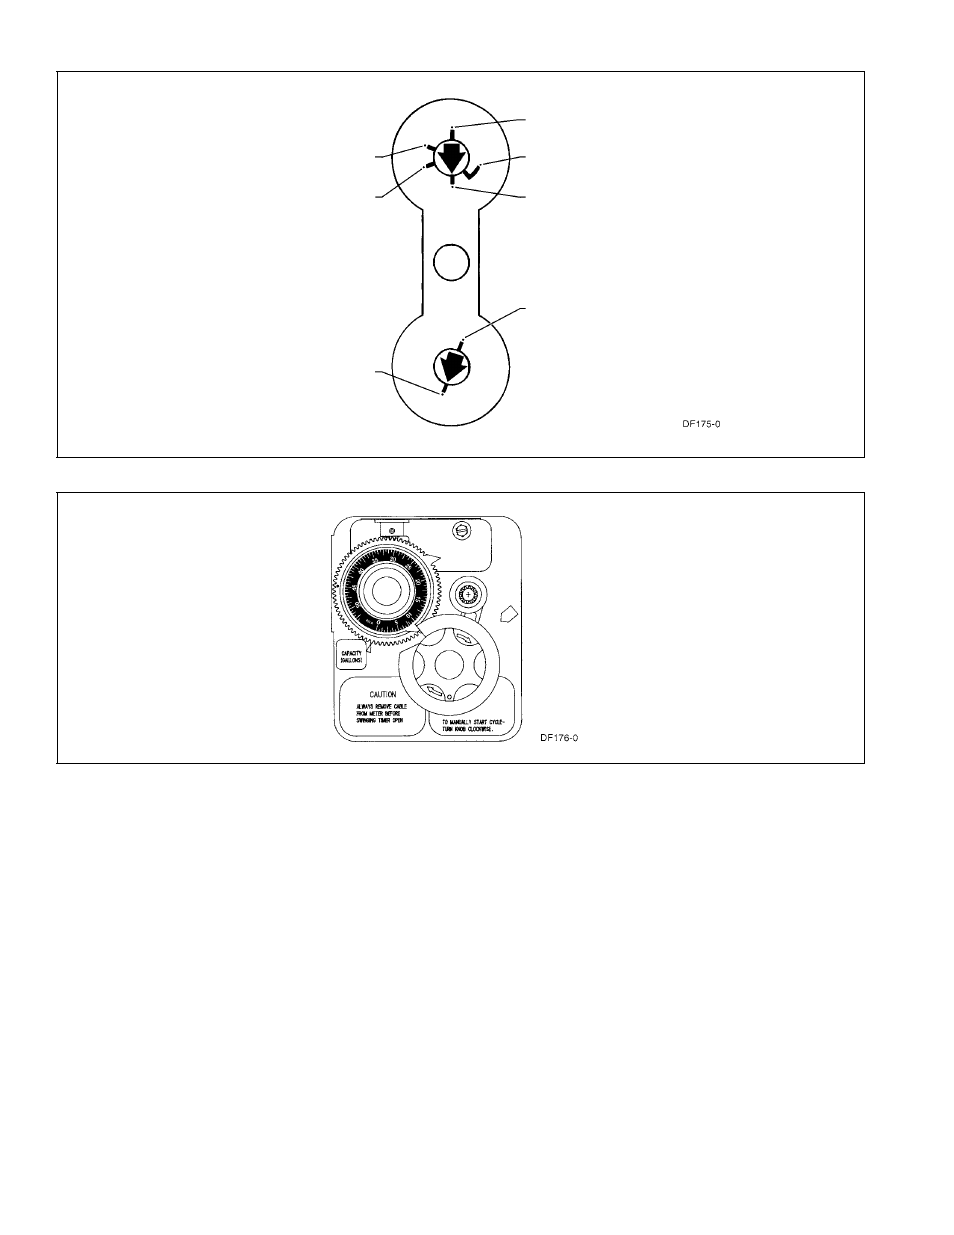
Figure 3: Control Valve Position Indicators
Figure 4: Timer
tank one
tank two
brine fill
stand-by
backwash
rapid rinse
brine rinse
16 . Cycle timer into backwash position . Turn manual knob so that
the micro switch rides on the first set of pins .
— In this position the tank's switch (lower piston) and the control
valve moves to the backwash position (upper piston) .
— Wait until the positioning of upper and lower pistons stops
before advancing the timer further . If advanced too fast the
control will not home into the In Service position (it will not
advance to any other position) . To correct this, rotate the
manual knob back to In Service and start again into back-
wash .
NOTE: Once valve positions itself into the backwash cycle,
the homing circuit locks in. Then unplug the system. Allow
the system to remain in the backwash position until air no
longer flows from the drain line.
17 . Plug the unit back in with all the air backwashed, slowly cycle
the timer to the brine position; rapid rinse; and brine tank refill .
Wait for the control drive motor to position itself in each cycle
and stop, before advancing on to the next position .
18 . Once back in the In Service position, cycle the control valve
again into the backwash position . The tanks switch again, and
air head backwashes out of the other tank . Once the system
reaches the backwash position unplug it again . Allow the system
to remain in the backwash position until all air is purged from the
system . When all air is gone no air will come out of the drain line .
Then plug the unit back in .
Proceed to regeneration cycle program setting procedure . Cycle
the control back to the In Service position . Leave the timer in
the open position. DO NOT insert meter cable yet.