Standard faucet installation, Step 2 – Watts PWRO4 User Manual
Page 4
4
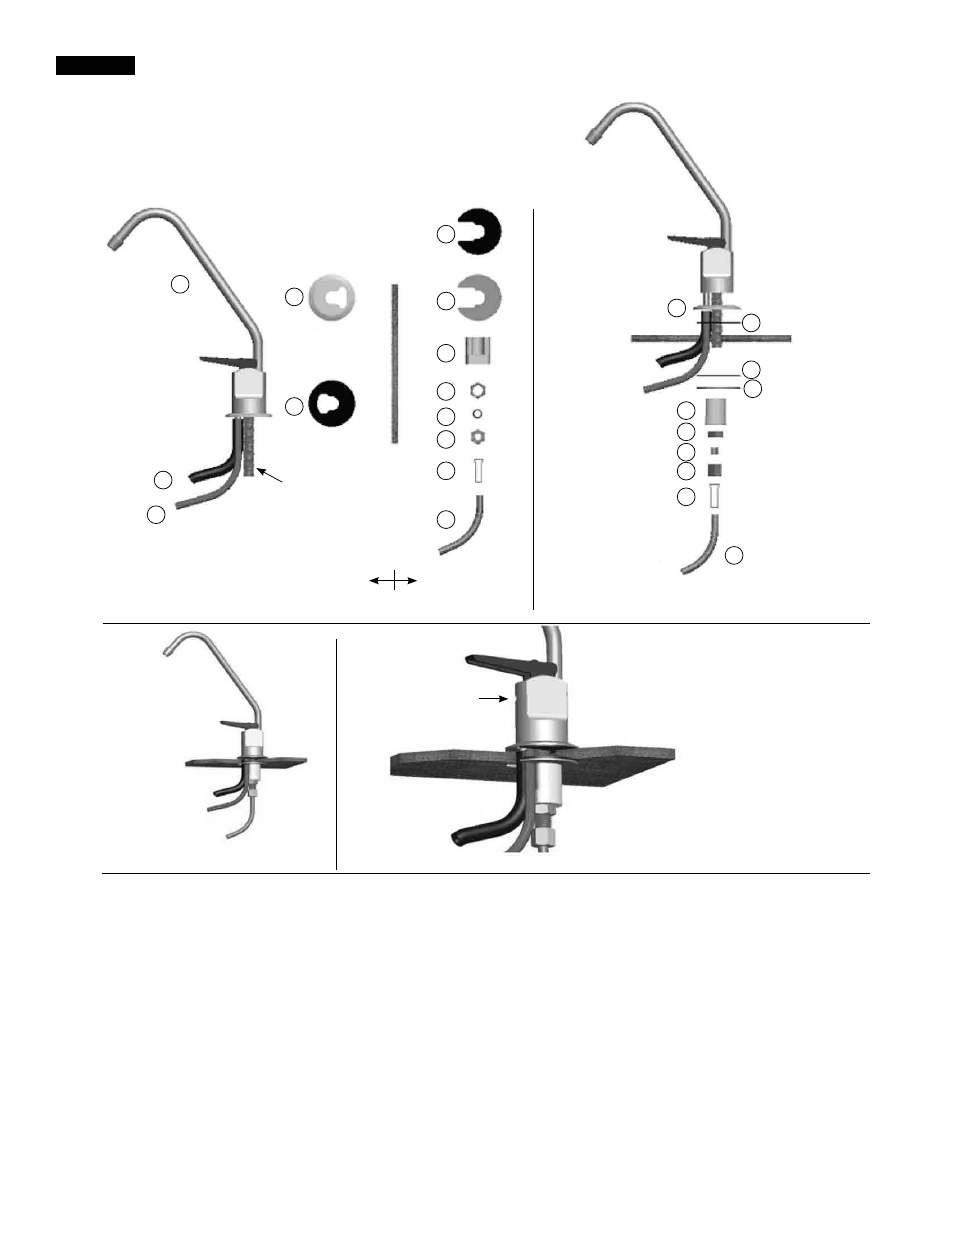
STEP 2
Step A – Remove nut (Item 11) and blue tubing (Item 12) from
faucet . (Leave the nut and plastic delrin sleeve (Item 10) on
the blue tube) .
Step B – Feed both the red and black tubing through the pre-drilled
hole in the sink/counter until faucet is seated .
Step C – Under the sink - on to the threaded faucet stem in order
first slide on the rubber gasket (Item 6), the slotted washer
(Item 7), the white spacer with the open end UP (Item 8),
the hex nut washer (Item 9), and lastly secure with nut
(Item 11) .
Step D – Make sure the plastic delrin sleeve (Item 10) is on the end
of the blue tube; push the white plastic insert (Item 13) into
the end of blue tubing with the delrin sleeve . Insert the blue
tube (Item 12) into the faucet stem and secure with nut
(Item 11) .
Note: DO NOT overtighten nut.
Standard Faucet Installation
1 . Faucet
2 . Gravity Drainline (
3
⁄
8
" Black)
3 . Red Line
4 . Escutchean Plate
5 . Full Circle Rubber Gasket
6 . Slotted Rubber Washer
7 . Slotted Metal Washer
8 . Plastic Spacer or Sleeve
9 . Hex Nut Washer
10 . White Plastic Delrin Sleeve
11 . Water Line Connect or Nut
12 . Blue Water Line
13 . Turn Insert
1
2
3
4
6
4
8
9
10
11
13
12
6
5
7
7
8
9
10
11
13
12
5
Stem
Black
Red
Blue
Sink/Counter
Exploded View
Air Gap Hole
(See Note) .
Gravity Drain Line
(See Important)
1. List of Parts and Assembly in Exploded View
2. Complete Assembly
3. Close-up Assembly and Important Notice
Sink Top
Under Sink