Dirt Devil SD40030 User Manual
Page 11
Safety Instructions . . . . . . . . . . . . . . . . . . . . . . . . . . . . . . Page 3-7
Consignes de sécurité
Instrucciones de Seguridad
Features . . . . . . . . . . . . . . . . . . . . . . . . . . . . . . . . . . . . . . Page 12
Descriptions de l’appareil
Características
How to Assemble . . . . . . . . . . . . . . . . . . . . . . . . . . . . . . . Page 13
Assemblage
Cómo Ensamblar
Attachments . . . . . . . . . . . . . . . . . . . . . . . . . . . . . . . . . . . Page 14
Accessoires
Accesorios
Cord Release/Rewind . . . . . . . . . . . . . . . . . . . . . . . . . . . . Page 14
Dégagement/enroulement du cordon
Liberación/enrollado del cordón
How To Operate . . . . . . . . . . . . . . . . . . . . . . . . . . . . . . . . Page 15
Utilisation de l’appareil
Cómo Funciona
Dirt Cup & Filter Removal & Replacement . . . . . . . . . . . . . Page 16-17
Retrait Et Remise En Place Du Vide-Poussière Et Du Filtre
Retiro Y Reemplazo Del Contenedor Para Polvo Y Filtro
Cleaning the Suction Tube . . . . . . . . . . . . . . . . . . . . . . . . Page 18
Nettoyage Du Tube De Succion
Cómo Limpiar El Tubo De Succión
Lightbulb: Removal and Replacement . . . . . . . . . . . . . . . . Page 18-19
Ampoule : Dépose Et Remplacement
Foco: Retiro Y Reemplazo
Storage . . . . . . . . . . . . . . . . . . . . . . . . . . . . . . . . . . . . . . . Page 19
Rangement
Almacenamiento
11
14
TABLE OF CONTENTS
TABLE DES MATIÈRES
ÍNDICE
ATTACHMENTS
ACCESSOIRES
ACCESORIOS
The hose can be used alone or with many combinations of wands and
tools.
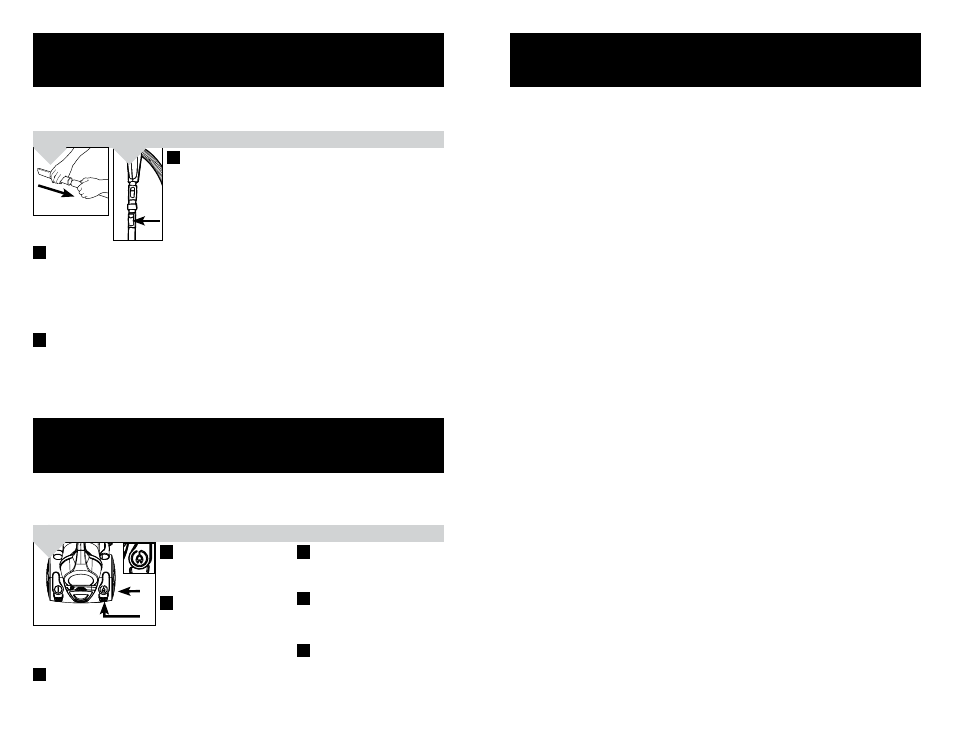
• Choose any of the accessories to meet your various cleaning needs.
Then simply push it firmly onto the handle grip or wand end (1).
• To lengthen the cleaning wand, press button on the extension wand
and slide excess cleaning wand out (2).
• To remove the tool, pull apart gently. To unlock the wand, push wand
towards handle grip, press and hold. Release wand button while pull-
ing wand away from handle grip.
NOTE: Please follow these instructions for attaching all other accessories.
1.
ATTACHMENT INSTALLATION AND REMOVAL
INSTALLATION ET DÉPOSE DES ACCESSOIRES
INSTALACIÓN Y RETIRO DE LOS ACCESORIOS
2.
1. To release cord, pull outward
from storage location. Only pull
out cord to yellow tape. Do not
pull out past the red tape.
1. Pour dégager le cordon,
l’extraire de son logement.
Tirer le cordon jusqu’à la bande
jaune seulement. Ne pas tirer
le cordon au-delà de la bande
rouge.
1. Para liberar el cordón, retírelo de su compartimiento. Tire del
cordón hasta la marca amarilla únicamente. No pase la marca
roja.
2. To rewind cord, push down on cord
rewind button. Hold on to the plug
while cord is rewinding to prevent
cord from whipping around.
2. Pour enrouler le cordon, appuyer
sur le bouton de l’enrouleur de cor-
don. Ne pas laisser la fiche s’agiter
pendant l’enroulement du cordon.
2. Para enrollar el cordón, presione
el botón del enrollador de cordón.
Sujete el enchufe cuando enrolle el
cordón. No permita que el enchufe dé
latigazos al enrollarlo.
1
2
1.
Le tuyau peut s’utiliser seul ou en combinant diverses rallonges et accessoires
• Choisissez l’accessoire le mieux adapté à vos besoins de nettoyage. Puis enclenchez-le fermement dans la
poignée ou à l’extrémité de la rallonge.
• Pour allonger la rallonge, appuyez sur le bouton situé au-dessus du support à accessoires et sortez davan-
tage la rallonge.
• Pour retirer l’accessoire, le tourner et le retirer délicatement. Pour déverrouiller la lance, la pousser vers la
poignée du manche, appuyer sur le bouton et le maintenir enfoncé. Relâcher le bouton de la lance en retirant
la lance de la poignée du manche.
Remarque : suivez ces instructions pour attacher tous les autres accessoires
La manguera puede usarse sola o con muchas combinaciones de lanzas y accesorios.
• Elija cualquiera de los útiles accesorios para satisfacer sus diferentes necesidades de limpieza. Luego simple-
mente empújelo en la empuñadura del asa o el extremo de la lanza (Diagrama 1).
• Para alargar la lanza de limpieza, oprima el botón ubicado encima del contenedor de accesorios y deslice
hacia afuera el resto de la lanza de limpieza (Diagrama 2).
• Para retirar el accesorio, tire con cuidado. Para desbloquear el tubo, empújelo hacia la empuñadura del
mango, presione el botón en el tubo y manténgalo presionado. Suelte el botón del tubo a la vez que tira el tubo
fuera de la empuñadura del mango.
NOTA: Por favor siga estas instrucciones para acoplar los otros accesorios.
E
E
E
F
F
F
S
S
S
CORD RELEASE / REWIND
DÉCLENCHEMENT/ENROULEMENT DU CORDON
REBOBINADO/LIBERACIÓN DEL CORDÓN ELÉCTRICO
CORD RELEASE
DÉCLENCHEMENT DU CORDON
LIBERACIÓN DEL CORDÓN ELÉCTRICO
CORD REWIND
ENROULEMENT DU CORDON
REBOBINADO DEL CORDÓN
ELÉCTRICO