Cyclopital3D Lighted Print Viewer User Manual
Page 2
3
Preparing Your Images for the Viewer
For best results, it’s important that your prints are formatted and sized properly
and printed with a high quality system that minimizes pixelation. In personal
printers, we highly recommend the Canon Selphy CP800/900 Desktop Printer
that uses a dye sublimation process and sells for only $90 at B & H Photo and
Amazon. In professional printers, the “Continuous Tone” print process used in
the Fuji Frontier systems found at some Walgreens Drug Stores can also
produce good results. Ink jet printers are NOT recommended.
The recommended formatting procedure is detailed here. The process requires
that you download two free software programs from the internet, StereoPhoto
Maker and IrfanView, instructions are given below.
Preliminary Set-up:
• Confirm that you have the latest version of StereoPhoto Maker (SPM),
v4.37 or newer. If you need a free download or update for SPM, go to
http://stereo.jpn.org/eng/stphmkr/
• Confirm that you have the latest version of IrfanView, v4.28 or greater. If
you need a free download or update, go to
http://www.irfanview.com/
• Create a new folder on the root of your C Drive to be used exclusively for
your Print Viewer image processing, named: 3D_PrintViewer. Within the
3D_Print Viewer folder create 3 folders with the names: MPOs, Temp,
Ready2Print. If you use these exact names, the templates will pre-fill the
dialogs and make the formatting process easier.
• Your Print Viewer package includes a CD or flash drive containing two
image processing templates, “LPV_SPM_Tmplt.mcv” and
“LPV_IV_Tmplt.ini”; copy the templates into your new 3D_PrintViewer
folder. The templates can also be downloaded from the Cyclopital3D
website at http://www.cyclopital3d.com/support/
Quick Print Instructions for one photo:
•
Open StereoPhoto Maker
•
Choose File> Open Stereo Image
•
Set image background color: File>Print Stereo card, on bottom ride side
of dialog box “BG color,” select black. Right below BG color, check the
box for “Full Page.” Then, “x” out of the dialog box. (This step might
not be necessary after setting it the first time)
•
To identify the printer and print parameters: choose File> Print
Setup>Printer (box on bottom right). Select the Selphy printer, choose
paper size 4x6 Postcard, Landscape orientation and click “OK.”
•
In the Print Setup dialog box: enter print width size 120mm (height will
automatically adjust), check “Print Center” box and click “OK.” Click
OK again to print.
4
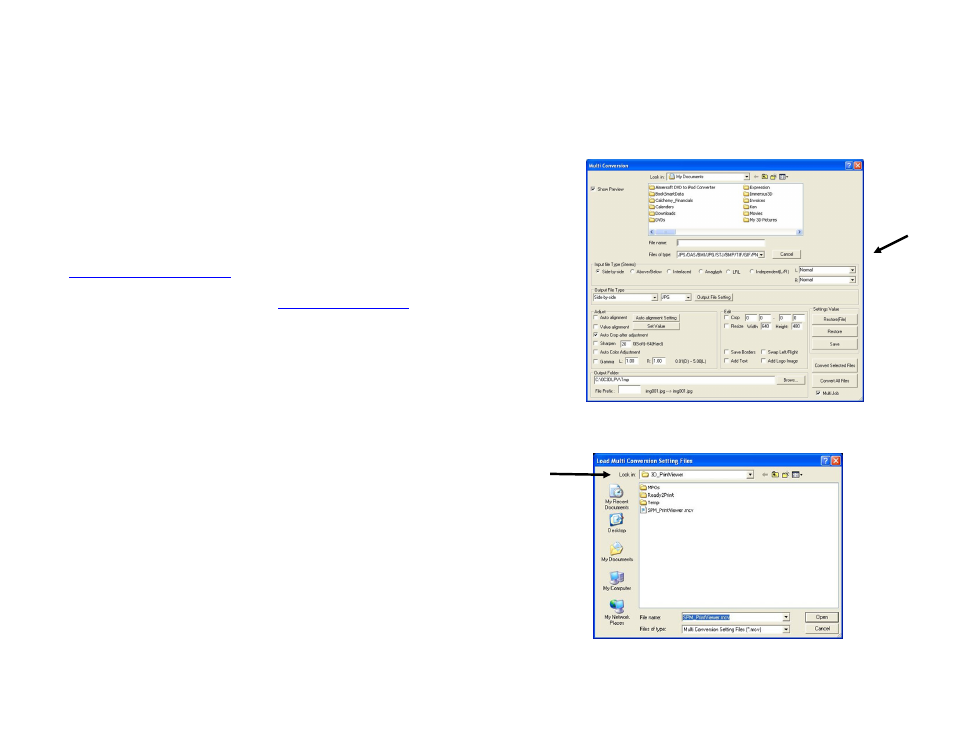
• Click “Restore(File)” near the bottom right of screen and a new, smaller
dialog box will appear as shown below:
• Using the “Look in” drop down box, locate the template file:
“LPV_SPM_Tmplt.mcv” (in the 3D_PrintViewer folder) select it and click
“Open” to load it and revert to “Multi Conversion” dialog.
Full Formatting Instructions, STEP 1:
• Start SPM. When it opens, you will see a black screen
• Sort your photos and select the MPO files you wish to print. Copy them
into the MPOs folder you created under the 3D_PrintViewer folder
• Click: “File” from top menu, then “MultiConversion…” to see dialog
box shown on page 4