Using the ninja blade – Atomos Ninja Blade User Manual
Page 12
Atomos Ninja Blade – User Manual Edition 1: Feb 2014 10
Headphone
Line Out Volume
Cut and Tag
Favorite/Reject
Monitor Assist Functions
Waveform Monitoring
Audio Channels
and Levels
Rec / Play / Menu
Timecode and
Record Trigger
Vectorscope or
Waveform
Continuous Power
Battery Indicator
Time
Remaining
Recording
Quality
Recording
Format
Video Input Format and
Pulldown Status
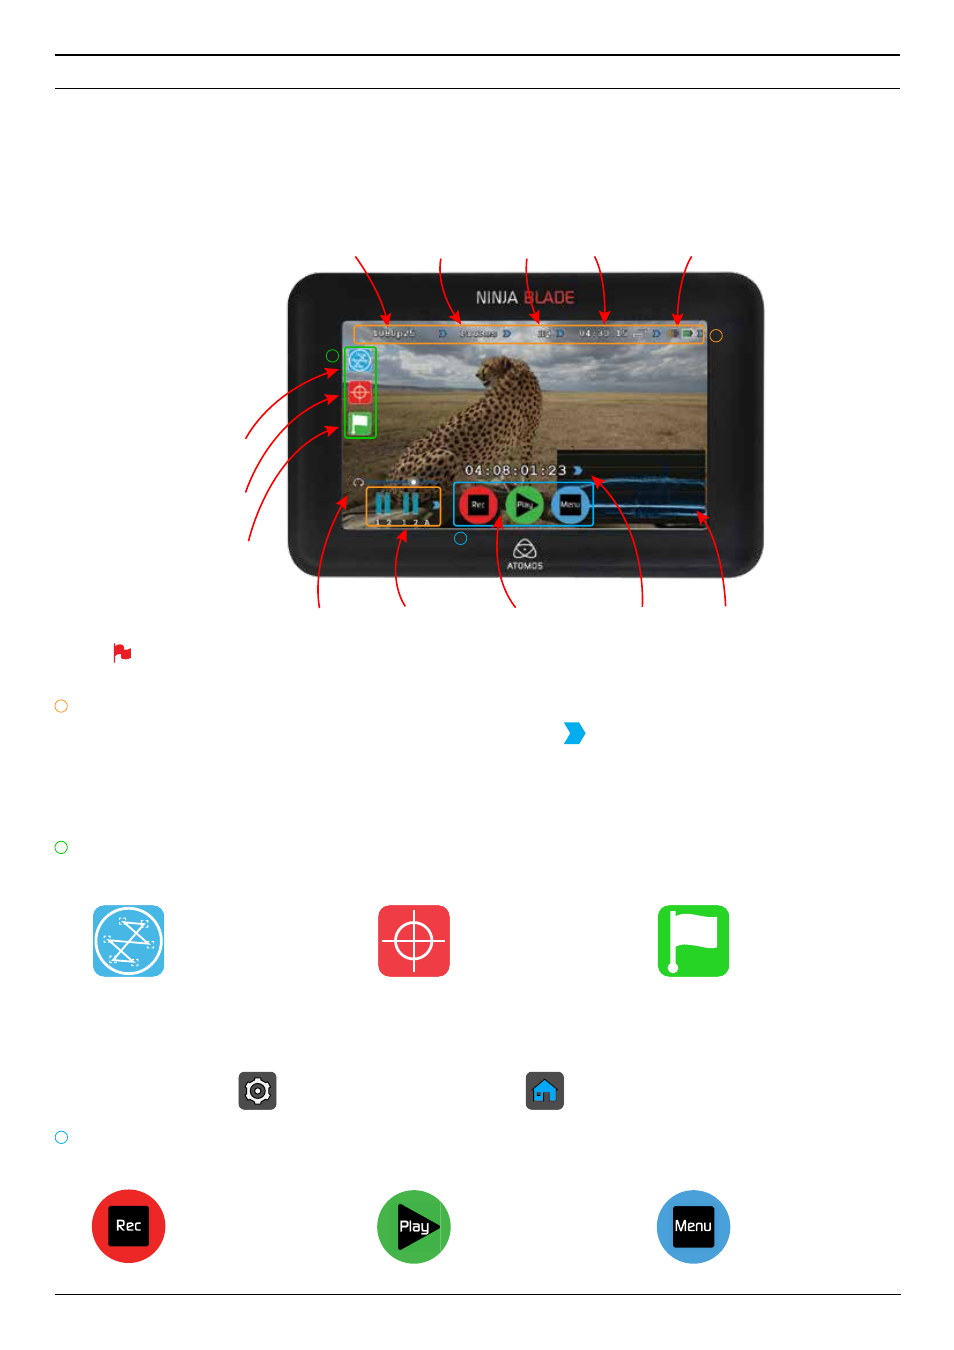
7. Using the Ninja Blade
1. Video Input
2. Recording Format
3. Recording Quality
4. Time Remaining
5. Battery Indicator
6. Time Code & Record
7. Audio Channels and Levels
8. Headphone/Line Out Volume (Slider only)
Waveform Monitoring Functions
Settings icon
Home icon
To enable recording
See page 17
See page 15
See page 11
See page 19
See page 22
Using the Ninja Blade
The Ninja Blade is controlled via an intuitive touchscreen interface. Icons and buttons have been designed and laid out in a specific way to ensure
operation is simple and fast.
The HOME SCREEN displays all necessary technical and functional information. Everything important for operation and adjustment is no more than one
touch away. Here is how it works:
Category 1 – Operating Settings
This list of real-time operating settings can be adjusted or toggled WHEN a BLUE ARROW is present. If the Blue arrow is disabled, the setting
cannot be adjusted.
Category 2 – Shot Setup & Monitor Assist Tools
This list represents the icons and functions available for Shot Setup and Monitor Assist Tools:
Touch these icons to reveal more functional options in a sub-category. Touch the sub category icons to toggle the functions on or off. When a Shot Setup
or Monitor Assist function is active, touch the settings icon (as seen below) to reveal detailed settings for each Shot Setup tool. Touch the Home icon (as
seen below) to go back to the Home Screen at any time.
Category 3 – Main Controls REC, PLAY & MENU
The Main Controls of the unit are indicated by large round icons.
Touching the center of the screen at any time removes all overlays except any active Shot Setup or Monitor assist functions
that are enabled. This is to allow you to use the Shot Setup and Monitor assist functions at all times while shooting.
Monitor Assist Functions
Smart Log Cut and Tagging
For instant playback and review
See page 28
To make settings changes
2
3
1
1
2
3