Ninja blade connections, Powering up the ninja blade – Atomos Ninja Blade User Manual
Page 10
Atomos Ninja Blade – User Manual Edition 1: Feb 2014 8
Turning ON power to the Ninja Blade
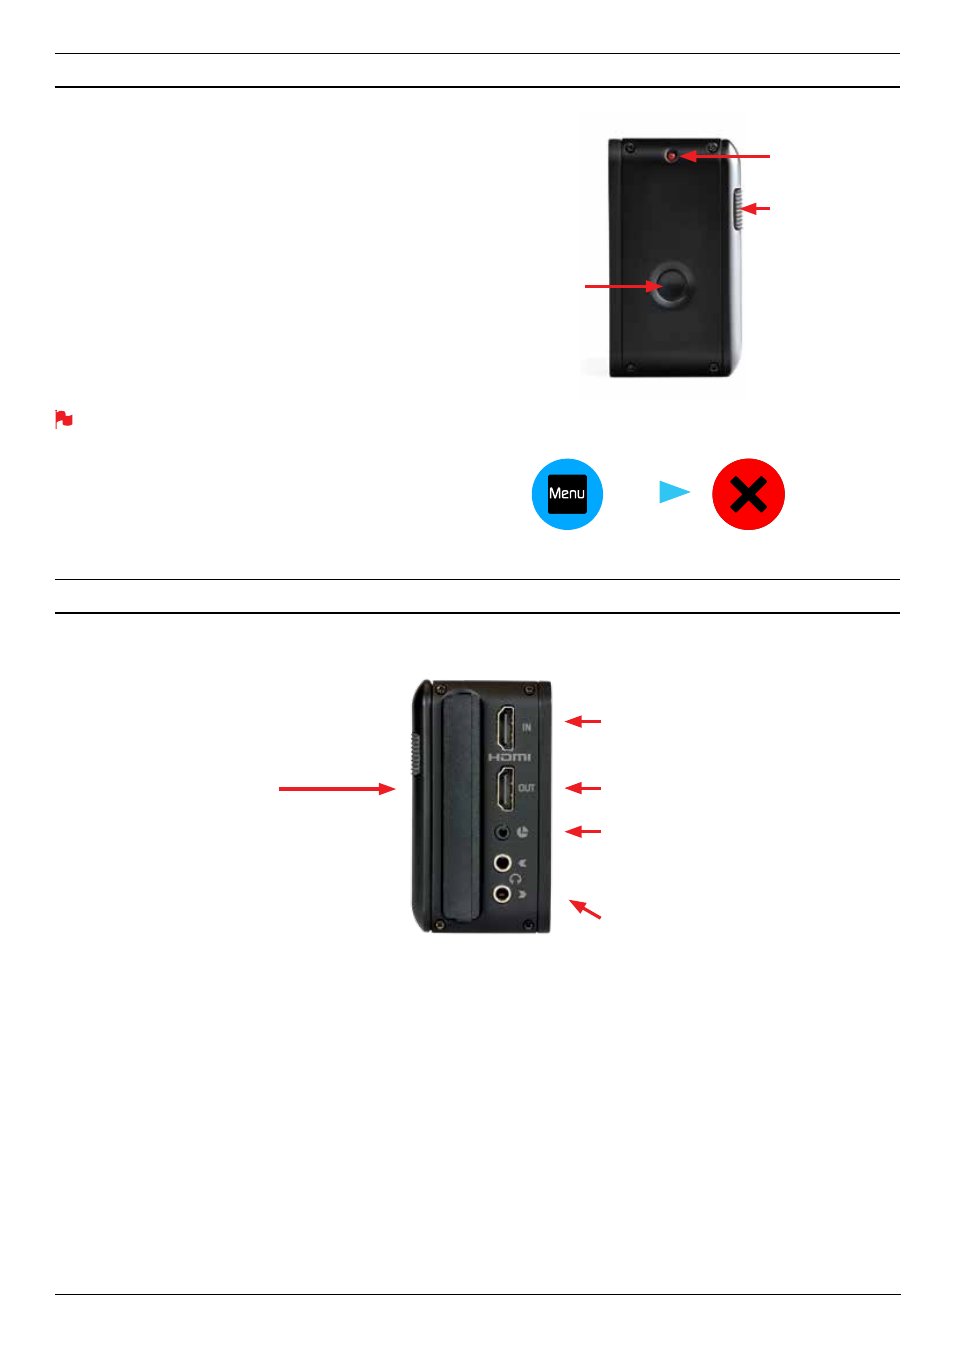
The start button is located on the right hand side of the unit (as you look
at the screen). Momentarily press the circular button on the right side
of the Ninja Blade as you look at the screen to power up the unit. After
a couple of seconds you will see the Atomos logo, and then the Ninja
Blade Home Screen.
Turning OFF power to the Ninja Blade
To turn the unit off, touch
menu
on the home screen, and then press
the red
Power off
icon for 4 seconds the icon will go white when
touched to indicate activation of the button. The unit will then power off.
You can also do a forced power down by depressing the on/off button
for four seconds.
Four seconds can seem like a long time! We’ve made it this way
to make absolutely certain that the Ninja Blade can’t be turned off
accidentally.
HDMI in:
The video input to the Ninja Blade is HDMI. This is the
connection that is used to record to the Ninja Blade’s storage media.
HDMI out:
This is for connection to an external monitor or other device
with an HDMI input. It carries a delay-free loop-through of the incoming
signal in record and standby mode, and the playout signal when the Ninja
Blade is in playout mode.
LANC Remote:
In addition to direct control through HDMI, you have
the option of controlling the Ninja Blade remotely using the LANC remote
control protocol. The Ninja Blade has a LANC input and a 2.5mm ‘Y’
adaptor cable is included to allow you to connect LANC-controllable
devices.
Audio:
The Ninja Blade can record 2 (left and right) channels of digital
audio embedded in the HDMI signal. There is a 3.5mm Stereo Line-
in socket for recording audio in sync with incoming video. Depending
on your set-up, you may find that this gives you better results than the
microphone on the camera.
You can switch between Analogue Audio Line In and HDMI as your audio
sources in the user interface, where you can also adjust the analogue
audio input level.
There is also a 3.5mm output that doubles as a Line Out or Headphone
Out, which has it’s own independent level control in the user interface.
5. Ninja Blade connections
ON
+ forced
power
down
Turning OFF power via touchscreen (preferred)
power off
menu
Master Caddy Slot
Simple, locking
HDD/SSD system.
Video Input
Connect to camera using HDMI cable
Tally Light
Flashes red when recording.
Battery Latch
Video Output
Connect to external device via the HDMI cable
Audio
Stereo Line In or Headphones
LANC Remote
Optionally control the Ninja Blade using LANC remote
control connected here (use a 2.5mm TRS/ 3-pin plug )
Share remote control with other devices (loop thru ) by
connecting them to the second LANC connector cable
4. Powering up the Ninja Blade