6 electrical connection, Electrical connection, Instrument setup – Leica Biosystems EG1150 H User Manual
Page 19
19
Leica EG1150 H – Paraffin Embedding Station
4.6 Electrical connection
4. Instrument Setup
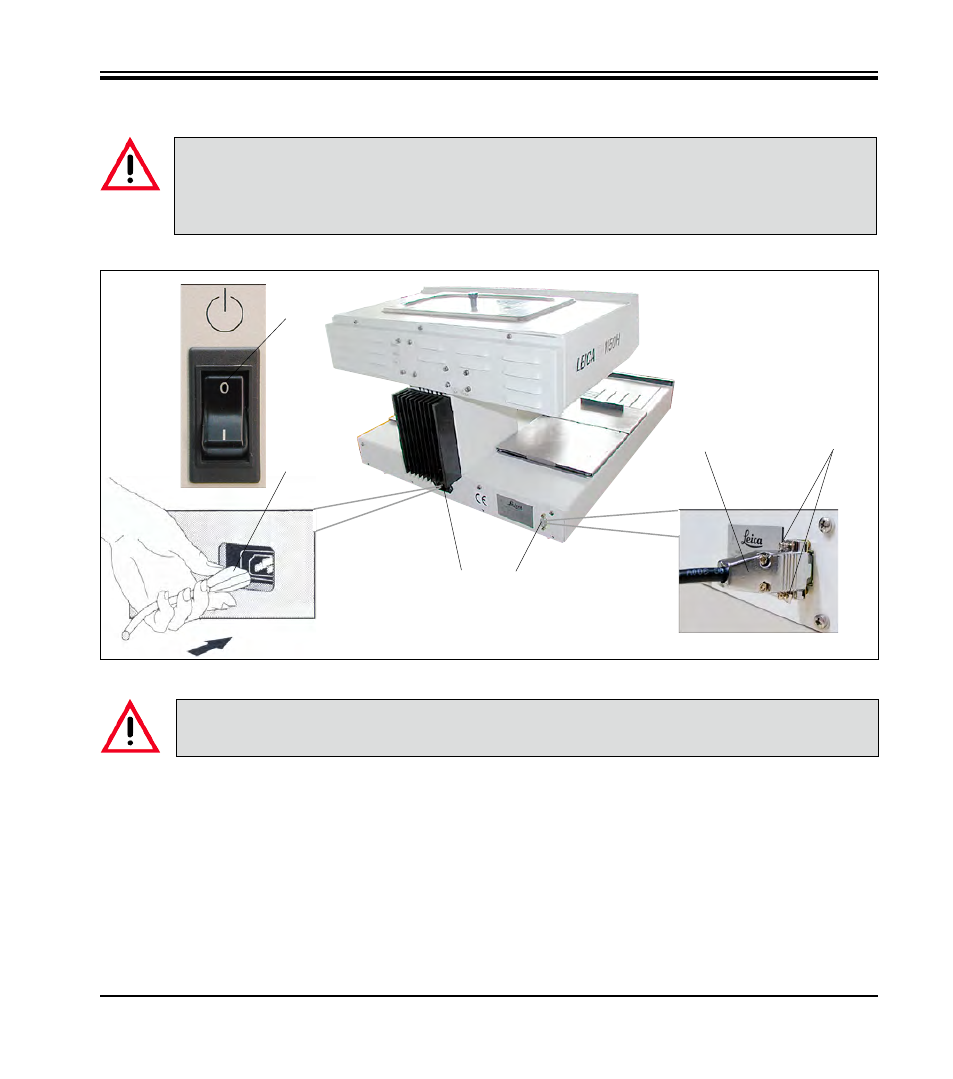
Connecting the power cord
• Connect the plug (2) of the power cord to the
connection socket (3) on the rear of the in-
strument.
• Plug the power cord into the wall outlet.
Fig. 9
1
2
Connecting the foot switch (optional)
• Insert the plug (4) of the foot switch into the
connecting port (5) on the rear of the instru-
ment.
• Tighten the screws (6) of the plug.
4
6
3
5
Before connecting the power cord to the foot switch, ensure that the standby switch (1)
(control panel, front) is set to "O" ("O" = OFF).
The instrument MUST be connected to a grounded power socket.
The instrument is supplied with a set of different power cords. Only the power cord intended
for the local power supply (socket) may be used.
Do not use an extension cord.
- SM2010 R (46 pages)
- CM305 S (66 pages)
- CE Knife holder (14 pages)
- CM1950 (78 pages)
- VT1200/VT1200 S (62 pages)
- VT1000 S (42 pages)
- HI1220 (18 pages)
- HI1210 (18 pages)
- CM1850 UV (56 pages)
- CM1850 UV (54 pages)
- CM1510-S (56 pages)
- CM3600 XP (114 pages)
- CM1100 (36 pages)
- CM1860/CM1860 UV (98 pages)
- Premium blade holder (14 pages)
- CM1520 (92 pages)
- VT1000 A (49 pages)
- VT1000 P (48 pages)
- SP2600 (51 pages)
- SM2500 (76 pages)
- SM2400 (8 pages)
- SM2000R (22 pages)
- EG1160 (32 pages)
- EG1150 C (20 pages)
- EG1130 (2 pages)
- EG1120 (2 pages)
- EG F (18 pages)
- ASP300 (70 pages)
- PELORIS_PELORIS II (160 pages)
- TP1020 (102 pages)
- ASP200 S (88 pages)
- ASP300 S (88 pages)
- ASP6025 (178 pages)
- LN22 (44 pages)
- RM CoolClamp (20 pages)
- RM2265 (88 pages)
- RM2255 (82 pages)
- RM2245 (78 pages)
- RM2235 (78 pages)
- RM2125 RTS (60 pages)
- SP9000 (30 pages)
- SP1600 (10 pages)
- ST4040 (50 pages)
- ST5020 (88 pages)