Step 9, Ford transit connect, con’t, Caution – Kargo Master PRO III Ladder Rack for Ford TC (80070) User Manual
Page 9: Do not overload your transit connect, That's it, Tighten down all nuts & bolts and, You are now ready to use your rack
TMCS_3:1
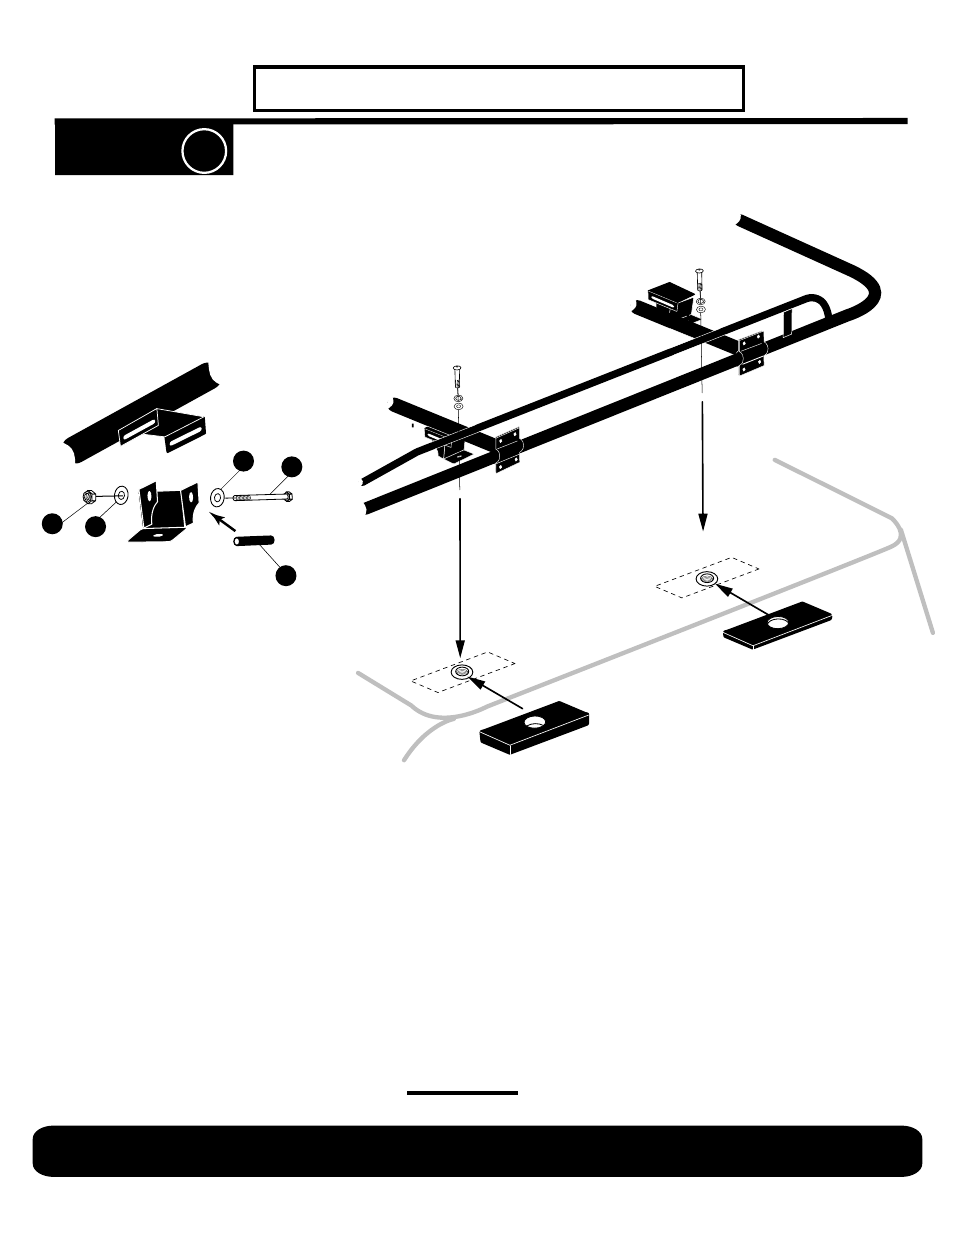
#3 = Place the spacer N inside the mounting
brackets. Loosely bolt the feet to slider brackets
using bolts K, washers L and lock nuts M.
#2 = Position the Transit Connect feet into the
slider brackets on the cross bars.
N
L
M
L
K
STEP 9
#4 = The Transit Connect has factory threaded
bosses on the roof. No need to drill holes in the roof.
These bosses have a threaded button with a rubber
washer. Remove the factory button and washer.
#6 = Carefully position the rack onto the roof. Align
the holes in the feet with the holes in the rubber pads
with the bosses. Loosely attach the rear feet to the
roof with
M8 x 32 button head bolt, flat washer and
lock washer. Adjust the front cross bar as necessary.
To align the front feet. Securely attach the front feet
to the roof with
M8 x 32 button head bolt, flat washer
and lock washer. Tighten rear feet.
#5 = There are 4 rubber pads in the box. Align the
middle hole of the pad with the middle hole in the
Transit Connect foot. Cut off the ends of the pads to
match the width of the Transit Connect foot. Position
the pads over the threaded bosses.
Ford Transit Connect, con’t
Rear Pad
Front Pad
Tighten down all nuts & bolts and
THAT'S IT!
You are now ready to use your rack.
CAUTION!
DO NOT OVERLOAD YOUR TRANSIT CONNECT.
#1 = There are 8 mounting feet in your box,
SEE NEXT PAGE FOR DETAILS. There are 4 feet (these are
the shorter ones with no flange and a single hole in the bottom)
that will be used for Transit Connect installation.
NOTE: The front feet (these are the shortest ones, are angled
to conform with the contour of the front of the roof. There is a left
and a right front foot. See diagram next page. Find these now.