How to use your new – General Machine Products 86350 E ladder Support User Manual
Page 2
How to Use Your New...
P/N 86350 & P/N 86351
E Ladder Support
You can use this support
on any wooden or fiber-
glass extension ladder up
to 18 in. (46 cm) wide,
with side rails up to 2 ⅛ in.
(54 ram) wide, and on any
1/4 in. to 7/16 in. (6-11
mm) diameter strand.
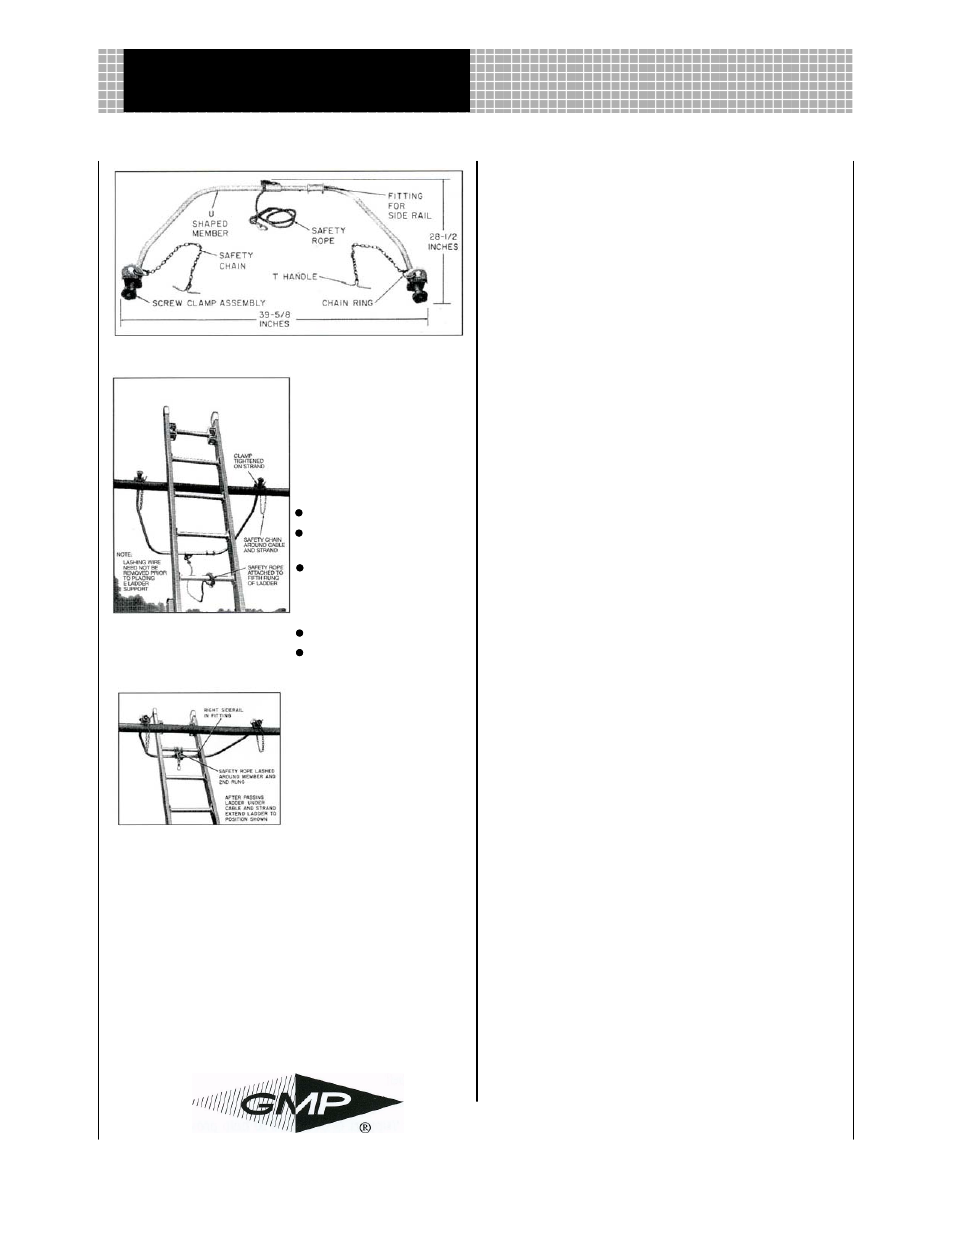
Each support consists of:
Two screw clamp
assemblies
A U-shaped alumi-
num alloy member
with a single rail fit-
ting
A safety rope
Two tether chains
The U-shape member has
a screw clamp assembly at
each end; each assembly
in turn has its own tether
chain, and can accommo-
date either lashed, ring-
supported or self-
supporting cable installa-
tions without disturbing
the cable itself.
The rope connected to the center of the member is for ty-
ing off the support to a rung on your ladder.
There are two versions of our E Ladder Support. The
arms on the larger version (P/N 86350) extend 33 ½
in. (85 cm) from the strand, giving you plenty of room
to use a splicing machine. The smaller version (P/N
86351) has shorter arms for a smaller 23 ½ in. (60 cm)
extension.
IMPORTANT: If you'll be working on lashed cable, you'll
also need Lashing Wire Grips (P/N 08605) and a pair of
E Lashing Wire Clamps (P/N 81460).
How To Use Your Support
First, set the ladder you want to use against the strand
as you normally would, following the practices that
apply to your installation.
If this is lashed cable, place a Lashing Wire Grip ap-
proximately two feet out from either side of the ladder,
then cut the lashing wire and secure the ends to the
clamps.
When you're done splicing, replace each end of these
temporary grips with permanent E Lashing Wire Clamp.
Carrying the complete support, climb up the ladder to
the strand.
Now pass the support over the ladder and away from
you towards the other side. Using the large hand
knobs, secure the screw clamps to the strand with the
knobs facing you.
On each side, take the chain on the clamp, wrap it
once around both the cable and strand (not just one),
and insert the T-bar at the end of each chain through
the metal ring on the clamp.
This tether prevents accidental dropping of the support
and keeps the ladder from turning in case a clamp be-
comes accidentally disengaged.
Attach the free end of the rope on the U-shaped mem-
ber on the fifth rung from the top of your ladder. This
will keep the support from passing over the top of the
ladder when you move it.
Get down from the ladder and pull the front of the lad-
der backwards until the top of the ladder falls below the
cable and strand. If you're using an extension ladder,
use your ladder's rope to lower the extension.
Now push the foot of the ladder forward until the ladder
and support are properly aligned and the right side rail
is sitting inside the fitting on the support (see the
photo). On an extension ladder, you can do this by
extending the top of the ladder with your ladder rope.
When you're finished using your E Ladder Support, just
reverse all of the above procedures to remove the sup-
port and your ladder from the cable strand.
Need Help? Call Us!
We want you to be satisfied with your new E Ladder
Support. If you have a problem or need additional infor-
mation, please call us at 1-800-345-6009 (AK, HI, PA
and outside the USA; call 1-215-357-5500). We'll do
what we can to help you get your support working
properly as soon as possible.
General Machine Products Co., Inc.
3111 Old Lincoln Highway Trevose,
PA 19053-4996 U.S.A. Tel: 215-
357-5500 Fax: 215-357-6216
E-Mail: [email protected]
http://www.GMPtools.com
GMP reserves the right, without notice, to make changes in equipment design or
components as progress in engineering or manufacturing methods may warrant.
All information contained herein is subject to such change. Printed in U.S.A.
E Ladder Support in position
on strand
E Ladder Support in use