Operation, Warning, Caution – Enerpac WMC-Series User Manual
Page 2
OPERATION
PRELIMINARY INFORMATION: Be sure to observe safe operating procedures. Follow the warnings listed below and all
other safety information contained in this document or decals attached to cutter. Failure to do so will result in personal injury
and/or equipment damage.
WARNING
CUTTING HAZARD: Keep
hands away from cutter
blades. Only one person
should operate cutter. Do
not have one person working
near the blades while another
person controls the pump.
WARNING
Never use the cutter on
electrically active or "hot" wire
or cable. Be sure power has
been turned off before working
on electrical wire or cable.
WARNING
When working with wire rope or
cable, wrap section being cut to
prevent pieces from fl ying loose
as they are cut.
2
1. WHC and WHR models: Couple pump hose to cutter. Turn
collar on coupler fi nger tight only. No tools are needed to make
this connection.
2. Select material to be cut. When cutting short pieces of wire
rope, clamp or tape it fi rst to help prevent wires from jamming
between the blade and head.
3. Inspect blade and cutting head. Cutting case hardened steel
will dent blades and cutting heads. The blades will eventually
fatigue and crack. Replace cracked blades immediately. DO
NOT operate tool with cracked or chipped blades.
4. Unlatch cutter head.
5. Place material between blade and head shear.
6. IMPORTANT: Securely latch the cutter head.
CAUTION
Most broken blades are the result of not latching the cutter
head. When the blade is advanced, it pushes on the cutter
head. As the cutter head is pushed open, a diagonal force
causes the blade to break, and, in some cases, the cutter
head may crack.
7. On self-contained units, push release lever in toward cutter
body. For hydraulic cutterheads, close or shift valve on pump to
advance position.
8. Operate handle or pump until blade is fully advanced. DO
NOT exceed maximum cutting limits printed on tool decal.
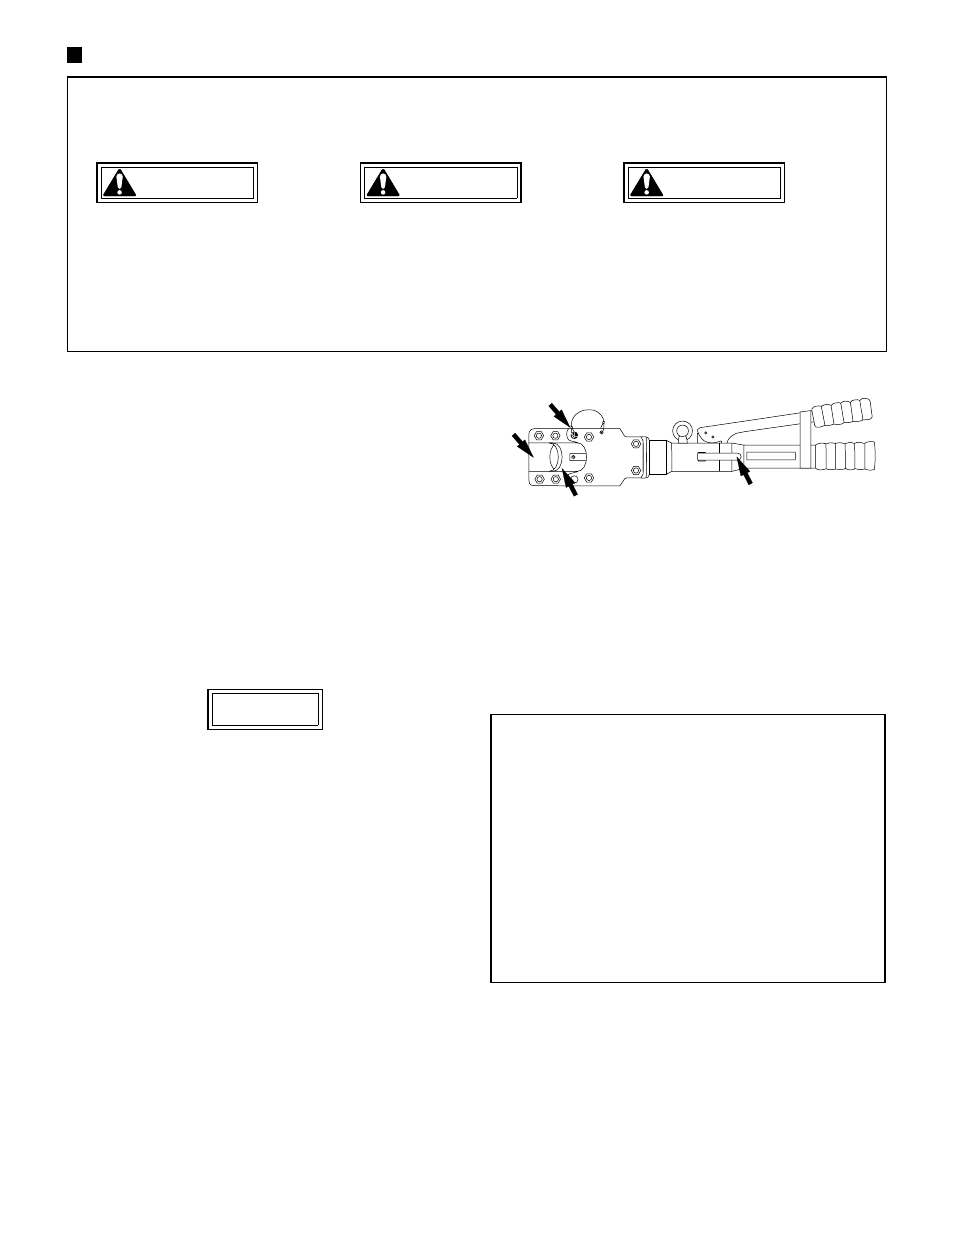
Cutter Head
Latch Pin
Release
Lever
Blade
Head
Shear
9. If the material being cut (usually wire rope or soft cables)
seems to be cut but does not break free of the tool, the blade
is hung up on something and needs to be removed. See
"Troubleshooting" on page 3.
10. Lift release lever or shift pump to release position to retract
blade. If blade does not retract, see "Troubleshooting" on
page 3.
11. Return tool to carrying case to protect from dirt and
corrosion. Always keep a spare blade on hand.
NOTE: Do not operate an empty cutter. The new blade
and cutter head shear edges will "roll" slightly with the
fi rst material cut, creating a burr. This burr falls off as
the cut takes place. Extending the blade prior to the
fi rst material cut will also raise a burr on the blade. With
no material present to knock the burr off , the blade and
head shear edges may lock together and the cutter will
not retract. To correct this situation, the blade must be
removed. Remove blade screw and blade. Unlatch cutter
head.
Use a sharpening stone to remove burr from blade. Run
the stone across the blade on the fl at side (not the knife
edge side). Keep the stone fl at and parallel to the blade.
Take care not to create a gap between the blade and
head shear.