Step 6, Adjust the burner using test instruments, Step 7 – Carlin 702G/O Inst Manual User Manual
Page 23: Set butterfly gas valve linkage, Verify operation
Model 702G/O Advanced gas/oil burners — Instruction manual
Carlin part number MN702GO Rev. 06/23/14
– 23 –
Where appliance instructions differ from this manual, follow the appliance instructions.
Step 6
(firing on gas)
Set butterfly gas valve linkage
1.
Switch the low-fire switch to low fire.
2.
Check CO
2
and CO. The CO
2
should be between 9.0% and 10.0% (natural
gas) or between 10.0% and 11.2% (propane); with CO less than 100 PPM.
3.
To adjust the low-fire air (change CO
2
), move the burner fuel selector
switch to OFF. Adjust the butterfly gas valve linkage as described in
the following to change the low-fire gas flow to the burner head. Do not
change the main gas pressure regulator setting.
4.
DO NOT ADJUST THE LOW-FIRE AIR DAMPER SETTING. This must
be left as set for oil firing.
5.
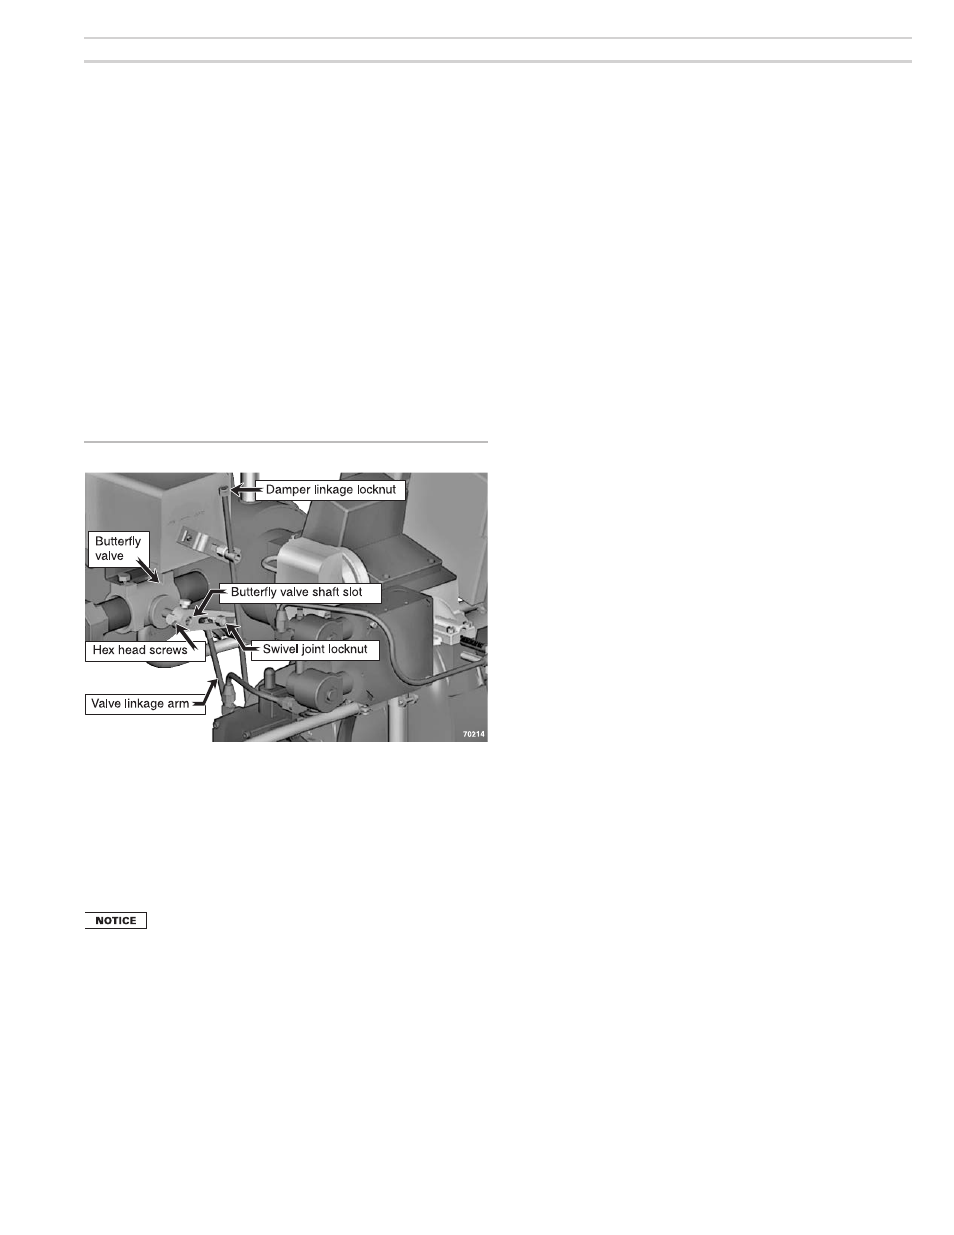
See Figure 18 for location of linkage components.
Figure 18
Butterfly gas valve linkage
6.
Raise the damper motor linkage by pulling up on the damper linkage
locknut and hold in this position.
7.
Loosen the two hex head screws on the butterfly valve linkage arm boss.
Then lower the damper linkage to the low fire position with the damper
linkage locknut. Release the locknut.
8.
Mark the position of the butterfly valve linkage arm swivel joint locknut
with a pencil or felt-tip pen. Then loosen the swivel joint locknut.
To adjust the linkage, move the swivel joint locknut in small
increments. A 1/8-inch move can cause CO
2
to change as
much as 1.5%.
•
If more gas is needed (to increase CO
2
), move the swivel joint to the RIGHT.
•
If less gas is needed (to decrease CO
2,
), move the swivel joint to the LEFT.
9.
Tighten the swivel joint in place.
10.
Raise the damper motor linkage by pulling up on the damper linkage
locknut and hold in this position. The butterfly valve shaft slot must
be horizontal. If not, use a common-bit screwdriver to rotate the valve
slot to horizontal.
11.
Tighten the two hex head screws on the butterfly valve linkage arm boss.
Then lower the damper motor linkage to the low fire position.
12.
Restart and repeat as necessary until CO
2
and CO are acceptable.
8. Adjust the burner using test instruments
(continued)
Step 7
(firing on oil and on gas)
Verify operation
Burner/appliance/controls operation
❏
Test operating and limit controls on appliance as specified in appliance
instructions.
❏
Check operation of the primary control by forcing lockout to occur. For
primary controls that enter latch-up after multiple lockouts, force latch-up
to occur as well. Reset primary control per control data sheet instructions
after each test.
❏
Start and stop the burner several times, allowing the primary control to
sequence through normal operation. Verify correct operation of burner
and primary control throughout on both oil and gas.
❏
Confirm and/or adjust overfire combustion pressure for oil and gas opera-
tion. Refer to boiler/furnace manufacturer’s recommendations.
Verify vent system operation
❏
Verify vent is operating correctly and flue products are properly exhausted
from building. If the building contains any exhaust fans or conditions that
could affect vent performance, check burner/appliance/vent operation
with exhaust fans (or other conditions) operating.
Combustion/ventilation air
❏
Verify combustion/ventilation air openings are not, and will not be ob-
structed.
❏
Verify air opening louvers are fully open.
❏
If louvers are motor-operated, verify motor and end switch are interlocked
with appliance/burner wiring to prevent operation of the burner if the air
louvers are not fully opened.
Prepare burner for normal operation
❏
Cycle burner off with appliance controls.
❏
Turn off power to the appliance.
❏
Seal the appliance flue test opening.
❏
Verify all components and wires are in place and burner is ready for
operation.
❏
Restore power to the appliance.
Train the user
❏
Train the user to operate the burner and appliance under normal condi-
tions.
❏
Explain the procedure to shut down the burner/appliance when required.
❏
Review the back cover of this manual (and the appliance manual) with
the user.
❏
Verify the user is aware of all procedures specified in the manuals.
❏
Verify that the user will not store or use combustible liquids or materials
or contaminants in the vicinity of the burner/appliance.