Anchor F3 FRAME TENT User Manual
Page 6
6
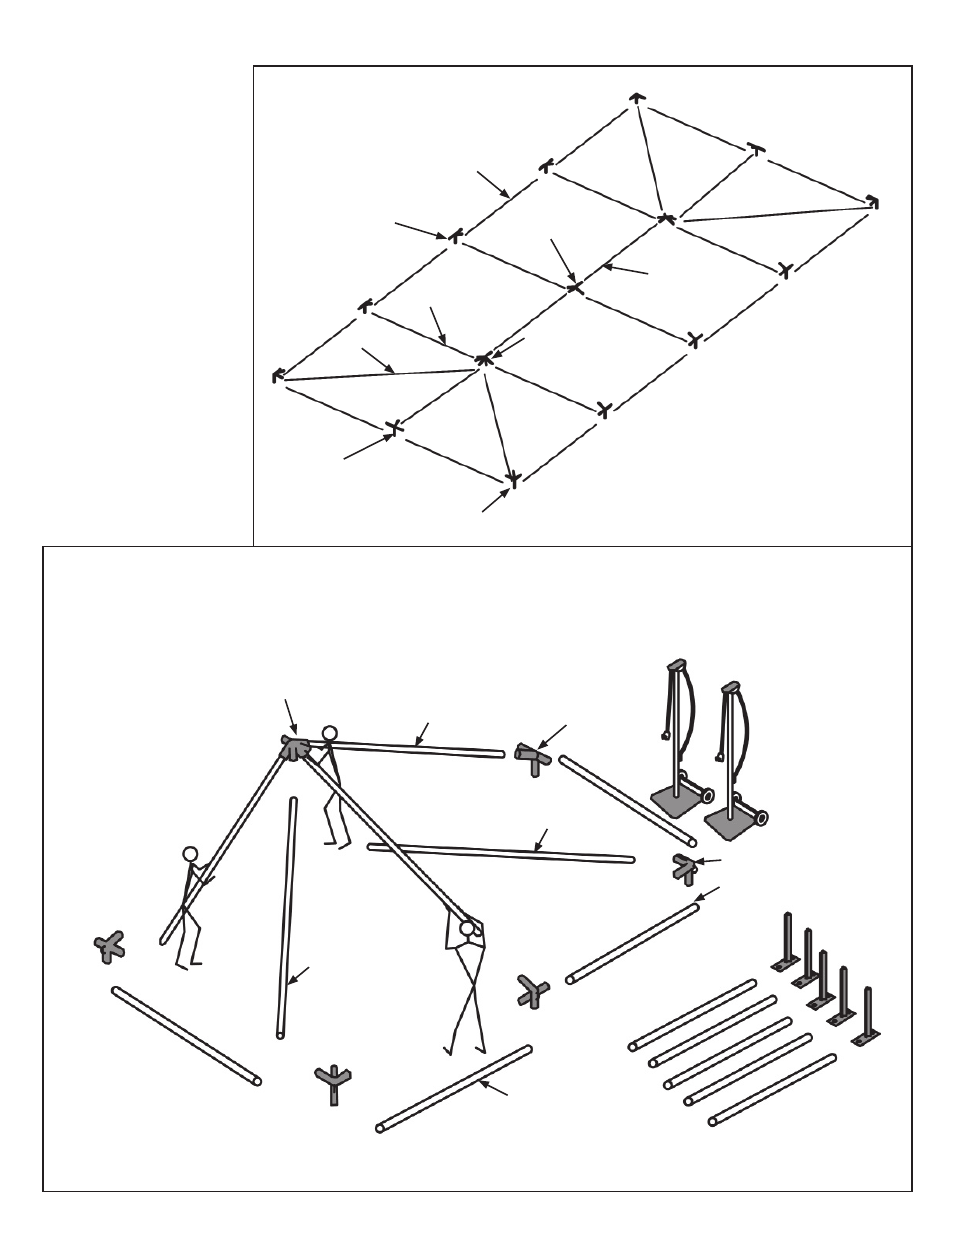
STEP 1 Layout Components for Assembly
STEP 2 Begin connection of components
RIDGE
INT/INT
RIDGE
HIP/INT
RAFTER
RAFTER
CORNER
CORNER
INT.
INT.
INT.
HIP
RIDGE
HIP/INT
EAVE/
RIDGE
PURLIN
EAVE/
RIDGE
PURLIN
HIP
HIP
EAVE/RIDGE
PURLIN
BASE PLATES
AND UPRIGHTS
FRAME LIFTS
EAVE/RIDGE
PURLIN
Layout components as
shown for your particular size
tent. Square tents will use
the Ridge Hip/Hip Weldment
at Peak.
Figure 1
Figure 2a
Begin by attaching rafters to ridge weldment. Align slots in tubes with Stop Buttons on weldment. Push button down
and carefully slide tube onto weldment until button pops up securely into slot. On 30’ Frame you will now attach the
installation cross web. See Figure 2b & 2c.
After all components are connected to ridge weldment, start at one of the Side Intermediate weldments,
connecting rafter to eave weldment, then hip to corner weldment, and on around (see direction on Figure 3)
until the bottoms of all the rafters, hips are connected to weldments.
Frame shown is a 30’ X 60’
- STAKE OUT (1 page)
- DOUBLE DECKER (2 pages)
- ORIGINAL PARTY TENT LINER (2 pages)
- FIESTA TENT LINER 10-30 WIDE (2 pages)
- NAVI-TRAC LINER 30-50 WIDE (2 pages)
- CENTURY TENT LINER (5 pages)
- EVENT AND VENUE LINER (8 pages)
- ANCHORSPAN LINER (2 pages)
- ANCHORSPAN AA 30FT-60FT (38 pages)
- ANCHORSPAN A 60FT-80FT (38 pages)
- EVENT SERIES - PROFILE SIZE: 20M - 220X100X4 - 3M UPRIGHTS (47 pages)
- EVENT SERIES - PROFILE SIZE: 220MM X 100MM, INSTRUCTION SUPPLEMENT - WINDOW / HARD WALL INSTALLATION (4 pages)
- EVENT SERIES - PROFILE SIZE: 220MM X 100MM, INSTRUCTION SUPPLEMENT - AMBASSADOOR WITH VINYL WALLS INSTALLATION (4 pages)
- EVENT SERIES - PROFILE SIZE: 220MM X 100MM, INSTRUCTION SUPPLEMENT - AMBASSADOOR AND HARDWALL INSTALLATION (4 pages)
- VENUE SERIES - PROFILE SIZE: 160MM X 100MM (28 pages)
- PZ (PARTY) SERIES - PROFILE SIZE: 94MM X 48MM (27 pages)
- PZ (PARTY) SERIES - PROFILE SIZE: 94MM X 48MM ADDENDUM - HIGH PEAK (5 pages)
- PZ (PARTY) SERIES - PROFILE SIZE: 94MM X 48MM ADDENDUM - HEX END (6 pages)
- NAVI-TRAC 30 WIDE HIP-END (21 pages)
- NAVI-TRAC 40 WIDE HIP-END (21 pages)
- NAVI-TRAC 50 WIDE HIP-END (21 pages)
- NAVI-TRAC 30 WIDE GABLE-END (21 pages)
- NAVI-TRAC 40 WIDE GABLE-END (21 pages)
- NAVI-TRAC 50 WIDE GABLE-END (21 pages)
- NAVI-TRAC FRAME LIFT (2 pages)
- NAVI-TRAC LITE PAVILLION - 12 TO 24 (16 pages)
- NAVI-TRAC LITE 20 WIDE (21 pages)
- NAVI-TRAC LITE 30 WIDE (20 pages)
- CENTURY FRAME TENTS 10X10, 15X15, 5M AND 20X20 (8 pages)
- CENTURY FRAME TENTS 20 AND 30 HEX (8 pages)
- CENTURY FRAME TENTS 30X30 WITH OPTIONAL WALLS (8 pages)
- CENTURY FRAME TENTS 20X30 WITH OPTIONAL WALLS (9 pages)
- FIESTA MARQUEE (5 pages)
- FIESTA MARQUEE STAIR STEP KIT (4 pages)
- FIESTA MARQUEE L-SHAPED (2 pages)
- FIESTA MARQUEE ROUND CORNER KITS (4 pages)
- FIESTA PAVILION 10, 12 & 14 WIDE X 15 LENGTH (8 pages)
- FIESTA FRAME TENT 8-16 (8 pages)
- FIESTA FRAME TENT 18-22 (10 pages)
- FIESTA FRAME TENT 24-30 (8 pages)
- FIESTA FRAME TENT 40 PLUS II RETROFIT (5 pages)
- FIESTA FRAME TENT CATENARY TOP FASTENING ASSEMBLY (2 pages)
- FIESTA FRAME TENT LIFT (4 pages)
- FIESTA FRAME TENT HIGH PEAK (4 pages)
- FIESTA PLUS II - 30 & 40 WIDE (8 pages)