Led t8 tubes – American Lighting LT8-48XX-PRO3 Series User Manual
Page 2
THE END RETROFIT LUMINAIRE HAS BEEN MODIFIED AND CAN NO LONGER OPERATE THE ORIGINAL INTENDED LAMP(S).
Model Number
LED Qty
Voltage
Hz
Wattage Input Current
LT8-48XX-PRO2
110
100-277V AC
60
18W
150mA
LT8-48XX-PRO3
132
100-277V AC
60
22W
182mA
LED T8 Tubes
NON-SHUNTED SOCKET INSTALLATION AND FIXTURE MODIFICATION - To replace fluorescent lamps
with LED T8 Tubes, the wiring must be retrofit according to the following instuctions. To ensure a
complete and safe installation of the LED Tubes, strictly follow this installation guide.
DANGER - RISK OF SHOCK! DISCONNECT POWER BEFORE INSTALLATION.
Note: The “live end” of the LED T8 Tube is marked with red sticker/label. See Figure 1.
I. GUIDELINE FOR RETROFIT OF INDUCTIVE AND ELECTRONIC FLUORESCENT FIXTURES:
1. Determine which end of the luminaire will receive AC power. This will be the “live end”. The opposite end will be the “dead end”.
2. Be sure power is shut off at source! Remove lens or diffuser, where applicable.
3. Remove the fluorescent lamps and properly dipose of them since they contain mercury.
4. Open the ballast cover to expose the fluorescent ballast.
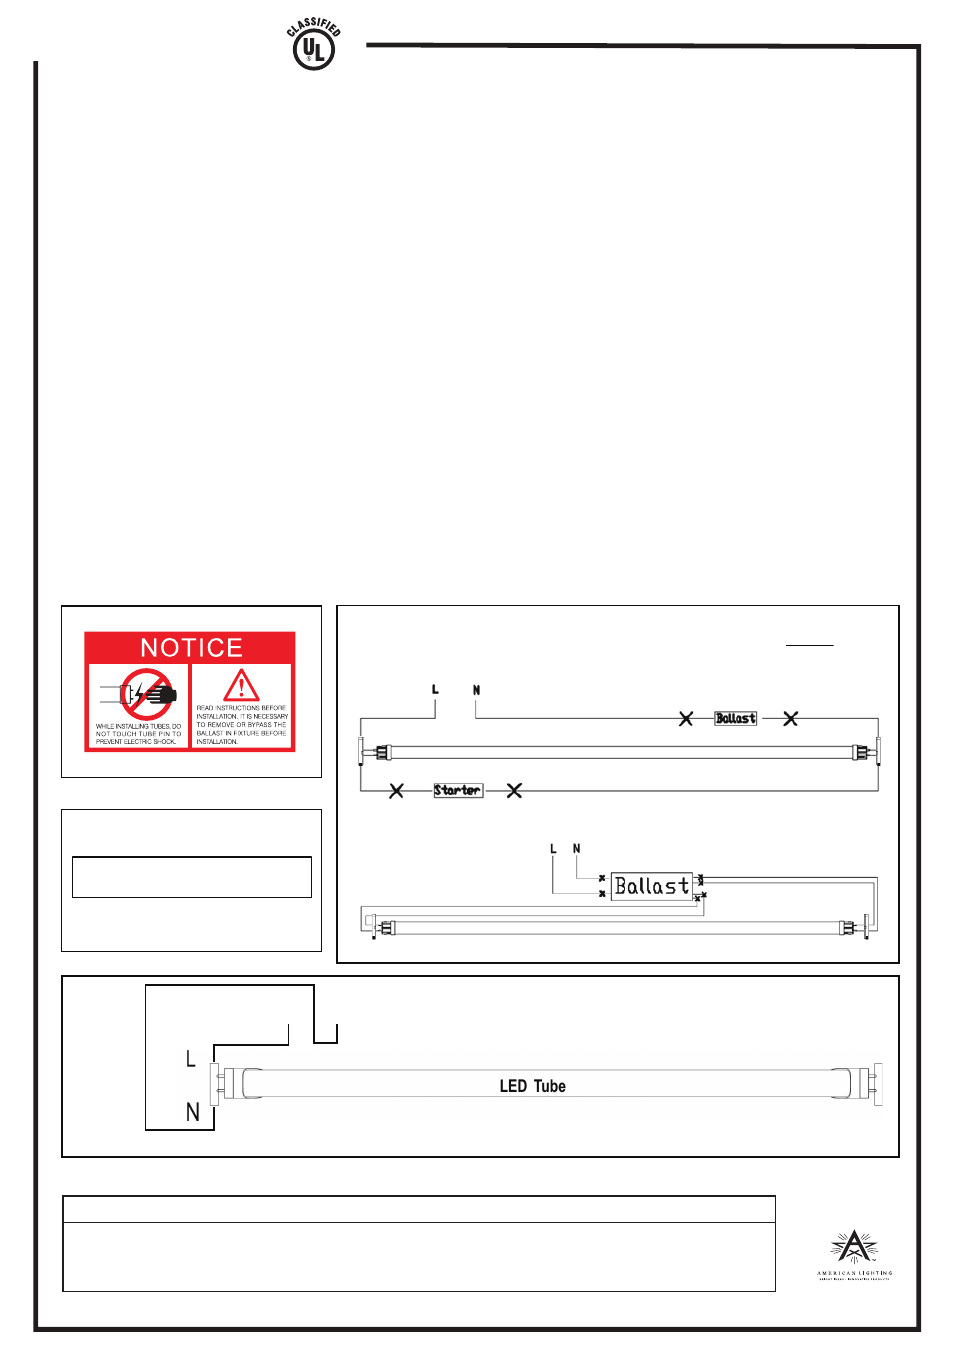
5. Cut the wires on either side of the starter (if applicable) and the ballast as shown in Figure 2, refering to INDUCTIVE or
ELECTRONIC example, depending on the luminaire type. Do not remove the starter and ballast. They must remain in place
since their removal could create openings in the luminaire housing.
6. Using 18-gauge solid copper wires, connect to branch circuit (L = Line and N + Neutral) as shown in Figure 3.
7. Using 18-gauge solid copper wire, connect ground wire (from AC supply) to ground screw or if already attached,
confirm the connection is solid.
8. Replace the ballast cover.
9. IMPORTANT: Install the fixture modification label “This luminaire has been modified and can no longer operate the
originally intended lamp” inside the fixture in an easily visible location to anyone changing lamps, possibly on the
cover over the wiring channel. See Figure 4.
10. Install the LED tubes, rotating pins in the “tombstone” sockets until fully seated. Replace the lens/diffuser, where applicable.
11. After the LED tubes are installed and lens/diffuser is in place, restore the power at the circuit breaker and turn the lights on.
------ continued on next page ------
Figure 1
Figure 4
Figure 2
www.americanlighting.com
RV-1334
Live end is marked with red sticker.
IMPORTANT! Install the fixture modification
label in an easily visible location.
NOTE: These are the branch circuit (L = Line and N = Neutral) wiring examples BEFORE retrofit.
Figure 3
NOTE: LED lamp pins at the “live end” are connected to power. The other end is not connected to any
electrical power and that bi-pin (tombstone) socket serves as means of mechanical support only.
L
N
AC
100- 277V
Connect the branch circuit (L = Line and N = Neutral) wiring to “live end” of
luminaire (as determined in step 1 above) for LED retrofit.
INDUCTIVE EXAMPLE WITH STARTER AND BALLAST:
ELECTRONIC EXAMPLE WITH BALLAST ONLY (NO STARTER):
Fluoresent lamp
Fluoresent lamp
This luminaire has been modified and can
no longer operate the originally intended lamp
Installation instructions for LT8-48XX-PRO2 and LT8-48XX-PRO3 Series