American Lighting LUC Series User Manual
Page 2
RV1303
www.americanlighting.com
Additional Safety Measures:
1. Do not look directly at LED light source.
2. Do not touch the LEDs.
3. To avoid electrical shock, do not turn on fixture with missing or damaged lens.
4. There are no serviceable parts inside LED module.
5. The power cord and extension cables are not serviceable. Inspect cords periodically.
Replace if damaged in any way.
6. WARNING! CAUTION - RISK OF FIRE: Keep fixtures away from curtains and other
combustible materials.
7. Suitable for indoor dry locations only.
8. This product is suitable for use in dimming circuits. For best results (5-100% lighting
control), use Lutron LG-603PG, CTCL-153PDH or CVCL-153PD type dimmers
(www.lutron.com).
WARNING! CAUTION - RISK OF FIRE: Keep fixtures away
from curtains and other combustible materials.
Suitable for indoor dry locations only.
For supply wires connection (hardwire instructions) via housing knockouts, see reverse.
Plug-in installation:
NOTE: Power cords are sold separately from fixtures. Plug-in installation requires purchase of LUC Series grounded power
cord (item number LUC-PC6-BK or LUC-PC6-WH).
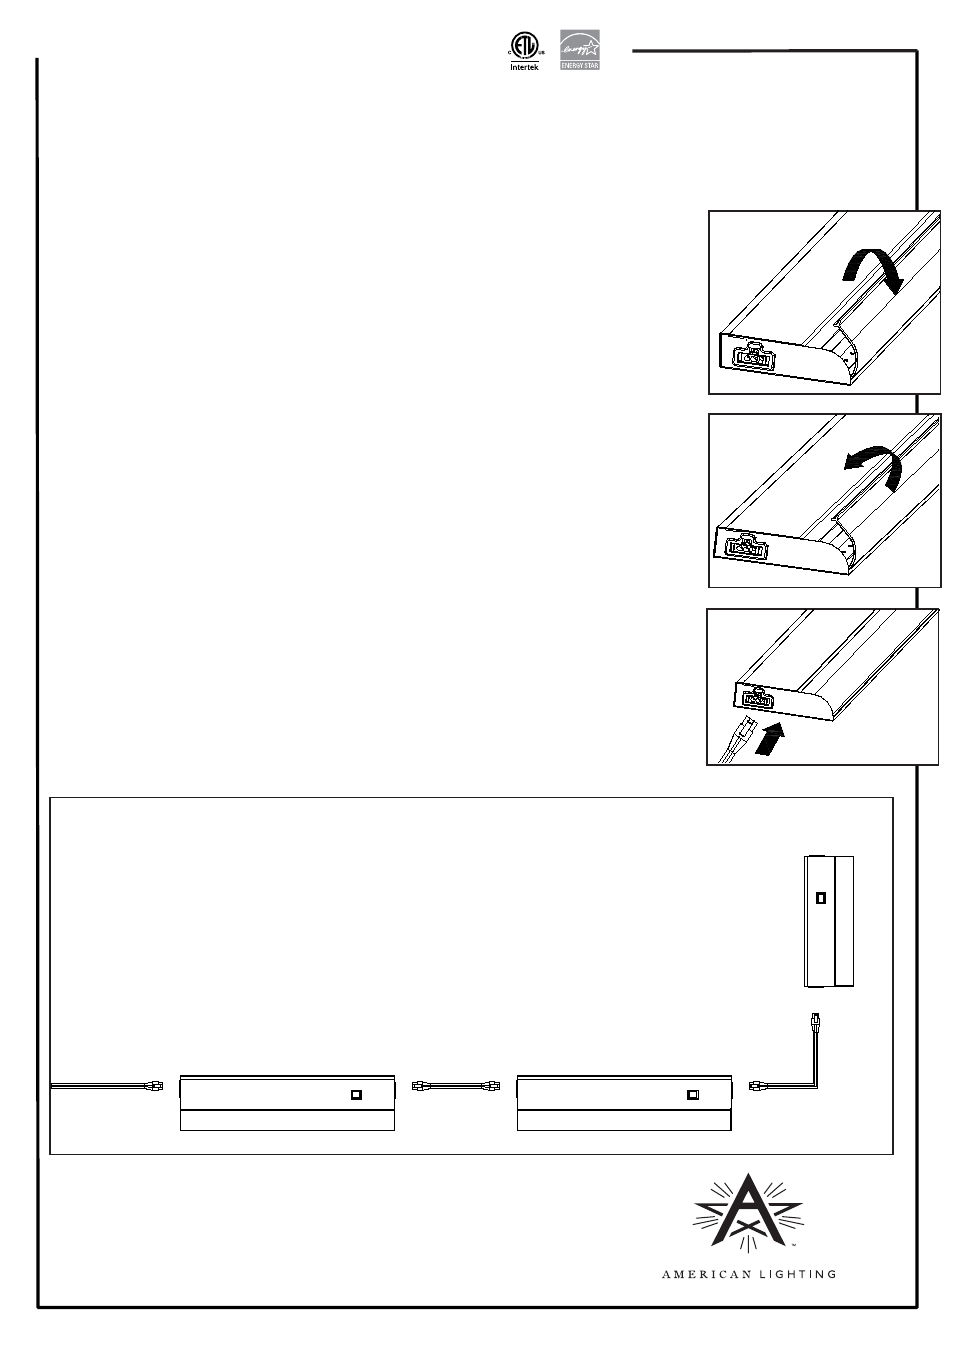
1. Remove the lens cover from the fixture by lifting its back edge up gently and rotating it toward
the front of fixture. See Figure 8.
2. Determine desired location of fixture and mark locations of mounting holes (mark at the small
end of each keyhole slot).
3. Use a drill gun (or start holes with an awl) and screw in mounting screws at these locations,
leaving 1/8” between head of screw and mounting surface.
4. Slide fixture over the mounting screws using the keyhole slots to hold it in place, then use a
Philips screwdriver or driver bit to tighten mounting screws and secure fixture to surface.
5. Replace the lens cover by tucking front lip under front edge and pressing down firmly along its
entire length until it is secure. See Figure 9.
6. Insert the power cord into one of the end ports of the fixture. The fixture can be powered from
either end. See Figure 10.
7. Plug other end of power cord into 120V AC receptacle.
Figure 8
Figure 9
Figure 10
The fixture can be
powered from either end
Connecting Multiple Fixtures Together:
Plug ends of linking extension into end power connection ports on adjacent fixtures.
Up to 50 fixtures can be connected with one power cord or to one hardwired fixture.
Each fixture includes a 3” linking extension. Fixtures can be installed so they are powered from
an adjacent fixture by using the 3” linking extension included with the fixture; or 6”, 12” or 24”
linking extensions sold separately.
For 6”, 12” or 24” length linking extensions, order item numbers LUC-EX6-XX, LUC-EX12-XX
or LUC-EX24-XX, respectively. (XX denotes cord color options where BK = Black and WH = White.)
LED Contrax 120V Under Cabinet Light
Installation Instructions for LUC Series