Led pendant series light module, Continued from reverse – American Lighting LED Pendant Series Light Module User Manual
Page 2
CONTINUED FROM REVERSE
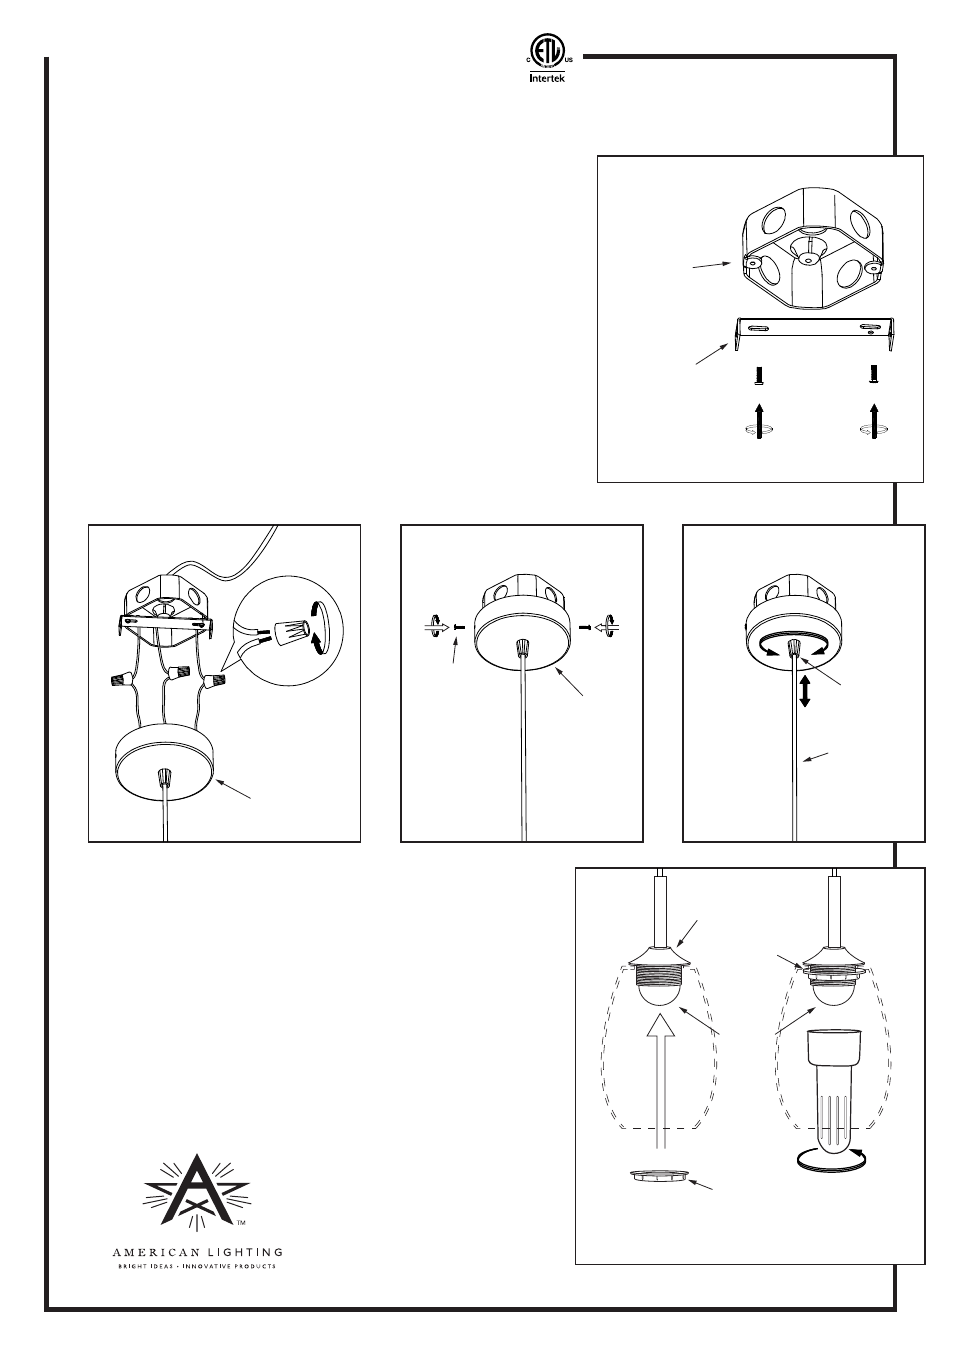
INSTALLATION INSTRUCTIONS: (See Figures 4-6)
1. Remove existing fixture if applicable.
2. Secure the mounting bracket to the existing junction box. See
Figure 4.
3.
Strip back jacket on supply wires 3/8“ and use UL Listed wire
connectors to connect wires (Black to Black/Hot, White to
White/Neutral and Yellow/Green stripe [Ground] to bare
wire). See Figure 5.
4. Bundle the extra pendant cord into canopy and/or junction box.
5. Align holes on side of canopy with mounting bracket holes and
attach canopy to mounting bracket using the retaining screws
previously set aside. See Figure 6.
6. Loosen the plastic nut and make any small adjustments to
2013 American Lighting, Inc.
RV1326 Page 2 of 2
Denver, CO 80231 • www.americanlighting.com
LED Pendant Series Light Module
ru
Installation inst ctions for PEN Series Light Module
Figure 4
WARNING: To avoid electric shock, disconnect power at source prior to installation.
junction
box
mounting
bracket
Figure 5
Figure 6
Figure 7
GLASS INSTALLATION INSTRUCTIONS:
1.
Unscrew round lock nut from pendant module. Set it aside. See
Figure 8.
2. Lift glass shade over frosted LED lens. Slide lock nut over
frosted LED lens and screw it back into place from the underside
of the glass shade.
3. Optionally, you may use the lock nut tightening tool (plastic
wrench provided with pendant module) to tighten lock nut into
place and secure glass shade. See Figure 8.
CAUTION! Do not over-tighten locking nut!
Overtightening risks breaking glass shade!
4. Carefully straighten pendant cord with glass shade attached.
Verify equipment is secure.
Frosted
LED lens
Lock nut
Pendant
module
Figure 8
Lock nut
Plastic nut
Canopy
Canopy
Pendant cord
Retaining
screw
overall length, if desired, and re-tighten the nut to secure pendant cord. See Figure 7.
Optional: Use
plastic wrench to
gently tighten lock nut