Warning – Echo 74624S Owners Manual v.2 User Manual
Page 18
16
OPERATION
4.4 chiPPing
Warning
the bear Cat chipper is designed to chip a variety of
materials into a more readily decomposing or handled
condition. the following guidelines can be used to help
you get started.
be sure the unit is at full operating speed before you
start to chip material. Adjust engine speed with the
throttle. on diesel models the throttle can be locked.
engage the hydraulic feed by moving the control
arm. Pull the arm toward you to engage the hydraulic
feed. The speed of the feed roller can be adjusted by
turning the speed control knob on the chipper valve
assembly.
Select limbs that are up to 6 inches in diameter. trim
side branches that cannot be bent enough to feed into
the chipper chute. Small diameter branches can be
held together in a bundle and fed in simultaneously.
Place limb, butt end first, into the chipper chute until it
contacts the hydraulic feed roller and is drawn into the
chipper blades. the actual feed rate of the limb into
the chipper will depend on the type of material fed, and
sharpness of the cutting blades.
Feed brush from the side of the chute, rather than from
the front. Step aside to avoid being hit by the brush
moving into the chipper.
Never lean over the chute to push objects into the cut-
ting device. use a push stick or brush paddle.
Never use shovels or forks to push brush. they can
go through the chipper and cause major damage. In
addition, metal pieces can come back like shrapnel to
injure or kill.
Never push brush into the chute with your feet.
If the feed roller slips downward pressure on the roller
can be increased by moving the eyebolt that connects
the spring to the feed roller.
alternate greener material with dry material to lubricate
the chipping blades for longer life and better perfor-
mance. When the chipping blades become dull, they
will require periodic sharpening. Refer to Service and
Maintenance, “Sharpening Chipper blades.”
1.
2.
3.
4.
5.
6.
7.
8.
9.
10.
obtain and wear safety glasses at all times when
operating the machine. Do not wear loose fitting cloth-
ing. use common sense and practice safety to protect
yourself from branches, sharp objects and other harm-
ful objects.
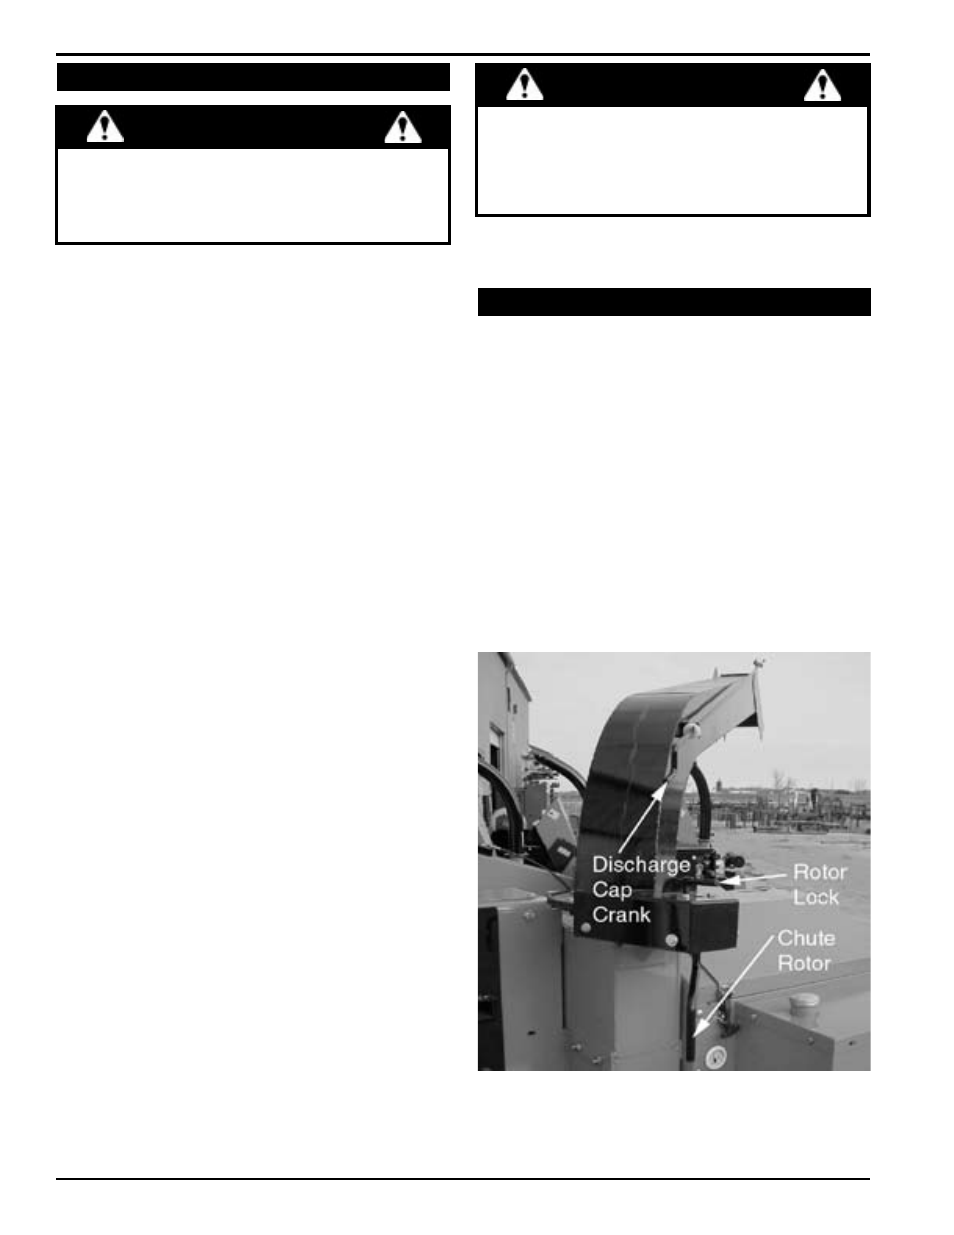
4.5 direcTing The chiPPer chuTe
Directing the chute
the chipper chute can be locked in 53 different positions
using the chute rotor. the discharge cap can be directed
to adjust how high and how far the chipped material is
blown.
To adjust the chute rotor, lift up the rotor lock. Turn the
chute rotor until the chute faces the desired position. let
go of the rotor lock and fine tune the position of the rotor
until the lock snaps in place.
The discharge cap is adjusted by turning the discharge
crank cap either clockwise or counterclockwise. turning
the handle clockwise will raise the position of the discharge
cap. turning the handle counterclockwise will lower the
position of the discharge cap.
Warning
Please read and follow all safety instructions in
this manual. Failure to operate the chipper in
accordance with the safety instructions May ReSult
IN PeRSoNal INJuRy!