Installation set up – Barco DATA 708 User Manual
Page 15
Installation Set Up
1-3
5975987A BARCODATA 708 260597
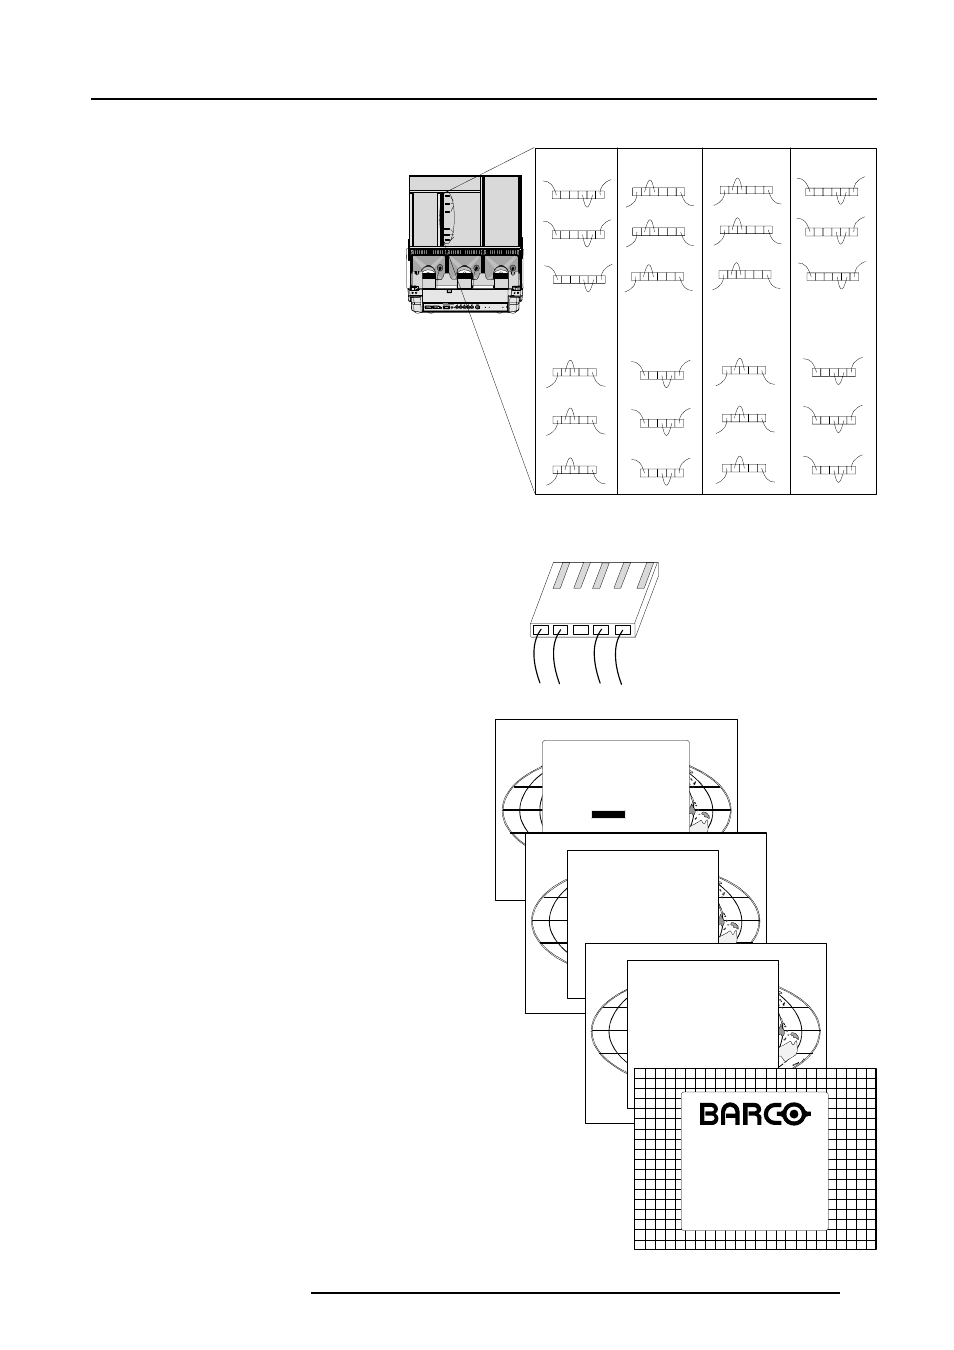
A : Horizontal scan inversion
Three connectors are used, one for each horizontal
deflection coil. When changing the horizontal scan,
insure that all three connectors are set in the same
position. See position of the connectors for the
corresponding projector configuration.
B : Vertical scan inversion
Three connectors are used, one for each vertical
deflection coil. When changing the vertical scan,
insure that all three connectors are set in the same
position. See position of the connectors for the
corresponding projector configuration.
Top view of the connectors; upper three connectors
for horizontal scan inversion, lower three for vertical
scan inversion.
Front / Table
Front / Ceiling
Rear / Table
Rear / Ceiling
Horizont al scan
connectors
Vertical scan
connectors
C : Convergence connectors
Three connectors are used. The position of these connectors has to
be changed when switching from one configuration to another.
With an open chassis, for a
front-table
or a
rear ceiling
configuration,
the connectors must be plugged in with the
contacts upwards
(away
from the tubes). For a
front-ceiling
or
rear-table
configuration, the
connectors must be plugged in with the
contacts facing the tubes
Contact side
After scan inversion, close the chassis and close the top cover.
Reconnect the power cord to the wall outlet.
Note
Switching over from floor to ceiling or vice versa requires a complete
readjustment of picture geometry and convergence.
Check of the correct connector position
Note : this check procedure can only be done after power (mains)
connection. So, first continue with the
projector set up
and the
connections
and then return to this checking procedure.
Switch on the BARCODATA 708 and press
ADJUST
to start up the
adjustment mode. Select with the control disk 'Service' and press
ENTER
. The service menu will be displayed. Select 'PROJECTOR
SET UP' and press
ENTER
. Select 'IDENTIFICATION' and press
ENTER
. On this screen, information is given about the projectors
configuration.
Configuration when leaving the factory : ceiling/front configuration.
Follow next procedure to check the configuration :
- switch on the projector.
- the projector starts up on the last selected source.
- press the
ADJUST
key.
- highlight 'service' with the control disk and press
ENTER
.
The
'service mode menu'
will be displayed
- select with the control disk
'Projector set up'
and press
ENTER
.
The
'Projector set up menu'
will be displayed.
- Select with the control disk
'Identification'
and press
ENTER
.
The projector displays the Identification screen
This screen gives information about the projector configuration in the
subject '
config.
'.
ADJUSTMENT MODE
Select a path from
below:
Select with or
then
source 1
GUIDED
RANDOM ACCESS
INSTALLATION
SERVICE
IRIS
Select with or
then
SERVICE MODE
PROJECTOR SET-UP
MEMORY MANAGEMENT
COMMON SETTINGS
I2C DIAGNOSTICS
Select with or
then
PROJECTOR SET-UP
IDENTIFICATION
TOTAL RUN TIME
CHANGE PASSWORD
CHANGE LANGUAGE
CHANGE PROJECTOR ADDRESS
CHANGE BAUDRATE
POWER UP MODE : operating
BARCO LOGO
DATA 708
Proj. address : 001
Soft. Version : 5.00
Config. : Ceiling
front
Baudrate PC : 9600
Text : ON
Serial No. : 10359852