Aries Automotive 209014-2 User Manual
Page 2
SIDEBAR
2014-2015 NISSAN ROGUE
EXCLUDES 2014 “SELECT” MODEL
Page 1 of 7 5/28/14 (DP)
PARTS LIST:
Qty Description
Qty Description
2
Driver/Left Front and Center Brackets
16
8-1.25mm x 25mm Hex Bolts
2
Passenger/Right Front and Center Brackets
20
8mm x 24mm x 2mm Flat Washers
1
Driver/Left Rear Bracket
16
8mm Lock Washers
1
Passenger/Right Rear Bracket
4
8-1.25mm Hex Nuts
2
8-1.25mm x 30mm Bent Tab Bolt Plates
8
6-1.00 x 25mm Hex Bolts
2
8-1.25mm x 30mm Bolt Plates
16
6mm x 12mm x 1.6mm Flat Washers
1
8mm Insert Tool
8
6mm Lock Washers
2
8-1.25mm Threaded Insert
8
6mm Hex Nuts
PROCEDURE:
1. REMOVE CONTENTS FROM BOX. VERIFY ALL PARTS ARE PRESENT. READ INSTRUCTIONS
CAREFULLY BEFORE STARTING INSTALLATION. DRILLING/CUTTING IS REQUIRED.
2. Start installation on the passenger side of the vehicle. Remove the plastic rocker panel cover running
from wheel opening to wheel opening, (Figure 1). NOTE: Removal of the rocker panel cover is not
mandatory but it is highly recommended.
3. Locate the (2) factory hex bolts in the bottom of the inner frame rail, (Figure 1). Remove only the rear
hex bolt if equipped, (Figure 2). Do not remove the front hex bolt.
4. Select (1) passenger side front/center Mounting Bracket, (Figure 3). NOTE: When properly installed,
the mounting cradles on all (3) Sidebar Brackets will point toward the rear of the vehicle.
5. Attach the inner end of the Bracket to the frame rail with (1) 8mm Hex Bolt, (1) 8mm Lock Washer and
(1) 8mm Flat Washer, (Figure 4). Line up the tab on the Bracket with the outside of the pinch weld. Use
a clamp to temporarily attach the tab on the Bracket to the pinch weld.
6. Move toward the rear of the vehicle. Locate the factory holes in the bottom of the floor panel behind the
jack point on the pinch weld directly in front of the rear suspension mount, (Figure 5). Select (1) 8mm
Bolt Plate, (Figure 6A). Insert the Bolt Plate into the round hole in the inner floor panel, (Figure 6C).
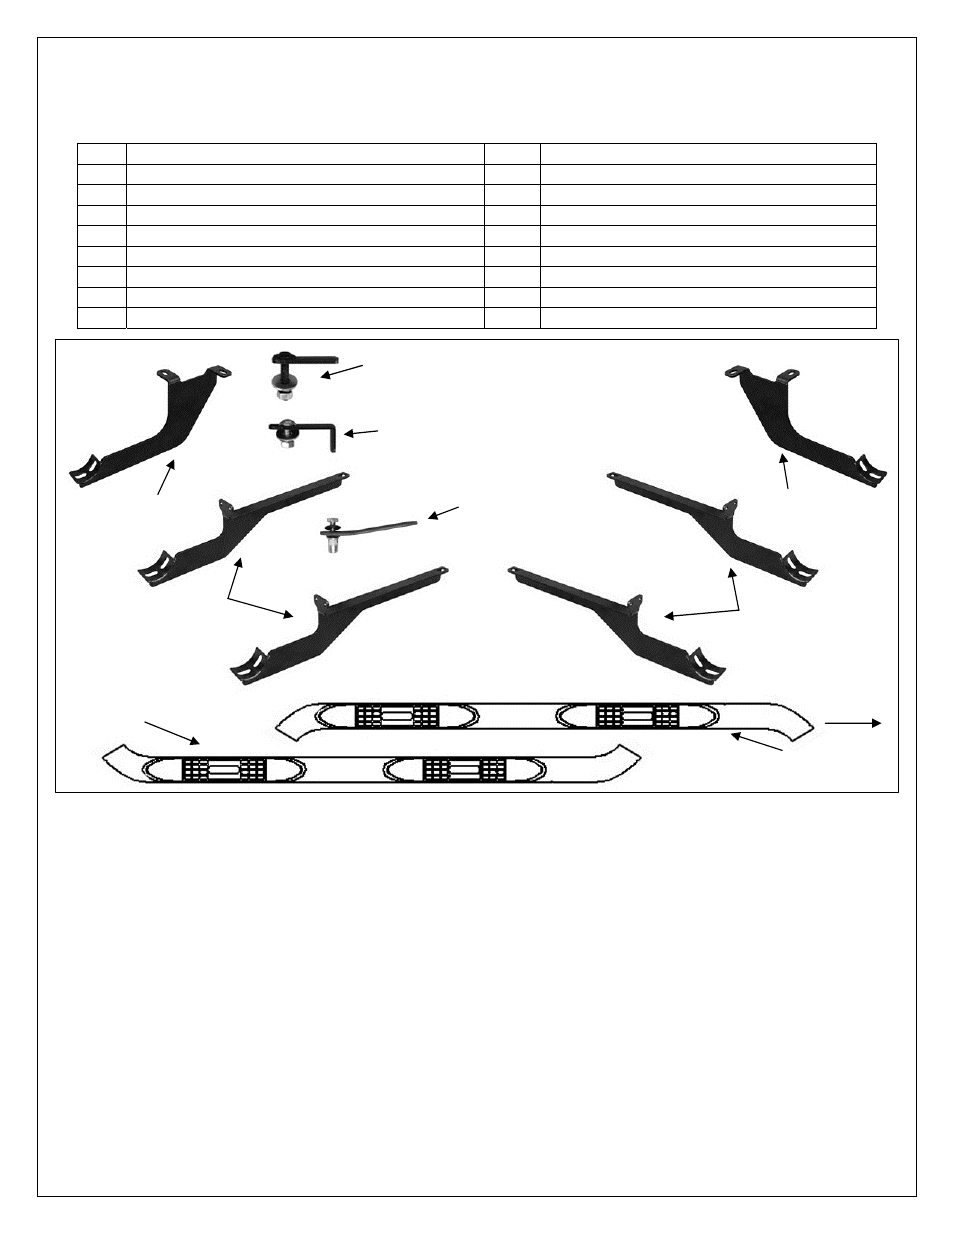
Driver/left Rear
Mounting Bracket
Passenger/right
Rear Mounting
Bracket
Passenger/right Sidebar
(2) Passenger/right
Front or Center
Mounting Brackets
8mm Threaded Insert
Tool with Insert
(2) 8mm x 30mm Bolt Plates
(2) Driver/left Front
or Center Mounting
Brackets
Driver/left Sidebar
(2) 8mm x 30mm Bolt Plates
w/bent tabs
Front