Using separately sold accessories, Wireless remote control fl ash photography, 131 en – Olympus E-M1 User Manual
Page 131
131
EN
Using separately sold accessories
12
Functions available with external fl ash units
Optional fl ash
Flash control mode
GN (Guide number) (ISO100)
RC mode
FL-600R
TTL-AUTO, AUTO, MANUAL,
FP TTL AUTO, FP MANUAL
GN36 (85 mm*) GN20 (24 mm*)
FL-300R
TTL-AUTO, MANUAL
GN20 (28 mm*)
FL-14
TTL-AUTO, AUTO, MANUAL
GN14 (28 mm*)
–
RF-11
TTL-AUTO, MANUAL
GN11
–
TF-22
GN22
–
* The focal length of the lens that can be used (Calculated based on 35 mm fi lm camera).
Wireless remote control fl ash photography
External fl ash units that are designated for use with this camera and have a remote
control mode can be used for wireless fl ash photography. The camera can separately
control each of three groups of remote fl ash units, and the supplied external fl ash. See
the instruction manuals provided with the external fl ash units for details.
1
Set the remote fl ash units to RC mode and place them as desired.
• Turn the external fl ash units on, press the MODE button, and select RC mode.
• Select a channel and group for each external fl ash unit.
2
Select [On] for [
# RC Mode] in X Shooting Menu 2 (P. 76).
• The super control panel switches to RC mode.
• You can choose the super control panel display by repeatedly pressing the
INFO
button.
• Select a fl ash mode (note that red-eye reduction is not available in RC mode).
3
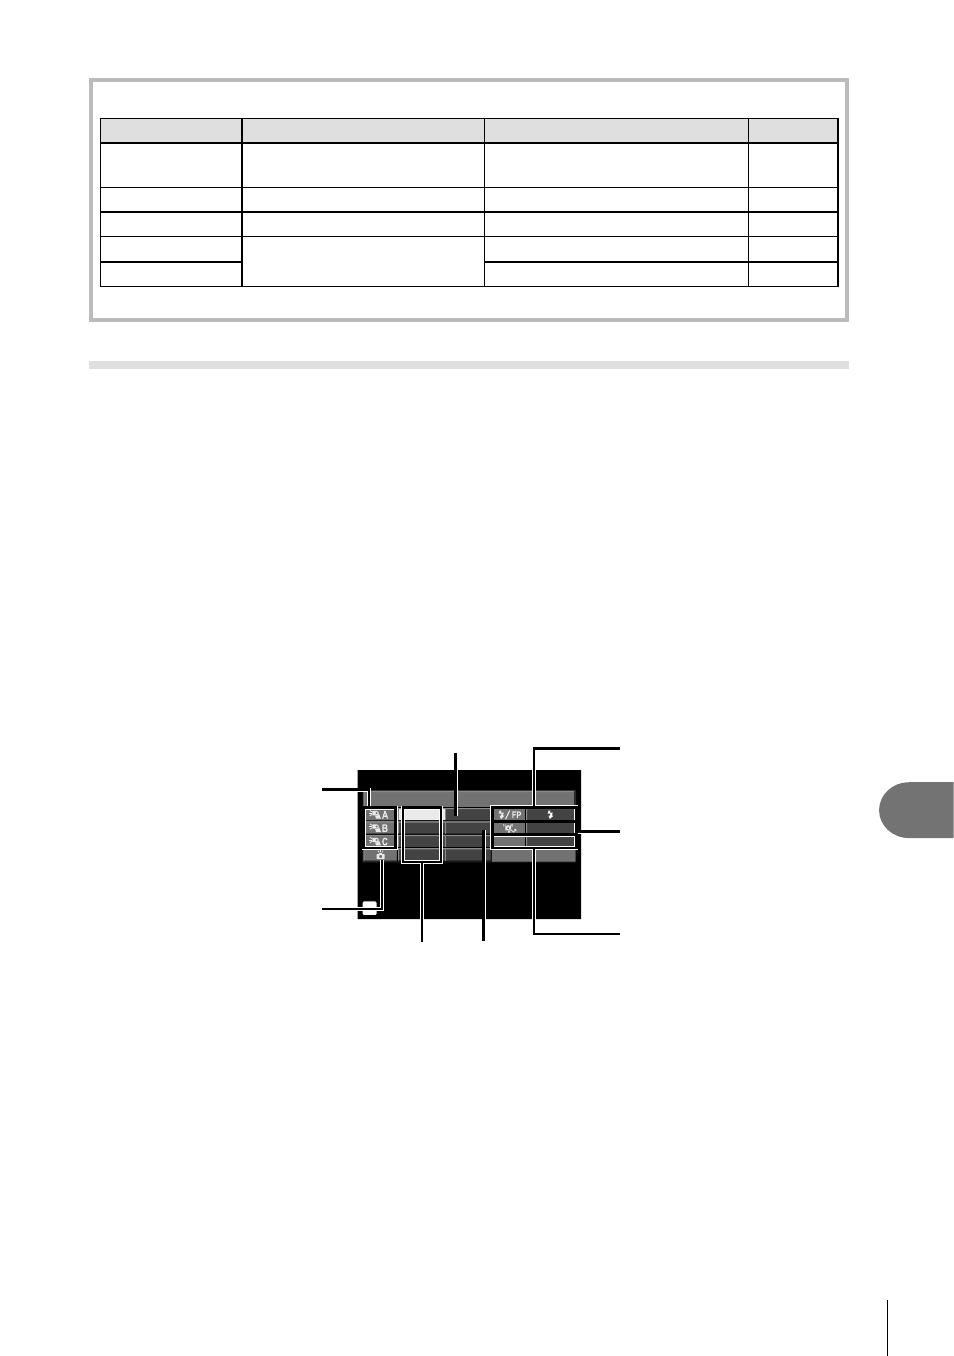
Adjust the settings for each group in the super control panel.
250
250 F5.6
P
38
38
A Mode
TTL
M
Off
+5.0
TTL
+3.0
1/8
–
LO
1
Ch
Flash intensity value
Group
• Select the fl ash control
mode and adjust the fl ash
intensity separately for
each group. For MANUAL,
select the fl ash intensity.
Normal fl ash/Super FP fl ash
• Switch between normal
fl ash and Super FP fl ash.
Communication light level
• Set the communication
light level to [HI], [MID],
or [LO].
Channel
• Set the communication
channel to the same
channel used on the fl ash.
Flash intensity
Flash control
mode
Adjust settings for the camera
fl ash unit.
4
Attach the supplied external fl ash to the camera and raise the fl ash head.
• After confi rming that the built-in and remote fl ash units have charged, take a test shot.