Wireless lan, Others, Turning off the power – Sony WG-C10 User Manual
Page 3: Trademarks
Mac
Wireless LAN
Step2: Connecting for the first time
Notes
• When this unit (WG-C10) connects to a computer by wireless
LAN, the computer’s internet connection is disconnected.
• To connect to the internet, see the Help Guide.
• If this unit’s security has already been set, you need to enter
your password when connecting to your computer for the first
time. In this case, you do not have to set in Step3 and Step4.
1 Turn on the power of this unit.
Green, blinking
2 Connect your computer to the wireless LAN.
Click
on the menu bar at the top right of the screen.
Select WG-C10-xxxxxx*. Type your password as required
and click [join].
* “xxxxxx” is the last 6 digits of the Mac address.
Check the MAC address in “Identifying the Parts” in this Quick
Start Guide.
3 Confirm the connection.
After clicking
in
above, check that “WG-C10-xxxxxx” is
displayed on the screen.
Notes
• Depending on the operating environment, it may take time for
this unit to connect to the computer.
Step3 Security set-up
Check that the proxy setting of the Web browser is not set. If it is
set, cancel it and do the following setting.
1 Type the address into the address bar of
Safari.
http://192.168.40.1:8080/
2 The security setting screen is displayed.
Select [WPA2] on the screen.
3 Enter a personal password of at least 8
numbers or letters.
4 Reenter your password to confirm it and
select [OK].
5 The wireless LAN connection is turned off
when the password is set.
Go to the next setting in Step4.
Step4 Reconnecting to the wireless LAN
1 Connect this unit.
Click
on the menu bar at the top right of the screen.
Select WG-C10-xxxxxx*. Type your password as required
and click [join].
* “xxxxxx” is the last 6 digits of the Mac address.
Check the MAC address in “Identifying the Parts” in this Quick
Start Guide.
2 Enter your password.
Enter the password you set in Step3 as required.
This unit is now connected.
From next time, you do not need to enter the password when
connecting to a device set up for this unit.
If an authentication error occurs:
The password may be wrong.
If you forgot your password:
Press and hold down the RESET (reset) switch for about 10
seconds to return to the factory default condition. Then set
the password again from Step3.
Mac
Wireless LAN
Access
When connecting to a memory card
1 Insert the memory card into this unit.
2 Connect this unit to your computer by
wireless LAN.
3 Select [Go]
[Connect to Server...].
Enter “smb://192.168.40.1” as the server
address and then click [Connect].
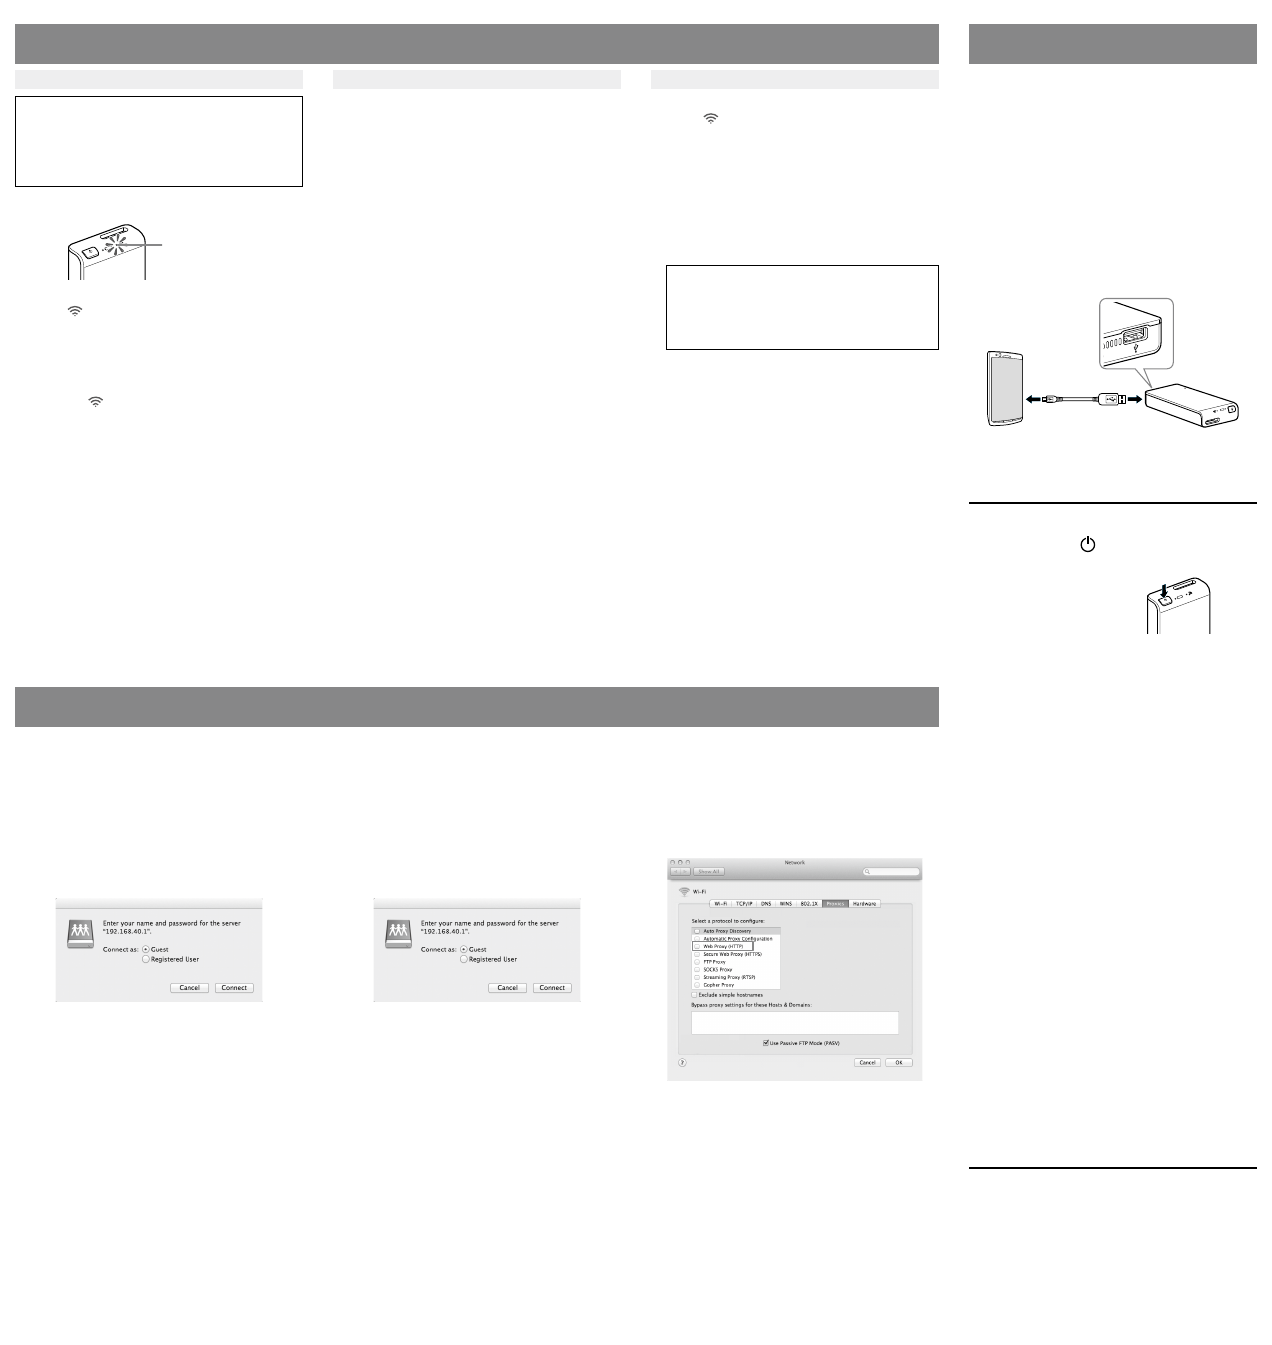
4 Select [Guest]
[Connect].
5 Double-click [MEMORY CARD] as the volume
to mount.
The MEMORY CARD drive icon is displayed on the desktop. You
can now read and write the files in the memory card.
Cancelling the proxy settings
1 Start Safari and then select [Safari]
[Preferences...]. Click [Advanced].
2 Click [Change Settings...].
The [Network] panel opens.
3 Uncheck [Web Proxy (HTTP)] and then click
[OK].
Restoring the proxy settings
• Check [Web Proxy (HTTP)] and undo the settings associated with
it.
Others
How to Power Other Devices
1 Connect the supplied USB cable* to the
device you want to power.
* For connecting an iOS device, use the special cable supplied
when you purchased that device.
Before Powering
• Turn on the power to this unit.
• Check that the remaining battery level of this unit is
sufficient.
Power supply
• The output of this unit is 500 mA maximum. If the output
exceeds 500 mA while power is being supplied, a safety
function turns off the power supply.
2 Connect the other end of the USB cable to
the USB A port of this unit.
* See the online manual here for a list of devices that support
power feeding.
http://rd1.sony.net/help/pws/c10/gb/
Turning off the power
1 Press down the (power) button (for 3
seconds or more).
Wireless LAN indicator lamp
and battery indicator lamp
turn off.
Note
Do not turn off the power of this unit during data transfer.
Trademarks
• Microsoft, Windows and Windows Vista are either registered
trademarks or trademarks of Microsoft Corporation in the United
States and/or other countries.
• Apple and Mac OS are trademarks of Apple Inc., registered in
the U.S. and other countries.
Other product names, trade names, service names etc. used in
this manual are trademarks or registered trademarks of their
respective companies or organizations.
The ™ and ® marks are not shown in this document.
When connecting to a USB device
1 Connect this unit to the USB device.
2 Connect this unit to your computer by
wireless LAN.
3 Select [Go]
[Connect to Server...].
Enter “smb://192.168.40.1” as the server
address and then click [Connect].
4 Select [Guest]
[Connect].
5 Double-click [USB] as the volume to mount.
The USB drive icon is displayed on the desktop. You can now
read and write the files in the USB device.