Installing the switch on a wall, Chapter 2: installation 34 – Allied Telesis AT-GS900/8 User Manual
Page 34
Chapter 2: Installation
34
Installing the Switch on a Wall
To install the switch on a wall, perform the following procedure:
1. Remove all the items from the packaging and store the packaging
material in a safe place. In the event a problem occurs and you need
to return the unit, please use as much of the original shipping material
as possible.
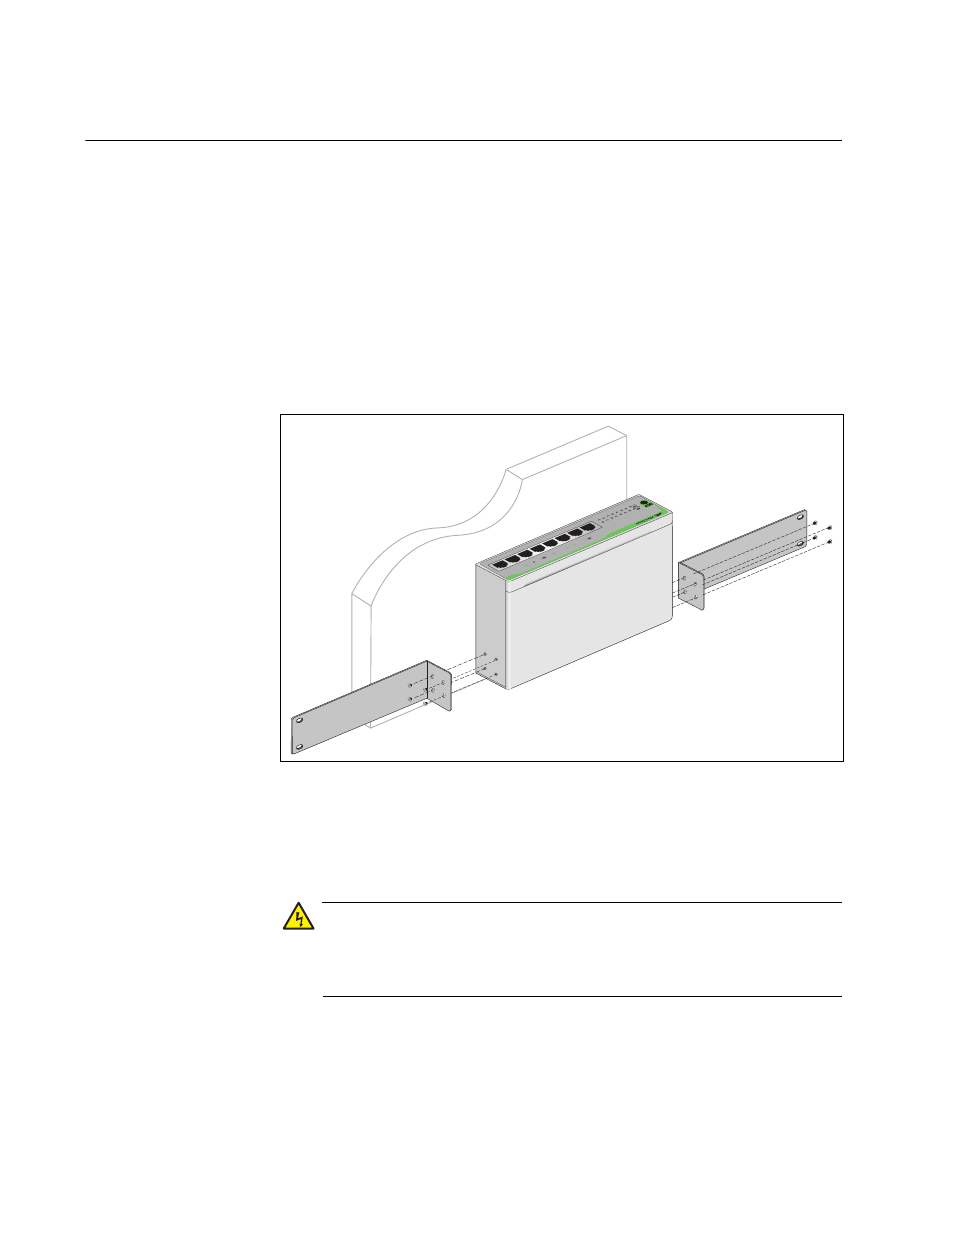
2. Attach the two rackmounting brackets (provided) to the sides of the
switch using the eight flathead Phillips screws (provided), as illustrated
in Figure 7.
Figure 7. Attaching the brackets to the sides of the switch
3. Place the switch on the wall. Then mount the switch using the plastic
anchors and screws which are shipped with the product. See Figure 8
on page 35.
Warning
The switch must be mounted with the AC Power Connector facing
down to conform with UL requirements as shown in Figure 8 on
page 35.
1923
A T-
GS
900
/8
8 P
ort 1
0/1
00/
100
0B
ase
-T
G
igab
it E
th
ern
et S
witc
h
1
2
3
4
5
6
7
8
PO
WER
10/1
00 L
IN
K
ACT
100
0 L
IN
K
ACT
FD
X
HD
X
COL
1
2
3
4
6
7
8
5
- AT-GS908M (54 pages)
- AT-x230-10GP (80 pages)
- AT-GS950/48PS (64 pages)
- AT-GS950/10PS (386 pages)
- AT-GS950/16PS (386 pages)
- AT-GS950/48PS (386 pages)
- AT-9000 Series (258 pages)
- AT-9000 Series (1480 pages)
- IE200 Series (70 pages)
- AT-GS950/48 (60 pages)
- AT-GS950/48 (410 pages)
- AT-GS950/8 (52 pages)
- AT-GS950/48 (378 pages)
- SwitchBlade x8106 (322 pages)
- SwitchBlade x8112 (322 pages)
- SwitchBlade x8106 (240 pages)
- SwitchBlade x8112 (240 pages)
- AT-TQ Series (172 pages)
- AlliedWare Plus Operating System Version 5.4.4C (x310-26FT,x310-26FP,x310-50FT,x310-50FP) (2220 pages)
- FS970M Series (106 pages)
- 8100L Series (116 pages)
- 8100S Series (140 pages)
- x310 Series (116 pages)
- x310 Series (120 pages)
- AT-GS950/24 (404 pages)
- AT-GS950/24 (366 pages)
- AT-GS950/16 (44 pages)
- AT-GS950/16 (404 pages)
- AT-GS950/16 (364 pages)
- AT-GS950/8 (52 pages)
- AT-GS950/8 (404 pages)
- AT-GS950/8 (364 pages)
- AT-8100 Series (330 pages)
- AT-8100 Series (1962 pages)
- AT-FS970M Series (330 pages)
- AT-FS970M Series (1938 pages)
- SwitchBlade x3112 (294 pages)
- SwitchBlade x3106 (288 pages)
- SwitchBlade x3106 (260 pages)
- SwitchBlade x3112 (222 pages)
- AT-S95 CLI (AT-8000GS Series) (397 pages)
- AT-S94 CLI (AT-8000S Series) (402 pages)
- AT-IMC1000T/SFP (23 pages)
- AT-IMC1000TP/SFP (24 pages)
- AT-SBx3106WMB (44 pages)